AR Quick Look and USDZ

.jpeg?width=1280&height=853&name=iphone-smartphone-apps-apple-inc-40011%20(1).jpeg)
Contents
In June 2018, during WWDC, Apple introduced a new built-in viewer for displaying and sharing high-quality 3D content using Pixar's USDZ file format.
It extends a Quick Look functionality, which is a framework implemented for previewing documents, images and from iOS 12.0 the 3D model files.
UZDZ files can be displayed not only in applications, but also on the website when opened with Safari. If the device is incompatible with ARKit, only the object mode is available. I reminded about the mysterious USDZ file – but what it actually is?

Universal Scene Description Zip-compressed – 3x “w”:
Many of us probably thought “why this name is so long and complicated” and “ok, now I prefer calling it by short name”. Nevertheless, we can ask three questions that I called 3x “w” – who?, what? and why?:
Who?
- Apple and Pixar
What?
- USDZ file format for mobile distribution of 3D models, which is a combination of several objects, but can still be rendered as one object. It is an unencrypted and uncompressed zip archive, which contains only file types whose data can be consumed by the USD runtime via mmap:
-
USD: USDA, USDC, USD (Apple’s current implementation allows only a single USDC file, but this restriction will be lifted in future OS updates)
-
Image: PNG, JPEG for images/textures
-
Audio: M4A, MP3, WAV for embedded audio
-
- The first file in USDZ archive is the USD file (here: USDC; it contains model, animation, and material definitions). Remaining files, if needed, are images and audios.
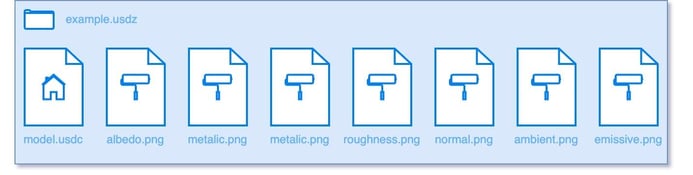 Example structure of USDZ file
Why?
- Apple developed with Pixar a set of new schemas to extend the format for AR use cases. According to Apple Documentation, it gives USDZ files 3D assets AR abilities such as:
-
Anchor 3D content at a specific location in the real world.
-
React to real-world situations.
-
Participate in a physics simulation.
-
Connect audio effects to a location.
-
Annotate the environment by displaying text.
-
-
- USDZ bundles all models and textures into a single file for efficient delivery of 3D content without having to work with reference files.
It’s worth mentioning that USDZ files work only with Apple devices – Android does not support them and has their equivalents: gLTF and gLB.
What can we achieve?
In AR Quick Look, we can use such functionalities like:
-
Realistic rendering
-
AR onboarding
-
Peek and Pop
-
Environment Texturing
-
AR Snapshots
-
Plane detection
-
Object placement with device movement
-
Haptics
-
Translation gestures
-
Rotation manipulation
-
Lightning
-
100% scale viewing
-
Object scaling
-
Contact shadows
-
Skeletal and transform animations
-
Hit-testing
-
File sharing
-
VoiceOver
-
Switch Control
How does it work inside?
Let me introduce you to the application flow between ViewController and QLPreviewController (a specialized view controller for previewing an item), which is used to present, in this example, 3D models:

-
ViewController presents QLPreviewController.
-
QLPreviewController asks ViewController for number of preview items.
-
ViewController answers QLPreviewController that it is one model. It is always one model.
-
QLPreviewController asks ViewController for URL of preview item.
-
ViewController provides QLPreviewController the URL for the USDZ file.
-
QLPreviewController asks ViewController for source view for transition.
-
ViewController provides QLPreviewController the source view for transition (e.g. above: tapped purple cell).
Become 3D files creator
To create good 3D models, you will need to set up 6 simple things:
-
Placement – object’s position regarding the area
-
Physical size – dimensions, proportions, magnitude, or extent of an object.
-
Animation – an illusion of movement through a three-dimensional space
-
Contact shadow – a dark area where light from a light source is blocked by an opaque object. It is a shadow that The High Definition Render Pipeline (HDRP) ray marches in screen space inside the depth buffer.
-
Appearance – a mental representation, a look of the 3D object.
-
Transparency – the ability to see through an object.
But how to do it properly, so a 3D model appears correctly in our world? Let’s jump into some useful tips provided by Apple:
1. Placement
- The object should face toward positive z (camera).
-
The base of the object should be placed on the ground plane, where y = 0.
-
The object’s natural pivot point should be put at the origin.
2. Physical size
-
The object should be created with a reference to the size in real life.
-
If the object doesn’t exist in real life, its size should be created in the way that the model fits fully on the device screen.
3. Animation
-
The animation should be looped.
-
The animation should not change objects position.
-
If the animation changes the object’s position, you should prepare some environment or place, which location is constant (e.g. a circle of grass). Thanks to it, when user wants to place the object somewhere else, he or she will move the environment, not the object itself.
4. Contact shadow
-
AR Quick Look always provides the contact shadow, so you should not add another one because you will have two shadows.
-
AR Quick Look can turn shadow on and off, depending on mode. Additionally, it can apply ambient lighting conditions to the shadow as the lighting source changes.
-
The first frame matters – choose one that will generate the best shadow.
5. Appearance
- AR Quick Look uses a PBR (Physically Based Rendered) shader, thanks to which we can set:
-
Albedo – model’s base color
-
Metallic – a paint, fabric, or color with a metallic sheen; object’s type: conductor or insulator
-
Roughness – object’s surface texture (component of surface finish): rough or shiny
-
Normal – surface details
-
Ambient occlusion – exposition of each point in a scene to ambient lighting; internal shadows
-
Emissive - level of light that is emitted by an object
-
- Each texture has its format:
-
Albedo: RGB/RGBA
-
Metallic: Grayscale
-
Roughness: Grayscale
-
Normal: RGB
-
Ambient occlusion: Grayscale
-
Emissive: RGB
-
- And other formats supported by iOS -
-
Textures should be square power of 2 (2048, 1024, 512…).
-
6. Transparency
-
Make sure you are using separate material for transparent and non-transparent parts.
-
Set transparency in Albedo texture’s alpha channel.
It’s easy to become creator, but hard to become master…
With this knowledge, you are ready to create your own 3D objects – but to become a master, you need to understand how to optimize them. There are many factors that affect a model’s memory requirements:
-
Mesh and animation complexity
-
Textures’ size and count
Theoretically, only the sky is the limit – but not in this case. There are limits for a model with single PBR material:
-
Implementing maximally 100k polygons (straight-sided shapes – 3 or more sides – defined by three-dimensional points called vertices and the straight lines that connect them called edges).
-
Having one set of 2048 × 2048 PBR textures.
-
Creating animation that is no longer than 10 seconds.
To get the best performance, Apple suggested:
-
Not including the textures that are not (and will not be) used.
-
Using single material/texture set for entire model (if possible).
-
Spending texture budget on areas that add most value and realism.
-
Balancing texture size and quality against download size.
-
Freezing transforms and merging adjacent vertices.
And as developers, we should also remember that pixels have a physical size in AR.
It’s easier than ever to get your own USDZ file!
In Xcode 10.0 Apple introduced the command line tool - USDZ Converter, which allows developers to convert 3D Models to .usdz format. It maps PBR textures to meshes and submeshes. There are three types of input files:
-
OBJ file
-
Single-frame Alembic (ABC) file
-
USD file (either .usda or .usdc; the ASCII and binary versions of USD)
You can turn on the terminal and:
-
Call usdz_converter with xcrun:
xcrun usdz_converter input_model.obj output_model.usdz-
Apply PBR textures to groups (meshes and submeshes) with the -g option:
xcrun usdz_converter Model.obj Model.usdz
  -g modelMesh
  -color_map Model_Albedo.png
  -metallic_map Model_Metallic.png
  -roughness_map Model_Roughness.png
  -normal_map Model_Normal.png
  -ao_map Model_AmbientOcclusion.png
-emissive_map Model_Emissive.png-
Print out group names and other verbose information during conversation with the -v option:
xcrun usdz_converter Model.obj Model.usdz -vReject 3D modelling software, edit via iPhone
USDZ file is read-only. Editing its contents requires unpacking the package and editing its constituent parts using appropriate tools. However, there is a possibility of modifying our 3D objects slightly thanks to the SceneKit.ModelIO.
Foremost, we need to import ARKit and SceneKit.ModelIO. Then we can create the sceneView: ARSCNView. It’s possible to add it in Interface Builder or create programmatically. Secondly, we must get the URL, where our 3D object is located in the local storage:
guard let url = Bundle.main.url(forResource: "ModelName", withExtension: "usdz") else {
  return
}
First steps done, great! Now we have to initialize MDLAsset, which is – according to Apple Documentation – an indexed container for 3D objects and associated information, such as transform hierarchies, meshes, cameras, and lights. We will use the URL generated above to locate our 3D model. The model will be loaded without textures, so you will see a white shape – that’s why we will call loadTextures() method.
let asset = MDLAsset(url: url)
asset.loadTextures()
If we don't load the textures, we will get an error printed in the console:
[SceneKit] Error: Failed to load <C3DImage 0x600000f4cc80 src:<url_to_our_usdz_file> [0.000000x0.000000]>However, it is okay to leave it as it is and not call loadTextures() – it won't affect anything else.
Now we need to insert the object to our scene, so the user can see it. We create the scene instance and assign it to our sceneView. To set up our scene, we have to add these lines to our code:
let scene = SCNScene(mdlAsset: asset)
sceneView.scene = scene
Depending on needs, it is also good to set:
-
sceneView.showsStatistics- it shows the statistics (like FPS) in an overlay on top of the rendered scene. When set totrue, it is displayed like this:

-
sceneView.allowsCameraControl- it determines whether the user can manipulate the perspective used to render the scene. The scene graph and existing cameras won't be modified by manipulating this point of view. According to Apple Documentation, in the default configuration, SceneKit provides the following controls:-
Pan with one finger to rotate the camera around the scene.
-
Pan with two fingers to translate the camera on its local X, Y plane.
-
Pan with three fingers vertically to move the camera forward and backward.
-
Double-tap to switch to the next camera in the scene.
-
Rotate with two fingers to roll the camera (rotate on the camera node's Z-axis).
-
Pinch to zoom in or zoom out (change the camera's FOV -
fieldOfView).
Without setting this property to true, the user can't modify the point of view.
-
-
sceneView.autoenablesDefaultLighting- it specifies whether the receiver should automatically light up scenes that have no light source. When set to true, a diffuse light is automatically added and placed to rendering scenes that have no light or only ambient lights. Without it, in most cases, the model will be black and only textures that are emissive will be applied.
The setup is done, good job! Now we can start the fun part, where we can edit our 3D model.
We will work on Apple’s Retro TV model, which you can find in Quick Look Gallery.
I was working on the Retro TV model, but you can choose anything else! However, it is not complex, and I couldn’t modify it’s content that much. Spoiler alert: the more complex the model, the more we can do with it.
When I was finishing this article, I found out that the chair model would be much better for modifying content like changing textures, removing elements, etc.
However, editing USDA files give us better editing possibilities - the biggest issue is that we need to import them; we can’t get the USDA/USDC from USDZ file using code without third-party frameworks.

Let’s sum up the first part, which I’ve been writing above. I downloaded the USDZ file and imported it to the project. Thereafter, I’ve got the URL to it and created the asset, which has been used in scene initialization. Then I assigned the declared scene and configured the sceneView.
// Configure scene
sceneView.delegate = self // << The ViewController must conform to ARSCNViewDelegate
sceneView.autoenablesDefaultLighting = true
sceneView.allowsCameraControl = true
sceneView.showsStatistics = true

// Get URL to our 3D model
guard let url = Bundle.main.url(forResource: "tv_retro", withExtension: "usdz") else {
  return
}

// Create asset from above URL
let asset = MDLAsset(url: url)
asset.loadTextures()

// Create scene using above asset
let scene = SCNScene(mdlAsset: asset)
sceneView.scene = scene
We have prepared everything we need. Now we can jump to the second part and investigate how our object works. Thanks to object(at: Int) method, we can get our top-level object. According to Apple Documentation, MDLObject is the base class for objects that are part of a 3D asset, including meshes, cameras, and lights. The RetroTV MDLObject structure looks like this:
- <<MDLObject: 0x7ff7bf5adc60>, Name: tv_retro, Children: 3> #0
  - super: NSObject
As you can see, MDLObject inherits from NSObject, which is its superclass. It contains the name of the resource and children. By children, we mean a component that manages a collection of object’s children. It conforms to the MDLObjectContainerComponent, which is a general interface for classes that can act as containers in an object hierarchy. It contains objects, which is an array of MDLObjects. Let's check what does the children contain in this case:
▿ 3 elements
  - <<MDLObject: 0x7ff7ba4b7b30>, Name: Looks, Children: 0> #0
    - super: NSObject
  - <<MDLMesh: 0x7ff7ba4b7b28>, Name: RetroTVBody, VertexCount: 69184, VertexBufferCount: 4> #1
    - super: MDLObject
      - super: NSObject
  - <<MDLMesh: 0x7ff7ba4b7b28>, Name: RetroTVScreen, VertexCount: 4096, VertexBufferCount: 4> #2
    - super: MDLObject
      - super: NSObject
Our children array contains three elements: One MDLObject and two MDLMeshes.
MDLMesh is a container for vertex buffer data used in rendering a 3D object. A mesh contains at least one MDLSubmesh object placed in an array of submesh objects called submeshes. The submesh describes how the mesh's vertices should be combined for drawing and references material information describing an intended surface appearance for the submesh.
VertexCount is a number of vertices in the mesh, and VertexBufferCount is a number of the sources of vertex information for the mesh.
Let’s declare the object and the childObjects - we will use them later:
let object = asset.object(at: 0)
let childObjects = object.children.objects
We got the object, and we know what does it contain. Let’s say that our user would like to have a plastic screen instead of the glass one. Let’s try to quickly change it.
Foremost, we need to create a node for our screen. According to Apple Documentation, the SCNNode is a structural element of a scene graph, representing a position and transform in a 3D coordinate space, to which we can attach geometry, lights, cameras, or other displayable content.
Do you remember the RetroTVScreen mesh? It is this one:
- <<MDLMesh: 0x7ff7ba4b7b28>, Name: RetroTVScreen, VertexCount: 4096, VertexBufferCount: 4> #2
    - super: MDLObject
      - super: NSObject
The object's children array contains this mesh, which we will use to modify the screen texture. We will also get the node’s geometry, to which we will assign a new texture. Both values are optional, so we will unwrap them by using guard let.
guard
  let tvNode = scene.rootNode.childNode(withName: "RetroTVScreen", recursively: true),
  let geometry = tvNode.geometry,
  let texture = UIImage(named: "texture")
else { return }
Awesome, now we can create a material, which we will assign to our model. SCNMaterial (and MDLMaterial, which we will use in more precise way below, after this part) is a set of shading attributes that define the appearance of a geometry's surface when rendered.
Let’s change our TV’s screen texture. We can do it by these three simple lines:
let material = SCNMaterial()
material.normal.contents = texture
geometry.materials = [material]
We create an instance of the material. Then we assign it to the type’s content - it can be for example normal, emissive, transparent, etc. In the end, we assign an array of materials to geometry.materials. That’s it - it’s that simple!
We can do it also in more precise way - we can change the texture of the submeshes. Unfortunately, in RetroTV model, we don’t have them. However, I will show you this simple way, which can be useful in the future. Firstly, we create an extension, which will facilitate our work.
extension MDLMaterial {
  func setTextureProperties(_ textures: [MDLMaterialSemantic: String]) -> Void {
    for (key, value) in textures {
      guard let url = Bundle.main.url(forResource: value, withExtension: "") else {
        fatalError("Failed to find URL for resource \(value).")
      }

      let property = MDLMaterialProperty(name: value, semantic: key, url: url)
      self.setProperty(property)
    }
  }
}
We get an URL for our texture resource. Then we create a MDLMaterialProperty instance, which is added to our MDLMaterial. You probably also thought: “but what actually are MDLMaterialSemantic in our dictionary?”
Well, they are options for the semantic use of a material property’s value in rendering a particular surface appearance; used by the semantic property. You can find a list of material semantic in Apple Documentation - the list is huge and thanks to that we can modify our object’s texture in many ways!
We have our extension created, but now we want to use it. We need to declare MDLScatteringFunction instance. It is a set of material properties that describes a basic shading model for materials, and the superclass for more complex shading models. Then we create a material, to which we provide its name and scattering function. Now we can use our extension above to set the textures.
let scatteringFunction = MDLScatteringFunction()
let material = MDLMaterial(name: "NewScreen", scatteringFunction: scatteringFunction)
material.setTextureProperties([.baseColor: "texture.jpg"])
We created a material, and it would be great to use it on our submeshes. We declare an MDLMesh instance from our tvNode implemented before. Thereafter, we iterate though submeshes and assign our new, beautiful material to them.
let mesh = MDLMesh(scnNode: tvNode)
mesh.submeshes?.forEach {
  if let submesh = $0 as? MDLSubmesh {
    submesh.material = material
  }
}
We finished our first part, which was changing the textures - what a ride! Now we can jump into changing size, position, and rotation. It’s simple and short part. We will operate on our tvNode declared before and SCNVector3, which is a representation of a three-component vector. It has three components: x, y, z.
Let’s say that our user wants to make the TV box smaller because he or she does not have a space in room for such big TV. We can scale it down by using:
tvNode.scale = SCNVector3(0.3, 0.2, 0.5) // << Decrease size (scale down)
tvNode.scale = SCNVector3(2.2, 2.5, 1.1) // << Increase size (scale up)
We can also set the position, thanks to which our object will be presented in the best place.
tvNode.position = SCNVector3(0.0, 4, 0.0)I like to combine these two, thanks to which we can modify the size of our object and change the placement, so the user can see it as good as possible. Personally, I think that when an object’s y is scaled down, it’s good to increase the position’s y value. The multiplier that I like the most is 20, but I encourage you to experiment with some other values. My personal final result looks like this:
let scaleY = 0.5
tvNode.scale = SCNVector3(1, scaleY, 1)
tvNode.position = SCNVector3(0, scaleY < 1 ? scaleY * 20 : 0, 0)
Great - now it’s good to get the best perspective for our model - we have size, we have position, so now we can try to rotate our 3D object. You will also learn how to set up animations for the above changes.
We will use SCNVector4 - it’s pretty similar to the SCNVector3, but its last parameter is a rotation angle in radians, or torque magnitude, in newton-meters.
tvNode.rotation = SCNVector4(0, 1, 0, Double.pi / 2)
SCNTransaction.begin()
SCNTransaction.animationDuration = 2.0
tvNode.rotation = SCNVector4(1, 0, 0, Double.pi / 2)
SCNTransaction.commit()
As you can see above, we’ve used the SCNTransaction, which is a mechanism for creating implicit animations and combining scene graph changes into atomic updates. We start with a begin() method, which begins a new transaction for the current thread.
Thereafter, we set animation duration - it tells us how long our animation will be performed. Finally, we commit all changes made during the transaction. If there is no current transaction, this method has no effect.
Now we can enjoy our smooth animation!
Now let’s jump straight into the rabbit hole. Because USDZ file is read-only, and we can manipulate it slightly thanks to SceneKit and ModelIO, we need to ask: is there a possibility to add or remove content in our object?
Yes and no. The real question is: how complex and precise is our object. The smaller number of content, the smaller are the possibilities.
The RetroTV model we use is not complex - it consists of two meshes: body (box) and screen (glass pane). If we would like to, for example, remove something, we must get rid of one from these two - or maybe both.
Let’s say that user didn’t like the glass pane and wants to check how the TV box would look like without it. We would solve this issue by inserting this code, thanks to which the user sees an updated model, without a glass pane and with previous point of view.
// Get screen object which we want to remove
guard
  let screenNode = scene.rootNode.childNode(withName: "RetroTVScreen", recursively: true),
  let nameOfNodeToRemove = screenNode.name,
  let objectToRemove = childObjects.first(where: { $0.name == nameOfNodeToRemove })
else { return }

// Remove screen from model
object.children.remove(objectToRemove)

// Reload sceneView
let newScene = SCNScene(mdlAsset: asset) // << Create new scene and assign our asset
let currentPOV = self.sceneView.pointOfView // << Get current point of view
self.sceneView.scene = newScene // << Assign new scene with updated object
self.sceneView.pointOfView = currentPOV // << Assign previous POV, so it's not reset to default one
Firstly, we unwrapped a SCNNode of our TV’s screen, got its name and found an object’s child which we would like to remove. Thereafter, we used a remove(_ object: MDLObject) method, which removed our screen from the object. However, the changes were applied, but the user doesn't see them. That's why we need to reload our sceneView.
To reload the sceneView, we created a new scene and assigned our modified asset. I also got the point of view value because without it loading a new scene to our sceneView would reset the perspective which user left before changes - it happens without an animation and in my opinion looks ugly. Finally, we assign a new scene with updated object and previous point of view to our sceneView.
It wasn’t that bad - we are just relying on the complexity of our model. We removed the TV’s screen - but now our model is so empty. What if we add something to it? I think that our RetroTV model is missing the green cube. Yes, a green cube. We will call it a box.
// Create green box
let box = SCNBox(width: 50, height: 50, length: 50, chamferRadius: 0)
let material = SCNMaterial()
material.diffuse.contents = UIColor.green
box.materials = [material]

// Add box node to our object
let boxNode = SCNNode(geometry: box)
boxNode.position = SCNVector3(10, 0, 0.3)
let mdlBox = MDLObject(scnNode: boxNode)
object.children.add(mdlBox)

// Reload sceneView to show user our greatest improvement
let newScene = SCNScene(mdlAsset: asset)
let currentPOV = self.sceneView.pointOfView
self.sceneView.scene = newScene
self.sceneView.pointOfView = currentPOV
Everything is like before - we create an object (this time we’ve used SCNBox) and assign a material to it. The next part is the most important one in this case, because we create a node from our box, we set up a position and declare MDLObject instance of our green cube. Thereafter, we insert it to the object's children. Finally, we reload the view like before, so the user can see the final result.
We want to save these changes and share our improved model to the world. How can we achieve that? It’s simple!
// Save file in documents directory
let manager = FileManager.default
let documentsUrl = manager.urls(for: .documentDirectory, in: .userDomainMask)
guard let url = documentsUrl.first else { return }
let finalURL = url.appendingPathComponent("improvedTV.usdz")
self.sceneView.scene.write(to: finalURL, delegate: nil)

// Save to Files app
if manager.fileExists(atPath: finalURL.path) {
  let activityController = UIActivityViewController(activityItems: [finalURL], applicationActivities: nil)
  activityController.modalPresentationStyle = .popover
  present(activityController, animated: true)
}
Congratulations! We’ve successfully saved our improved TV model!
Bonus tip:
It’s possible that on the physical device, you will have a camera set inside the object, even though it is shown correctly in the simulator. Below, you can find a simple code, which will give you direction for perfectly setting up your camera to get the best perspective on your beautiful 3D model when the user launches the application. After creating a scene and assigning it to the sceneView for the first time, you can set up the point of view.
// Create scene using asset
let scene = SCNScene(mdlAsset: asset)
sceneView.scene = scene

// Setup default point of view, so we can see whole object
sceneView.pointOfView?.position.y = 50
sceneView.pointOfView?.position.z = 300 


