3 Ways How To Implement Certificate Pinning on Android

Contents
One of the most important things in mobile development is secure communication, especially between the app and its backend server. Currently, the most common architecture of web services is REST based on HTTP.
The best protection method for this model of communication is the TLS/SSL standard. It can be combined with the HTTP protocol to create an encrypted variant called HTTPs. HTTPs ensures safe, encrypted communication channels between client apps and the backend server. Moreover, implementing this security feature is very simple on Android. You just need to watch out for some common pitfalls.
The problem
It’s very common for developers to implement communication over HTTPs, but not in a proper way. This improper implementation is reduced to replacing the protocol name in the URL from http to https, eg. https://www.example.com. Indeed, such an implementation will enable TLS/SSL encryption (if the backend server supports it). However, it will not ensure a good enough security level. The TLS standard is based on X509 certificates and asymmetric encryption. Simply replacing the protocol name will enable encryption, but the app will trust every certificate issued by the server. This means that the attacker can generate their own fake certificates. The certificates will then allow the hacker to intercept encrypted communication. This kind of attack is called Man-In-The-Middle. It is the main reason why you should spend a bit more time and effort to implement HTTPs configuration correctly.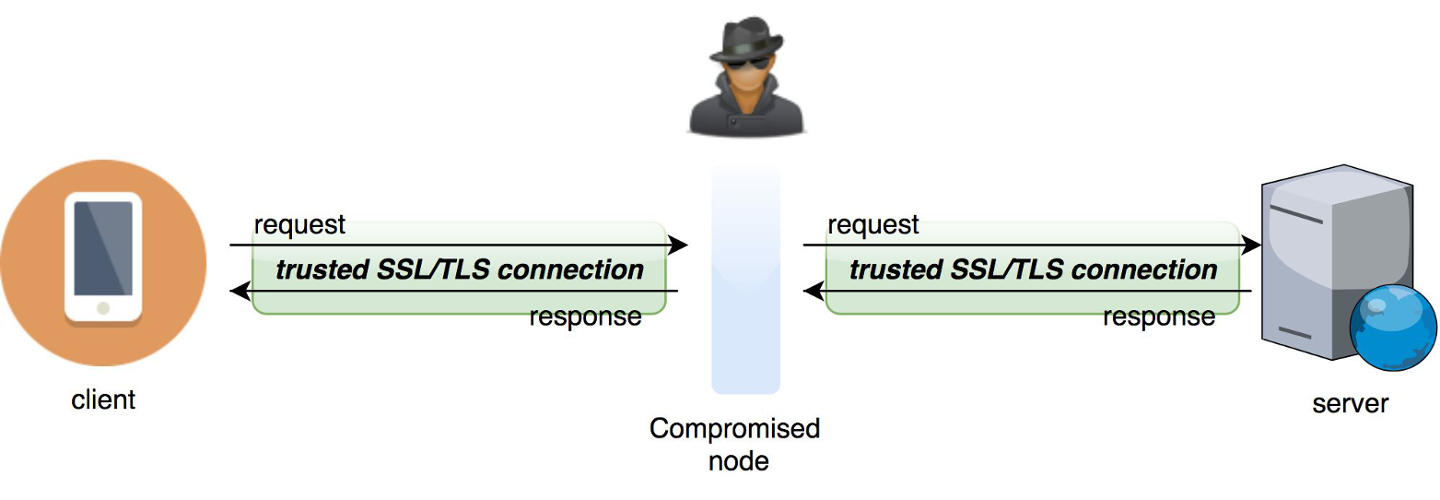
Solution
To avoid this exploit, developers should implement Certificate Pinning. It’s a method that depends on server certificate verification on the client side. This verification requires the server certificate or its fingerprint to be previously known to the mobile app. When establishing a connection with the server, the app should compare the fingerprint with a certificate from the remote server. If the fingerprints are identical, then the connection is valid and the data transfer can proceed. If the fingerprints are not identical, then the app should reject the connection immediately, as it’s compromised. The following 3 methods are the most popular ways to implement Certificate Pinning in Android apps.The old-school way - TrustManager
TrustManager is a component responsible for deciding whether the Android app should accept credentials submitted by the peer or not. This mechanism is sourced from the javax.net.ssl package and you can use it to implement Android Certificate Pinning. Keep reading for a step-by-step tutorial on how to implement pinning using this component.- Add your certificate file to the app resources under
/res/raw
- Load KeyStore with the Certificate file from resources (as InputStream).
val resourceStream = resources.openRawResource(R.raw.demo_cert) val keyStoreType = KeyStore.getDefaultType() val keyStore = KeyStore.getInstance(keyStoreType) keyStore.load(resourceStream, null) - Get TrustManagerFactory and init it with KeyStore.
val trustManagerAlgorithm = TrustManagerFactory.getDefaultAlgorithm() val trustManagerFactory = TrustManagerFactory.getInstance(trustManagerAlgorithm) trustManagerFactory.init(keyStore) - Get an instance of SSLContext, bind it with TrustManager, and create an sslContext with a URL connection.
val sslContext = SSLContext.getInstance("TLS")
sslContext.init(null, trustManagerFactory.trustManagers, null)
val url = URL("http://www.example.com/")
val urlConnection = url.openConnection() as HttpsURLConnection
urlConnection.sslSocketFactory = sslContext.socketFactory
OkHttp and CertificatePinner
OkHttp by Square is a very popular HTTP client library for Java and Android. The library is used by one of the most popular tools for handling REST communication in Android - Retrofit. OkHttp provides a mechanism that makes implementing Certificate Pinning easy, as it only requires creating an instance of CertificatePinner using a dedicated builder with its corresponding fingerprints. The fingerprints need to be hard-coded into the Android app, of course. Personally, I prefer to inject such keys during the build process, using the buildConfigField method. It’s more flexible and safer than keeping the keys in the repository. Then, you need to build an OkHttpClient instance with the CertificatePinner. Here's how to do it:
val certificatePinner = CertificatePinner.Builder()
       .add(
               "www.example.com",
               "sha256/ZC3lTYTDBJQVf1P2V7+fibTqbIsWNR/X7CWNVW+CEEA="
       ).build()

val okHttpClient = OkHttpClient.Builder()
       .certificatePinner(certificatePinner)
       .build()
You can add multiple fingerprints for different domains. Multiple fingerprints will also make your app more flexible. You can add all fingerprints from the certification path. You can also add additional certificates if the old ones are going to expire soon. Fingerprints can be retrieved directly from the certificate. You can also import the certificate file to the resources folder, like in TrustManager case. This time you need to manually write a class that will extract the fingerprint from the file. You can also use Peer certificate extractor to do that for you.
Something fresh - Network Security Configuration
The Android platform provides a new, easy tool to handle network configuration - Network Security Configuration (NSC). It has been available since Android 7.0. With NSC, you can declare secure communication methods, including Android Certificate Pinning, using XML files. To enable the configuration, you need to bind a configuration file with the Manifest. To bind it, use the networkSecurityConfig attribute in the application tag. Here is a short snippet showing how to handle it:-
Create a network security config file under
res/xml/network_security_config.xml
- Add the android:networkSecurityConfig attribute to the application tag.
<?xml version="1.0" encoding="utf-8"?> <manifest xmlns:android="http://schemas.android.com/apk/res/android" package="co.netguru.demoapp"> <application android:networkSecurityConfig="@xml/network_security_config"> ... </application> </manifest - Set up the configuration file and add fingerprints.
<?xml version="1.0" encoding="utf-8"?>
<network-security-config>
   <domain-config>
       <domain includeSubdomains="true">example.com</domain>
       <pin-set>
           <pin digest="SHA-256">ZC3lTYTDBJQVf1P2V7+fibTqbIsWNR/X7CWNVW+CEEA=</pin>
           <pin digest="SHA-256">GUAL5bejH7czkXcAeJ0vCiRxwMnVBsDlBMBsFtfLF8A=</pin>
       </pin-set>
   </domain-config>
</network-security-config>
Summary
I’ve presented three ways of implementing Certificate Pinning. Personally, I think that the most flexible option is to use CertificatePinner. This method is both short and universal - it works on all Android API levels out of the box. You must use OkHttp as the HTTP client, but the library is very easy to use and pretty much a standard on Android at this point, so it’s recommended anyway.However, it does not matter which implementation method you’ll use, but always remember that Android Cert Pinning is obligatory. It is the only way to provide truly secure networking, which is why OWASP Mobile recommends certificate pinning as the most effective protection method for MiTM attacks.
Photo by Rubén Bagüés on Unsplash


