Lazy Loading Images with Vue.js Directives and IntersectionObserver

Today images (their size and number on a single page) can be a major issue when it comes to performance. Keeping in mind that the page load time of a website has a direct impact on the conversion rate, this issue should not be ignored.
In this article I would like to describe one way of reducing that initial weight of a website. What I will demonstrate is how to load only the content visible for the user when she/he sees the initial view and lazy load all the rest of the heavy-weight elements (like images) only when required.
To do that we need to solve two things:
- How to store the source of the image we want to load without loading it in the first place.
- How to detect when the image becomes visible (is required) to the user and trigger the request to load the image.
We will solve the above mentioned issues using data-attributes, IntersectionObserver and Vue.js custom directive.
To make it easier to understand I created an example, a list of random articles, each one containing a short description, image, and a link to the source of the article. We will go through the creation process of components for displaying that list of articles, displaying a single article, and displaying (and lazy-loading) an image for a specific article.
Most of the things I would like to show are based on the component displaying the image, so I will show a basic example of what that component looks like. We will do a step-by-step explanation in the next sections, so don’t get too deep into the code just yet.
ImageItem.vue
In the component we have an ImageSpinner component that is shown when the image is being loaded, and an img tag that is responsible for keeping the image source and displaying the image when the loading is completed.
The key lazy-load logic is extracted to a LazyLoadDirective that is used on our component by adding the v-lazyload attribute.
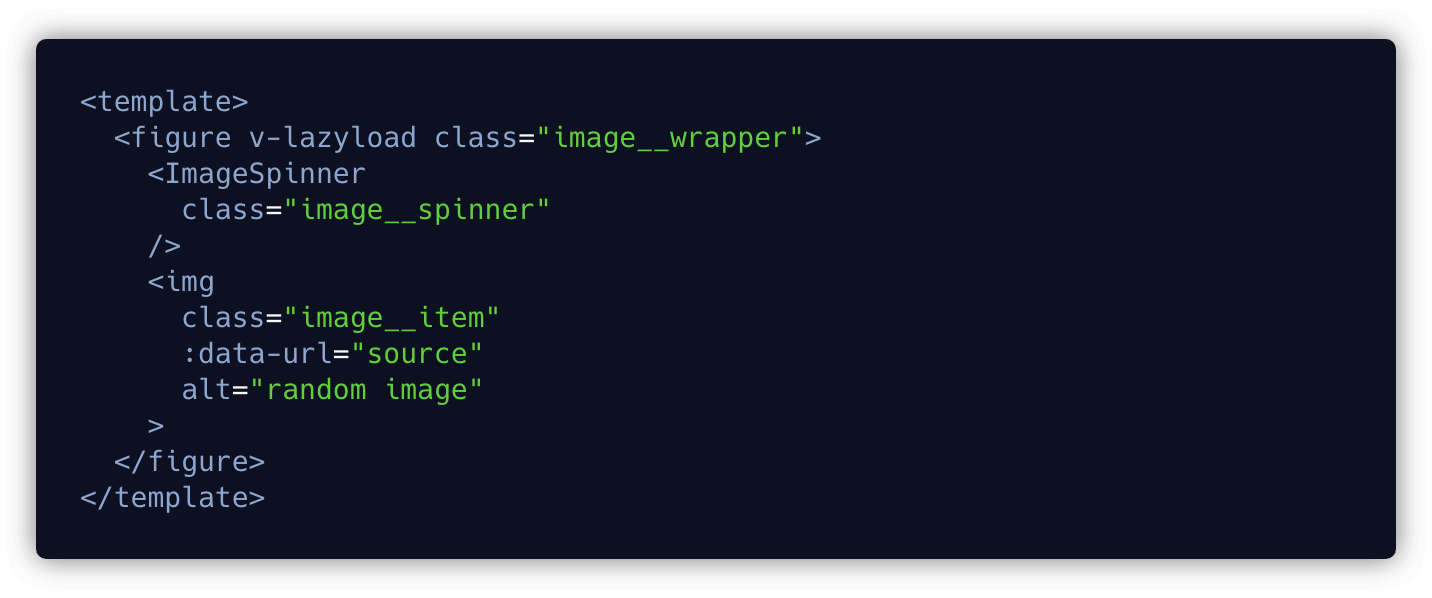
ImageItem.vue
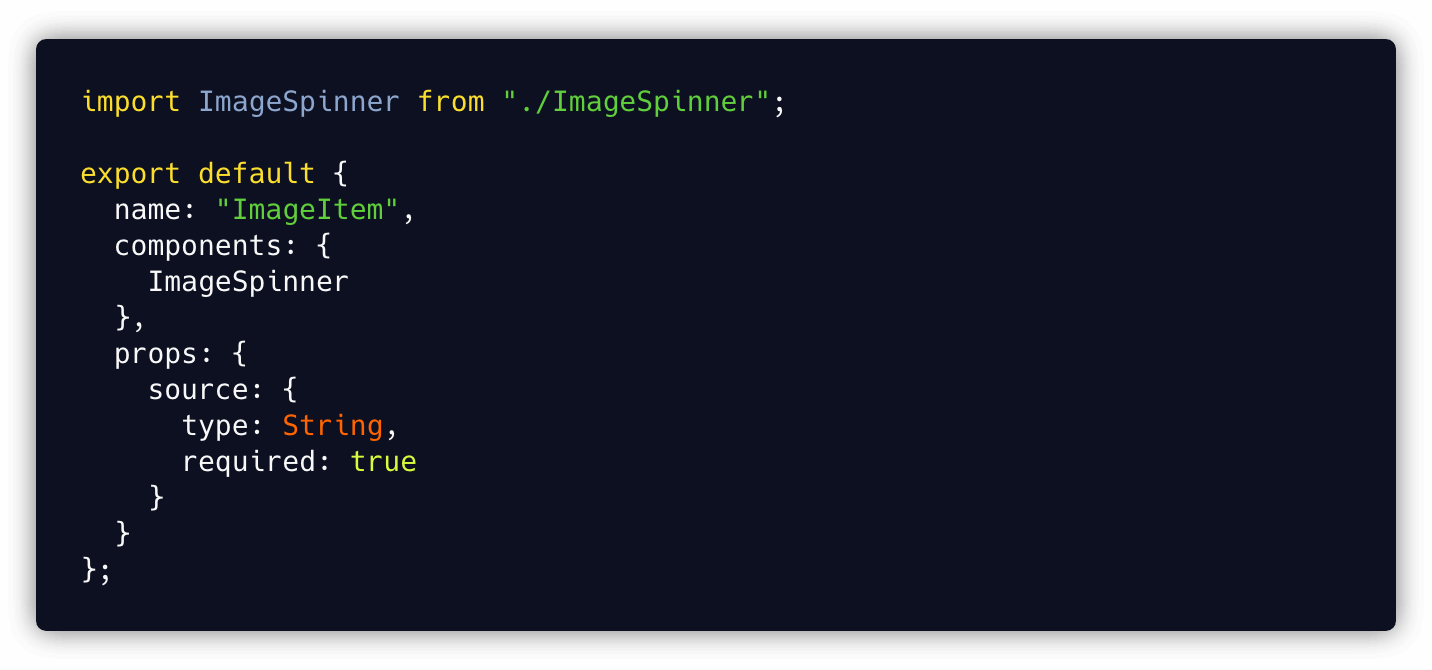
The script part of that component looks like this:
ImageItem.vue
As mentioned above, the lazy-load logic is kept in LazyLoadDirective:
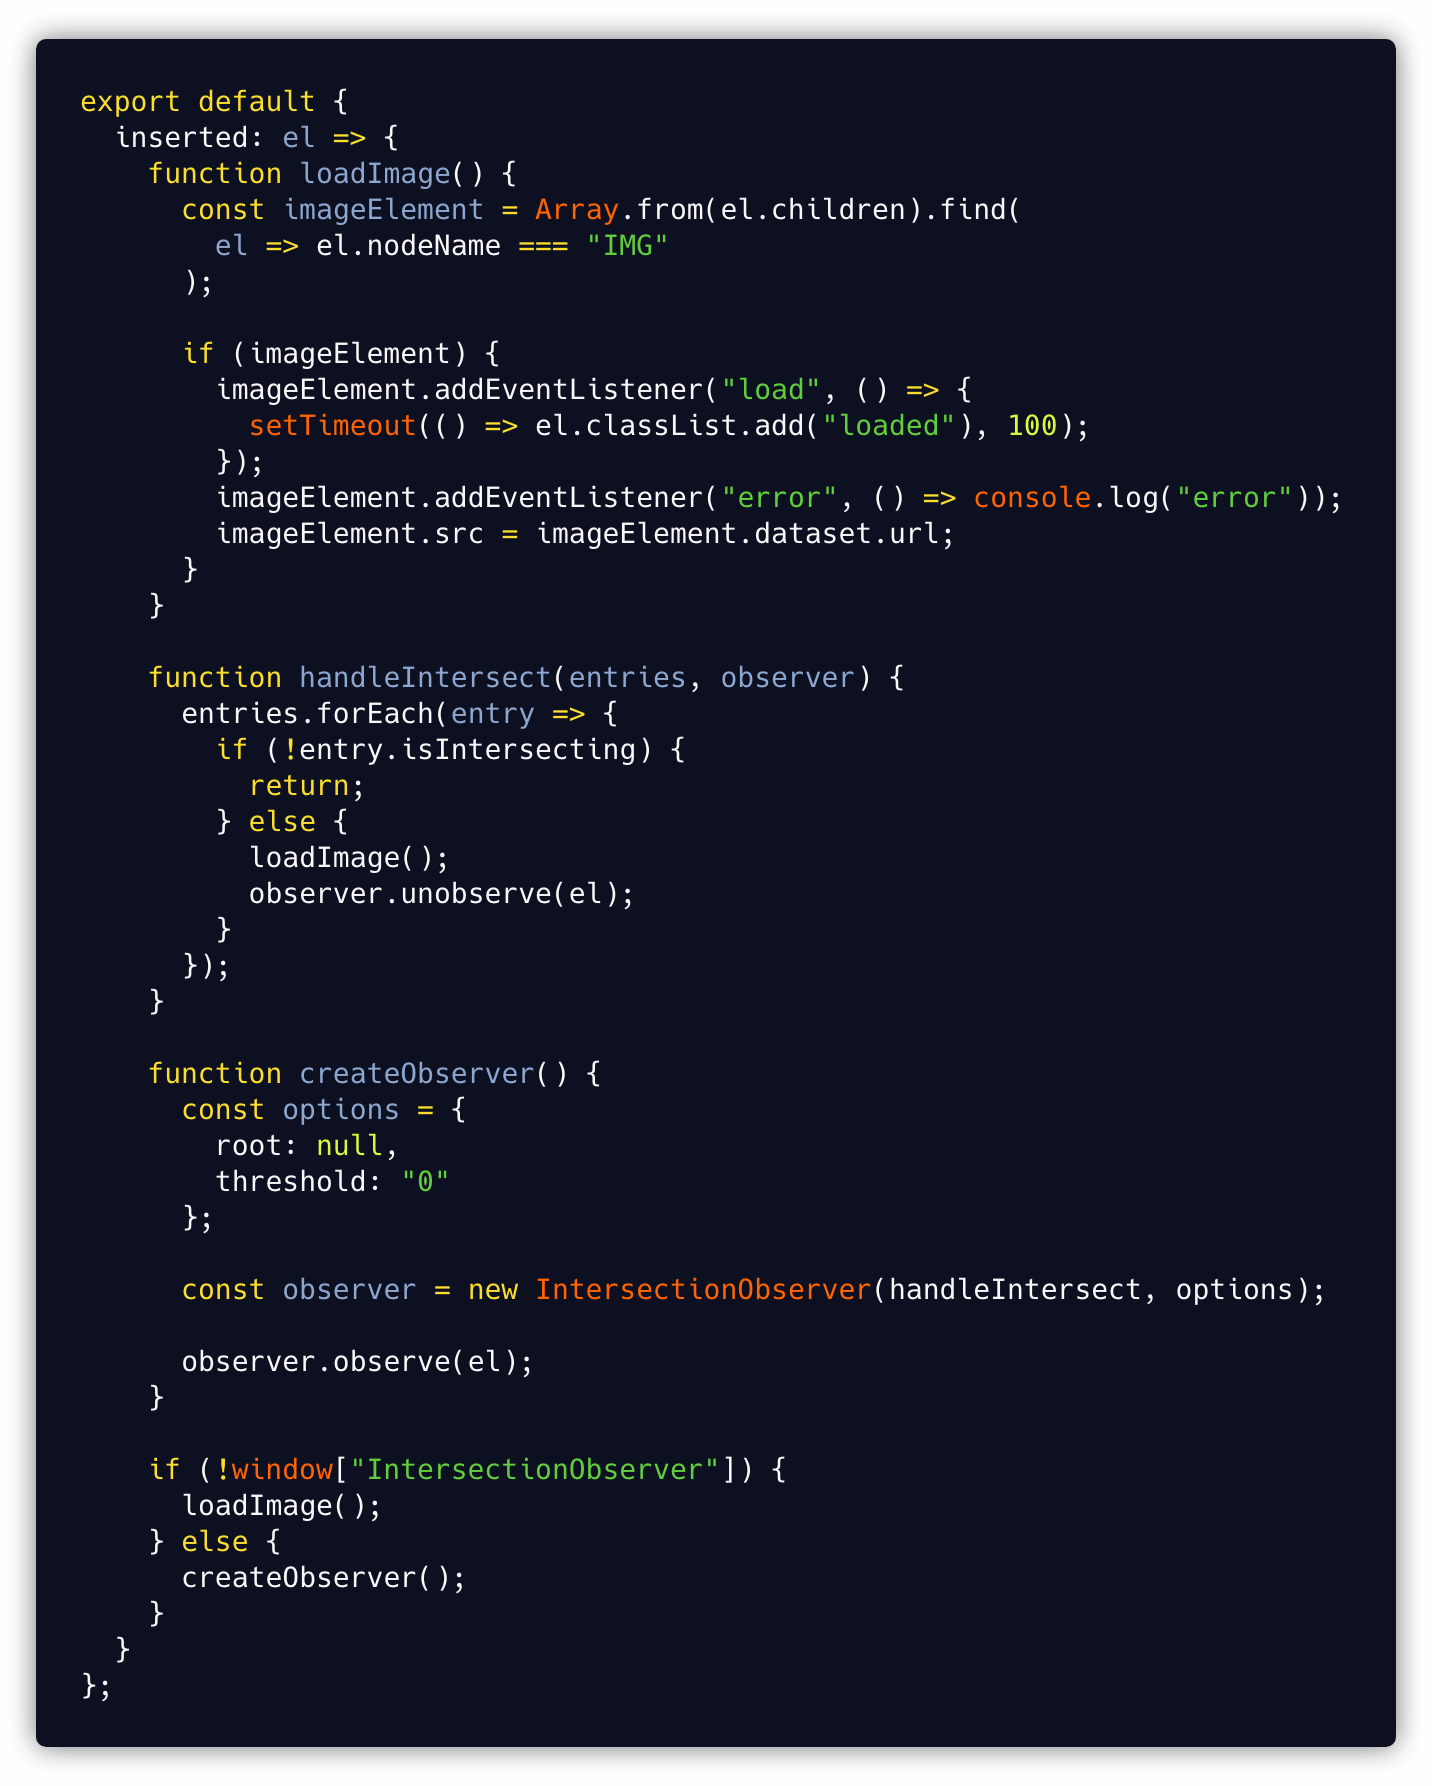
LazyLoadDirective.js
This is just a part of a working example. You can find the complete solution in this Codesandbox example. We will analyse the code piece by piece and see what is actually happening in the next section.
Real-World Example: Creating a LazyLoadDirective and using it in an ImageItem component
1. Create a basic ImageItem component
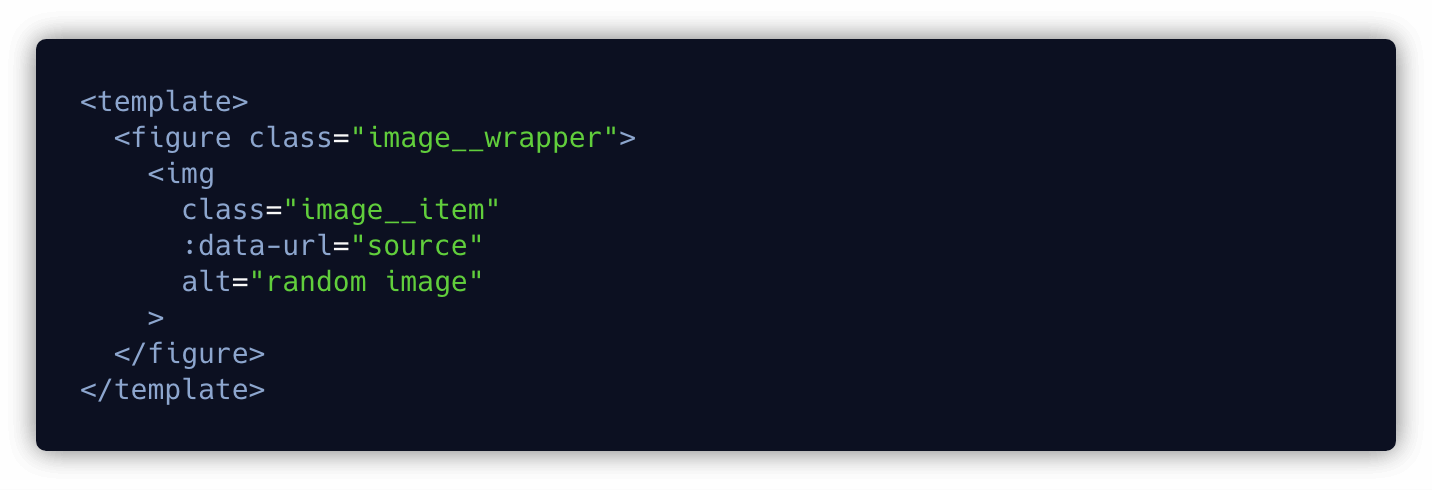
Let’s start with creating a component that will show an image (no lazy-loading involved). In the template, we create a figure tag that contains our image, and the image itself receives an src attribute that carries the image source (URL).
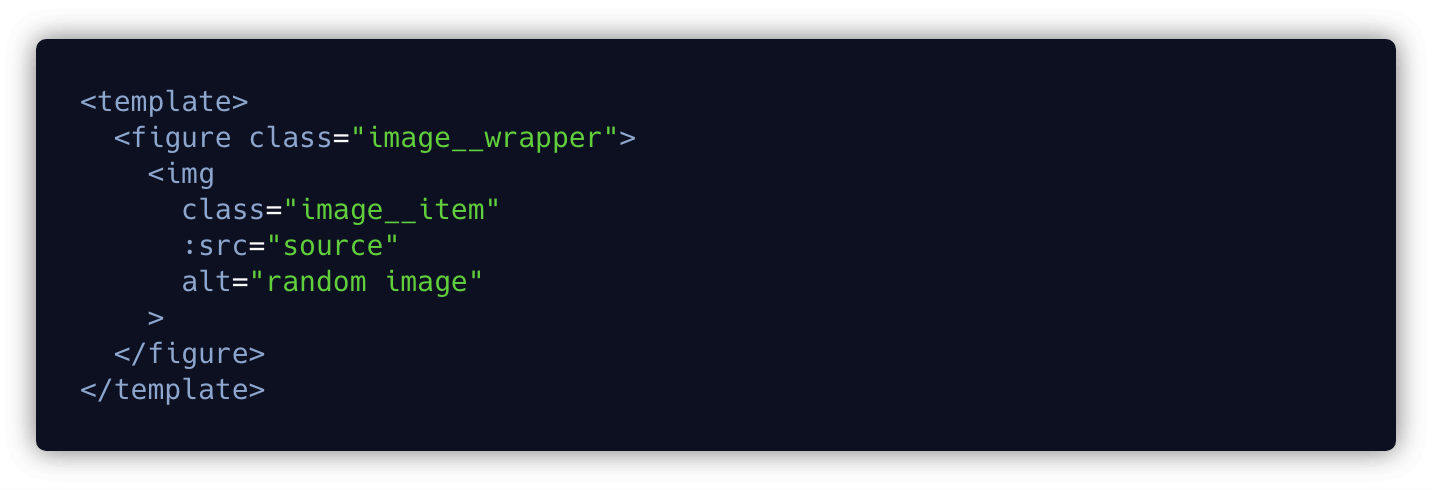
ImageItem.vue
In the script part we receive the prop source that gives us the source URL of the image we are displaying.

ImageItem.vue
This is fine - we render the image we wanted. But if we leave it as it is, we will be loading the image straight away without waiting for the component to be visible on our screen. That is not what we want, so let’s go to the next step.
2. Prevent the image from being loaded when the component is created.
To prevent the image from being loaded, we need to get rid of the src attribute from the img tag. But, as pointed out at the beginning, we still need to keep the image source somewhere. A good place to keep that information is the data-* attribute.
As per its definition, the data-* attribute allow us to store information in standard, semantic HTML elements.
Sounds like a perfect fit for our need.
ImageItem.vue
OK, with that done, we will not load our image. But wait, we will not load our image… ever!
Obviously, that is not what we wanted. We want to load our image, but under specific conditions. We can request the image to be loaded by replacing the src attribute with the image source url kept in data-url. That is the easy part, the issue we encounter now is - when should we replace that src?
We would like to load the image when the component carrying it becomes visible to the user. How can we detect if the user sees our image or not? Let’s check that out in the next step.
3. Detect when the image is visible to the user.
If you ever encountered that challenge, you probably ended up using some crazy magical JavaScript that, when you finished, didn’t look very nice. For example, we could use events and event handlers to detect the scroll position, offset value, element height and viewport height and calculate whether an image is in the viewport or not. It even sounds crazy, doesn’t it? If we really needed, we could probably stick to that solution (no matter how ugly that would be), but doing it that way has direct implications to our website's performance. Those calculations would be performed each time there is a scroll event. Even worse, imagine a few dozen images each having to recalculate if they are visible or not on each scroll event. This is madness!
4. Intersection Observer to the rescue!
This very inefficient way of detecting if an element is visible in the viewport can be solved by using the Intersection Observer.
Looking at the description, it allows you to configure a callback that is called whenever one element, called the target, intersects either the device viewport or a specified element.
Firing a custom callback function when the element becomes visible in the viewport? Sounds like a magic spell for what we need.
So, what we need to do to use it?
To use the Intersection Observer we need to do few things:
- Create a new intersection observer
- Watch the element we wish to lazy load for visibility changes
- When the element is in the viewport, load the element (replace
srcwith ourdata-url) - Once the element is loaded, stop watching it for visibility changes (
unobserve)
In Vue we can use a custom directive to wrap all this functionality and then reuse it when we need.
5. Create a Vue
What is a custom directive? As per documentation, it is a way to get low-level DOM access to elements. For example to change an attribute of a specific DOM element or, in our case, change the src attribute of an img element.
Our directive looks like below. Again, we will break it into pieces in a moment, I just want to give you an overview.
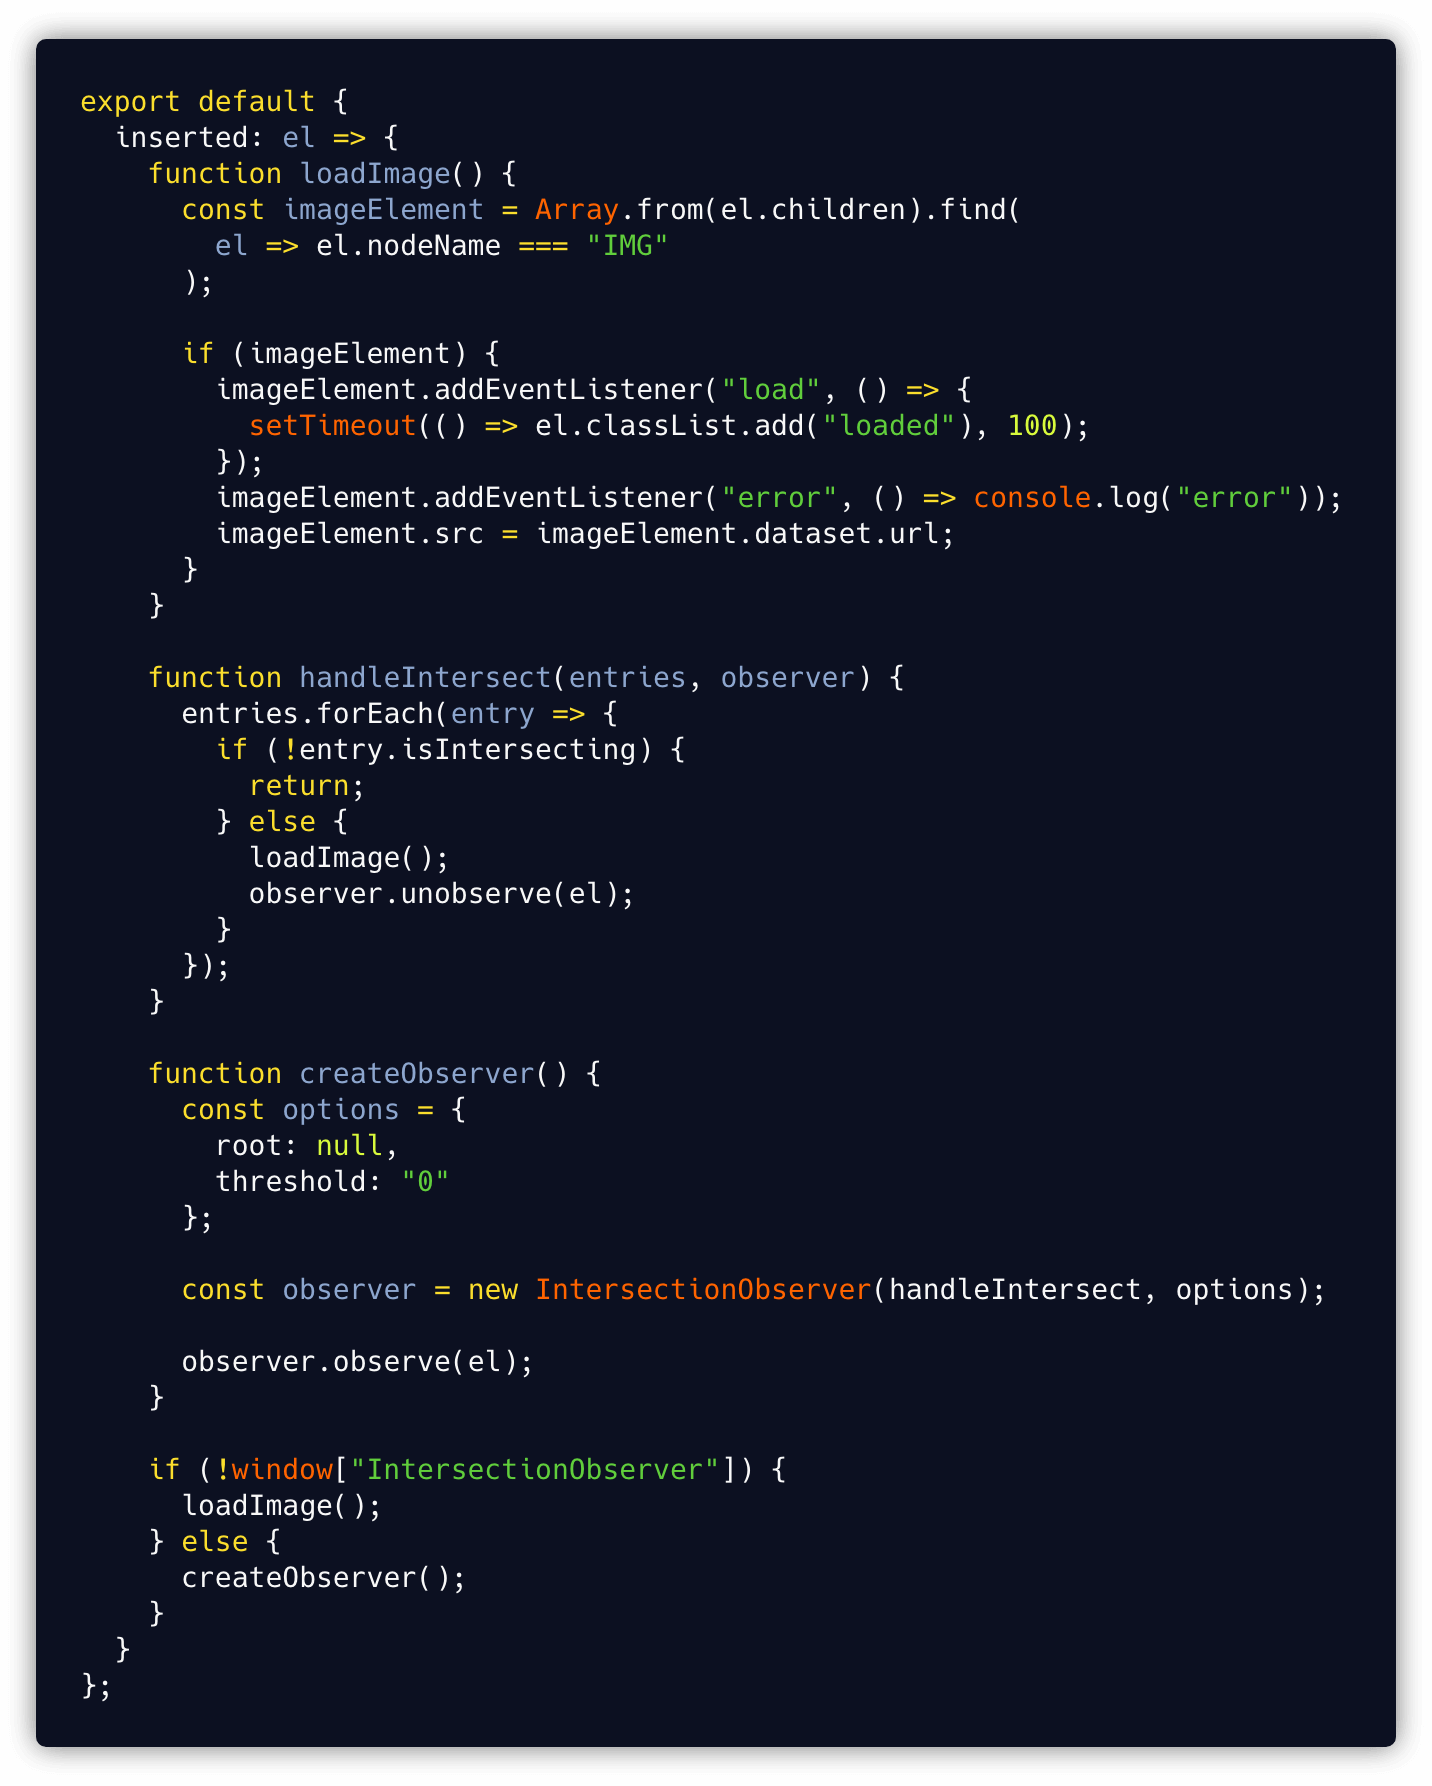
LazyLoadDirective.js
Let’s go step by step.
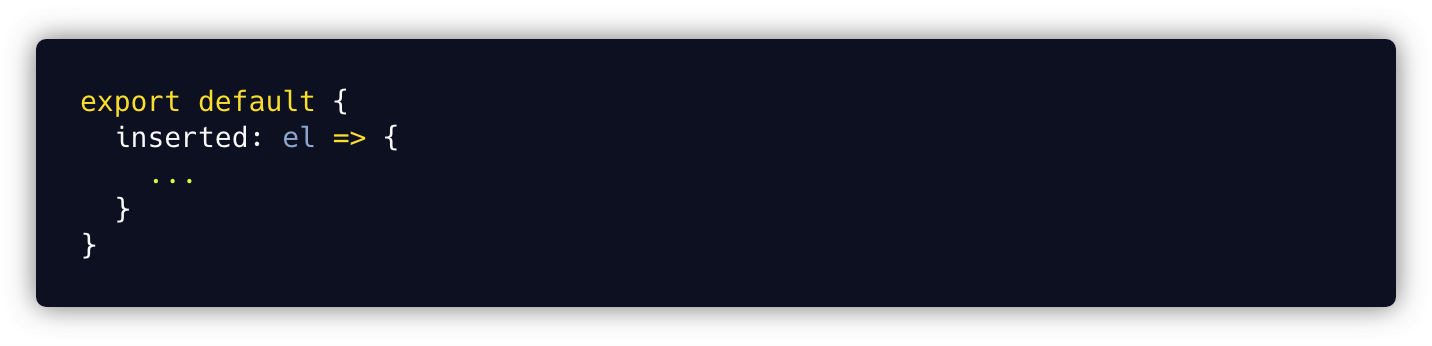
- Allows us to fire custom logic at a specific moment of a bound element's lifecycle.
- We use an
insertedhook because it is called when the bound element has been inserted into its parent node (this guarantees the parent node's presence). Since we want to observe the visibility of an element in relation to its parent (or any ancestor), we need to use that hook.
LazyLoadDirective.js
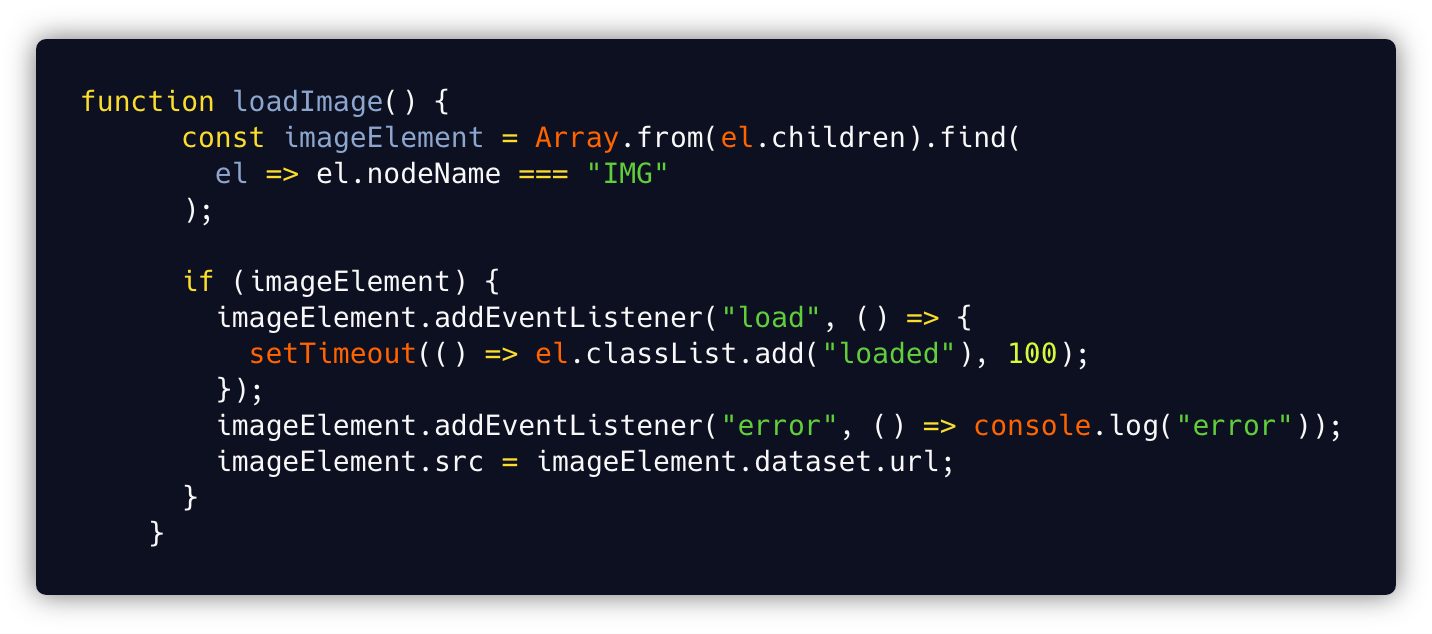
loadImage function
- Responsible for replacing the
srcvalue withdata-url. - In this function we have access to our
el, the element to which the directive is applied. We can extract theimgfrom that element. - We check if the image exists and, if it does, we add a listener that will fire a callback function when loading is finished. That callback will be responsible for hiding the spinner and adding an animation (fade-in effect) to the image using a CSS class.
- We add a second listener that will be called when the loading of the image from our source URL fails.
- Finally, we replace the
srcof ourimgelement with the source URL of the image we want to request and show (that triggers the request).
LazyLoadDirective.js
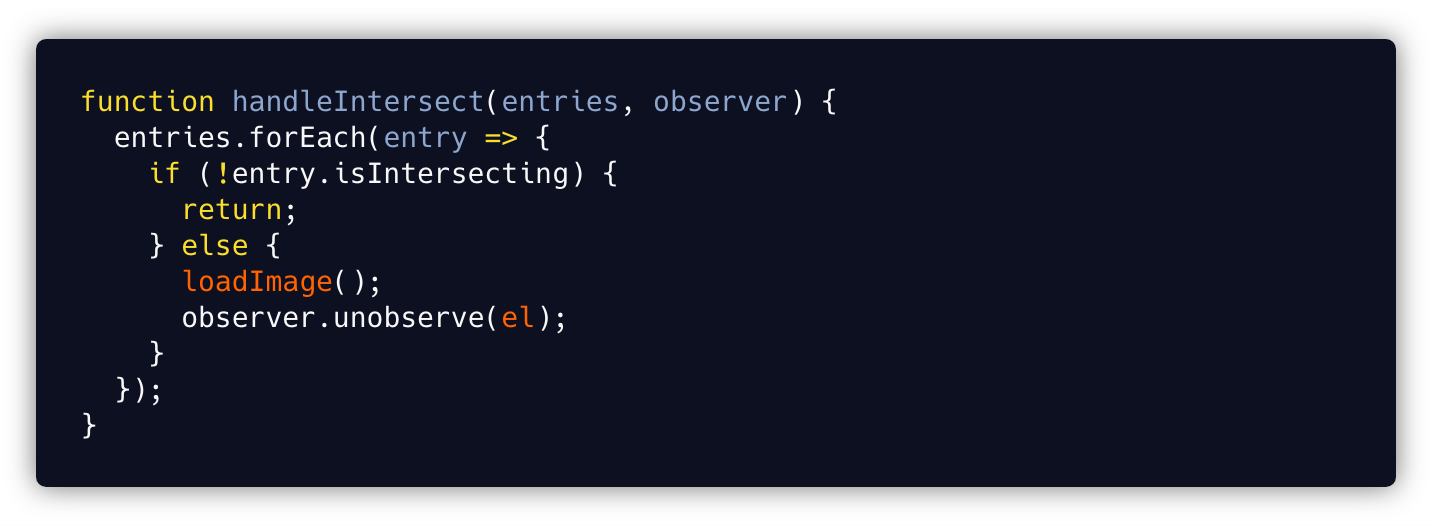
handleIntersect function
- This is an IntersectionObserver callback function responsible for firing
loadImageon certain conditions. - It is fired when the IntersectionObserver detects that the element entered the viewport or a parent component element.
- It has access to
entries, which is an array of all the elements that are watched by the observer and theobserveritself. - We iterate through
entriesand check if a single entry becomes visible to our user viaisIntersectingand, if it does, theloadImagefunction is fired. - After the image is requested, we
unobservethe element (remove it from the observer’s watch list). That prevents the image from being loaded again.
LazyLoadDirective.js
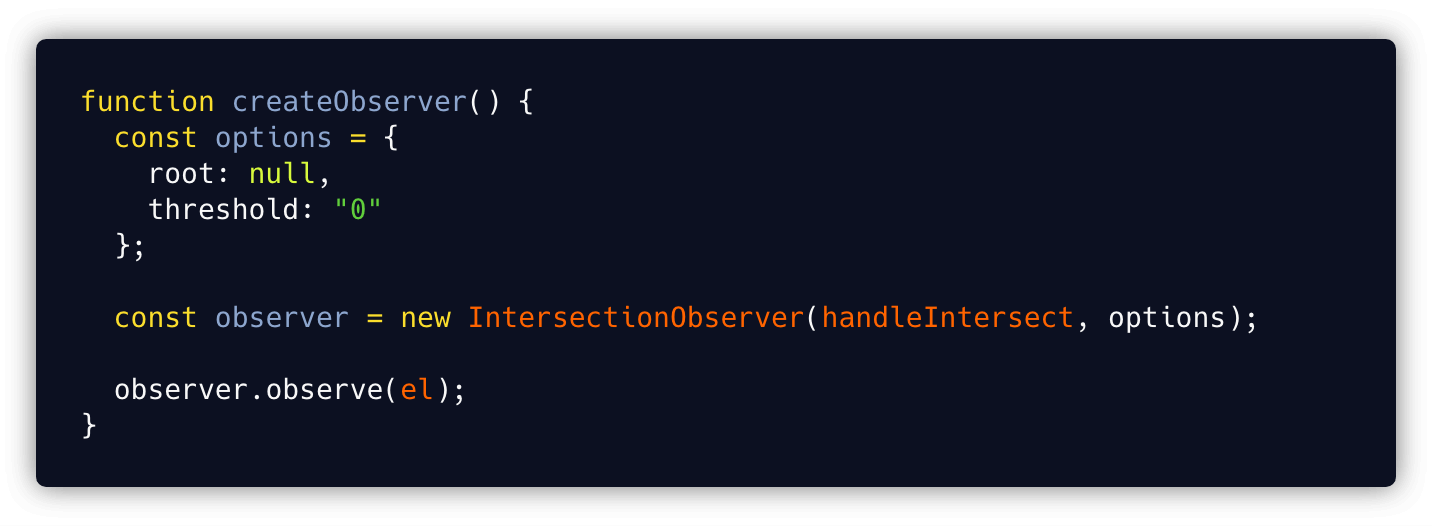
createObserver function
- Responsible for creating our IntersectionObserver and attaching it to our element.
- The IntersectionObserver constructor accepts a callback (our handleIntersect function) that is fired when the observed element passes the specified
threshold, and an options object that carries our observer options. - The
optionsobject specifies aroot- that is the reference object on which we base the visibility of the watched element (it can be any ancestor of the object or our browser viewport if we passnull). It also specifies athresholdvalue which can vary from 0 to 1 and tells us at what percentage of the target’s visibility the observer’s callback should be executed (0 meaning as soon as even one pixel is visible, 1 meaning the whole element must be visible). - After creating the IntersectionObserver, we attach it to our element using the
observemethod.
LazyLoadDirective.js
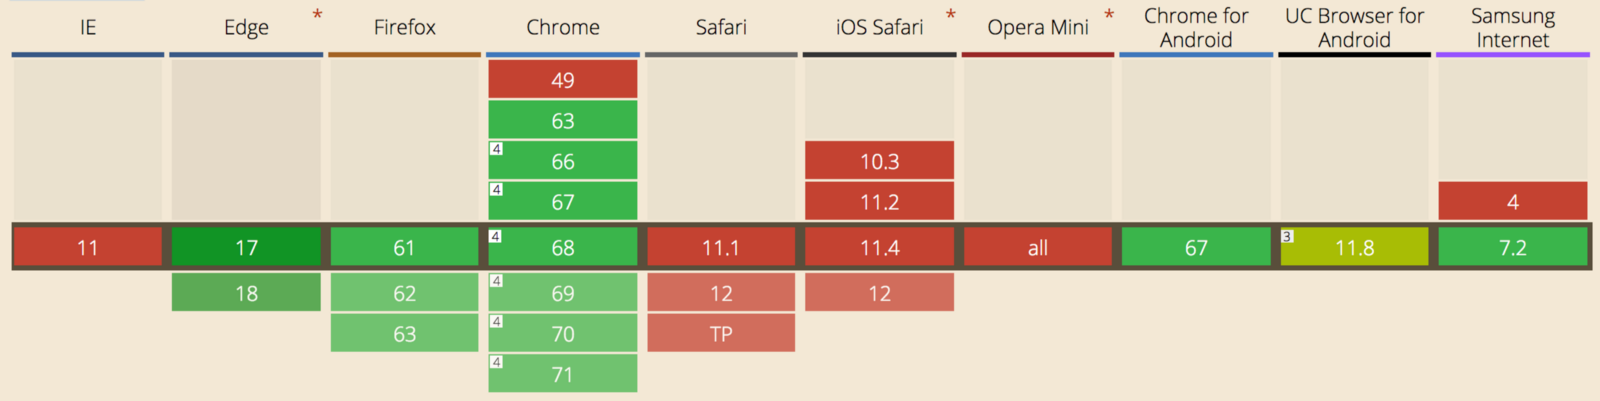
Browser support
Even though it is not supported by all browsers, coverage of 73% of web users (as of 28th August 2018) sounds good enough.
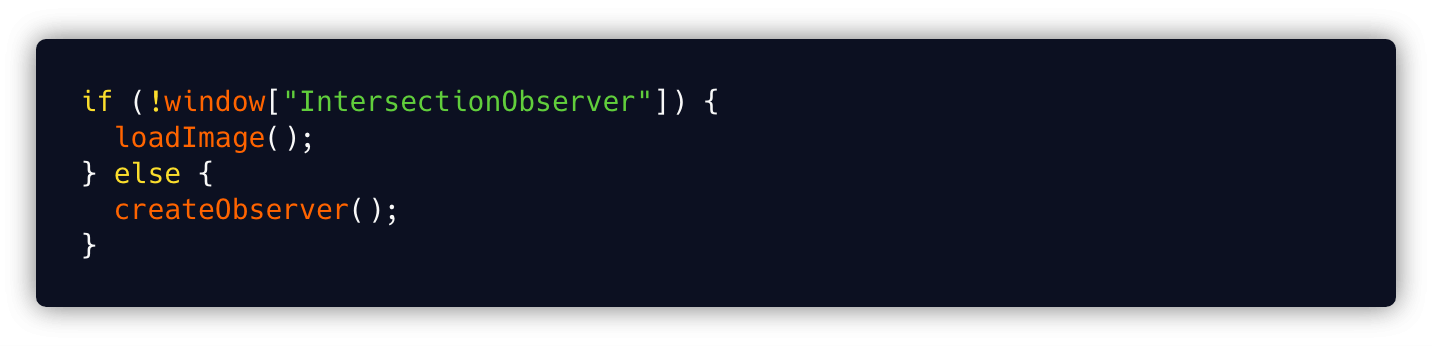
But, having in mind that we want to show images to all users (remember that using data-url prevents the image from being loaded), we need to add one more piece to our directive.
We need to check if the browser supports IntersectionObserver, fire loadImage if it doesn’t (that will request all images at once), and createObserver if it does.
LazyLoadDirective.js
6. Registering a directive
To use our newly created directive, we need to register it first. We can do it in two ways, globally (available everywhere in the app) or locally (on a specified component level).
Global registration
To register a directive globally, we import our directive and use the Vue.directive method to pass the name under which we want to register our directive and the directive itself. That allows us to add the v-lazyload attribute to any element in our code.
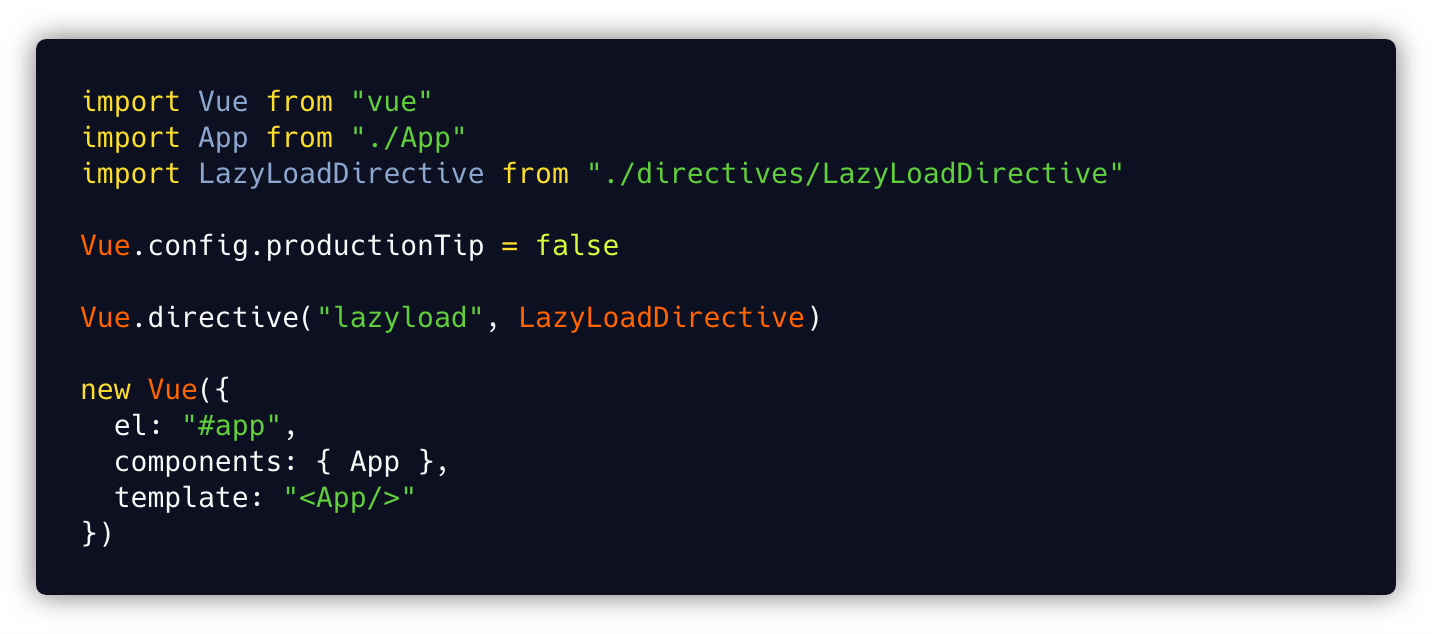
main.js
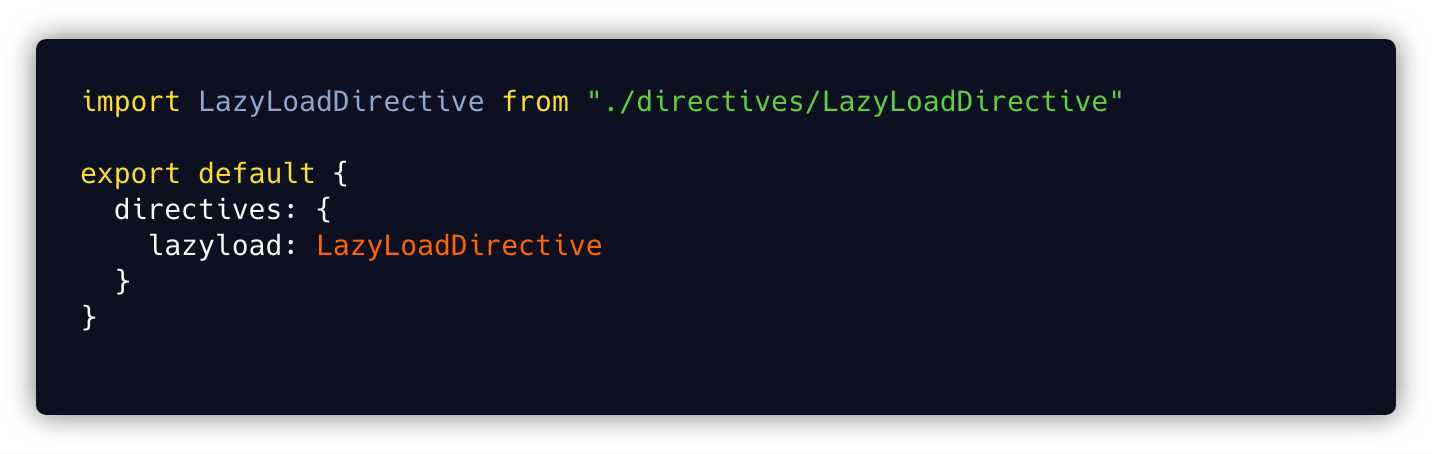
Local registration
If we want to use our directive only in a specific component and restrict the access to it, we can register the directive locally. To do that, we need to import the directive inside the component that will use it and register it in the directives object. This will give us the ability to add the v-lazyload attribute to any element in that component.
7. Using the directive on the ImageItem component
After registering our directive, we can use it by adding the v-lazyload attribute to the parent element that carries our img (the figure tag in our case).

ImageItem.vue
Summary
Lazy loading images can significantly improve your page's performance. It allows you to load images only when the user can actually see them.
For those still not convinced if it is worth playing with, I prepared some raw numbers. Let’s take our simple articles list. At the moment I was performing that test, it had 11 articles with images (meaning 11 images on the page). I don’t think that is a lot of images, you can probably find bigger number in a second by going to any news page.
Let’s stick to our 11 images and check the performance of our page on fast 3G with only the first article visible, without lazy-loaded images.

As expected - 11 images, 11 requests, total page size 3.2 MB.
Now, the same page with only the first article visible and lazy-loaded images.

Result: 1 image, 1 request, total page size 1.4 MB.
By adding this directive to our articles we saved 10 requests and we reduced the page size by 56% - and bear in mind this is a really simple example.
No more comments, let the numbers speak for themselves.


