How to Add a Splash Screen to a React Native Application

First impression can only be made once. That’s why creating a perfect splash screen is so important.
Here’s a tutorial on adding it to React Native apps.
Let’s start with some suggestions about how a splash screen should look:
- It shouldn’t be too complicated.
- No important info should be shown there.
- Remember that it is just a loading screen.
When it comes to the implementation we can split adding a splash screen to an app into two main steps:
- Add a native splash screen to each platform - as you would do in a native app.
- Adjust the splash screen implementation to react-native.
Why can’t we just add a splash screen natively? Because there is a time gap before a splash screen disappears on the native side and the first screen rendering on React Native side takes place, which causes a white blink.
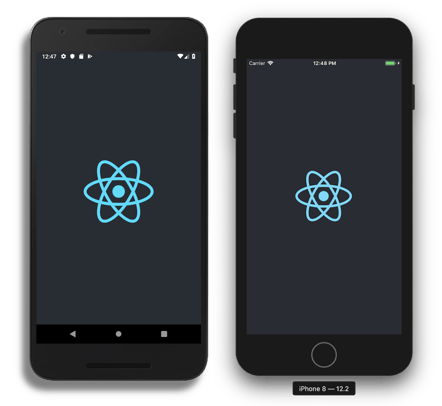
In this tutorial, I will show how to create a basic splash screen containing a logo and a custom background color.
IOS
1. Prepare your splash screen by editing LaunchScreen.xib. If you are not familiar with Xcode, the Adding Splash Screen IOS section from this blogpost will be helpful.
2. Install react-native-splash-screen:
yarn add react-native-splash-screenor
npm install react-native-splash-screen --save
If you use React Native version 0.60 you don’t have to link the library. Otherwise, run:
react-native link react-native-splash-screen.
3. If you are using cocoapods (default in React Native 0.60+), you have to also run the pod install command from the project's iOS folder.
4. Edit your AppDelegate.m file to make your splash screen displays while the JS code is loading. Open AppDelegate.m and add following code:
#import "AppDelegate.h"

#import <React/RCTBridge.h>
#import <React/RCTBundleURLProvider.h>
#import <React/RCTRootView.h>
+++ #import <RNSplashScreen.h>

@implementation AppDelegate

- (BOOL)application:(UIApplication *)application didFinishLaunchingWithOptions:(NSDictionary *)launchOptions
{
  RCTBridge *bridge = [[RCTBridge alloc] initWithDelegate:self launchOptions:launchOptions];
  RCTRootView *rootView = [[RCTRootView alloc] initWithBridge:bridge
                                                   moduleName:@"splashScreenTutorial"
                                            initialProperties:nil];

  rootView.backgroundColor = [[UIColor alloc] initWithRed:1.0f green:1.0f blue:1.0f alpha:1];

  self.window = [[UIWindow alloc] initWithFrame:[UIScreen mainScreen].bounds];
  UIViewController *rootViewController = [UIViewController new];
  rootViewController.view = rootView;
  self.window.rootViewController = rootViewController;
  [self.window makeKeyAndVisible];
+++  [RNSplashScreen show];
  return YES;
}

[...]

@end
5. Optional: If you have a dark background, you probably will want to change the status bar icons’ color. You can do that by adding these two lines to Info.plist:
<?xml version="1.0" encoding="UTF-8"?>
<!DOCTYPE plist PUBLIC "-//Apple//DTD PLIST 1.0//EN" "http://www.apple.com/DTDs/PropertyList-1.0.dtd">
<plist version="1.0">
<dict>
[...]
+++ <key>UIStatusBarStyle</key>
+++ <string>UIStatusBarStyleLightContent</string>
[...]
</dict>
</plist>
The available options here are: UIStatusBarStyleLightContent and UIStatusBarStyleDarkContent. Remember that making a change here will affect your entire app. To control the status bar within a React Native app, use the StatusBar component.
6. The last thing to do is hide the splash screen when the first screen is mounted. But remember, you can hide the splash screen at any moment, e.g when the initial data is fetched.
[...]
import SplashScreen from 'react-native-splash-screen';
[...]
const App = () => {
+++  useEffect(() => {
+++    SplashScreen.hide();
+++  }, []);

  return (
  [...]
  );
};
ANDROID
1. Create an activity which is responsible for forwarding to the main activity, which is the React Native app. In app/src/main/java/[packageName] create a SplashActvity.java file with the following code:
package com.splashscreen; // ← Make sure that is your package name

import android.content.Intent;
import android.os.Bundle;

import androidx.appcompat.app.AppCompatActivity; // ← For RN <= 0.59
import android.support.v7.app.AppCompatActivity; //  ← For RN >= 0.60

public class SplashActivity extends AppCompatActivity {
    @Override
    protected void onCreate(Bundle savedInstanceState) {
        super.onCreate(savedInstanceState);

        Intent intent = new Intent(this, MainActivity.class);
        startActivity(intent);
        finish();
    }
}
2. Modify your AndroidManifestFile.xml to use SplashActivity initially:
  <uses-permission android:name="android.permission.INTERNET" />

    <application
      android:name=".MainApplication"
      android:label="@string/app_name"
      android:icon="@mipmap/ic_launcher"
      android:roundIcon="@mipmap/ic_launcher_round"
      android:allowBackup="false"
      android:theme="@style/AppTheme">
+++        <activity
+++            android:name=".SplashActivity"
+++            android:theme="@style/SplashTheme"
+++            android:label="@string/app_name"
+++            >
+++            <intent-filter>
+++                <action android:name="android.intent.action.MAIN" />
+++                <category android:name="android.intent.category.LAUNCHER" />
+++            </intent-filter>
+++        </activity>
      <activity
        android:name=".MainActivity"
        android:label="@string/app_name"
        android:configChanges="keyboard|keyboardHidden|orientation|screenSize"
        android:windowSoftInputMode="adjustResize"
---       <intent-filter>
---            <action android:name="android.intent.action.MAIN" />
---            <category android:name="android.intent.category.LAUNCHER" />
---        </intent-filter>
+++        android:exported="true">
     </activity>
      <activity android:name="com.facebook.react.devsupport.DevSettingsActivity" />
    </application>

</manifest>
As you can see, SplashActivity uses SplashScreenTheme, which is not yet declared.
3. To do this, modify app/src/main/res/values/styles.xml and add the new style:
<resources>

  <!-- Base application theme. -->
  <style name="AppTheme" parent="Theme.AppCompat.Light.NoActionBar">
    <!-- Customize your theme here. -->
    <item name="android:textColor">#000000</item>
  </style>

+++   <style name="SplashTheme" parent="Theme.AppCompat.Light.NoActionBar">
+++     <item name="android:background">@drawable/background_splash</item>
+++     <item name="android:statusBarColor">@color/background</item>
+++   </style>

</resources>
4. We refer to the background color constant here, so we need to add it to our colors.xml file under the res/values folder.
<?xml version="1.0" encoding="utf-8"?>
<resources>
    <color name="background">#282c33</color> ← Use a background color of your preferences
</resources>
5. The next step is to create a background_splash.xml file in the app/src/main/res/drawable folder. If the folder does not exist, create it.
Add your icon to the drawable folders first. Android drawable importer might be handy here.<?xml version="1.0" encoding="utf-8"?>
<layer-list xmlns:android="http://schemas.android.com/apk/res/android">
<item
android:drawable="@color/background" />
<item
android:drawable="@drawable/react_icon"
android:height="200dp"
android:width="200dp"
android:gravity="center"
/>
</layer-list>
Now, similar to iOS, we need to make the splash screen display until the first component is mounted.
6. Firstly, install the react-native-splash-screen library if you haven’t installed it already. If you use React Native > 0.60, the package will be linked automatically. Otherwise, you need to run the linking command:
react-native link react-native-splash-screen
7. Then modify MainActivity.java:
package com.splashscreen;

+++ import org.devio.rn.splashscreen.SplashScreen;
+++ import android.os.Bundle;
import com.facebook.react.ReactActivity;
public class MainActivity extends ReactActivity {

+++    @Override
+++    protected void onCreate(Bundle savedInstanceState) {
+++        SplashScreen.show(this, R.style.SplashStatusBarTheme);
+++        super.onCreate(savedInstanceState);
+++    }

    /**
     * Returns the name of the main component registered from JavaScript.
     * This is used to schedule rendering of the component.
     */
    @Override
    protected String getMainComponentName() {
        return "splashScreen";
    }
}
8. As you can see, a custom theme is passed as the second parameter to the show method. Modify style.xml once again by adding a new theme.
<resources>

    <!-- Base application theme. -->
    <style name="AppTheme" parent="Theme.AppCompat.Light.NoActionBar">
        <!-- Customize your theme here. -->
        <item name="android:textColor">#000000</item>
        <item name="android:statusBarColor">@color/background</item>
    </style>

    <style name="SplashTheme" parent="Theme.AppCompat.Light.NoActionBar">
        <item name="android:background">@drawable/background_splash</item>
        <item name="android:statusBarColor">@color/background</item>
    </style>

+++    <style name="SplashStatusBarTheme" parent="SplashScreen_SplashTheme">
+++        <item name="android:statusBarColor">@color/background</item>
+++    </style>

</resources>
It’s recommended to do that. Otherwise, StatusBar will change color to black as the app's JS code loads.
9. To work properly the react-native-splash-screen library needs a file named launch_screen.xml inside the app/src/main/res/layout directory. In this file, create a layout using the previously created background.
<?xml version="1.0" encoding="utf-8"?>
<LinearLayout xmlns:android="http://schemas.android.com/apk/res/android"
    android:orientation="vertical"
    android:layout_width="match_parent"
    android:layout_height="match_parent"
    android:background="@drawable/background_splash"
/>
10. The last thing to do is adding a color called primary_dark in app/src/main/res/values/colors.xml. We don’t use it directly in code, but without that resource, the app will crash.
<?xml version="1.0" encoding="utf-8"?>
<resources>
[...]
+++    <color name="primary_dark">#000</color>
</resources>


