Introduction to the Missing Keyboard Layout Guide

This article is about a solution that I have been using for at least three years, and it is surprisingly simple and works pretty well. But let’s start from the beginning.
Understanding a keyboard layout system
Every iOS developer experiences a problem with the keyboard sooner or later. When visible, it covers quite a lot of the screen. How much? Let’s do some math:
- iPhone 11 screen resolution is 1242 per 2688 pixels
- which is 414 per 896 points
- when multiplying it gives 370 944 square points
- keyboard size is 414 per 301 points
- when multiplying it gives 124 614 square points
- dividing 124 614 per 370 944 gives 0.3359
It means a keyboard on the iPhone 11 covers 33.59% of the entire screen area. That’s a lot. And we didn’t take into account the UITextField.inputAccessoryView nor the keyboard’s dictation bar. We don’t want to have our beautifully designed screen covered by a keyboard, do we?
There are two typical solutions for this kind of issue:
- Change constraints when the keyboard appears, but this only applies to screens with small amounts of UI elements.
- Embed UI elements within a scroll, so the entire content becomes scrollable when the keyboard is present.
Both require some calculations and frame or constraint changes. Ideally, it would be good if a solution could encapsulate this logic into a class or two so it could be written once and used out of the box easily later.
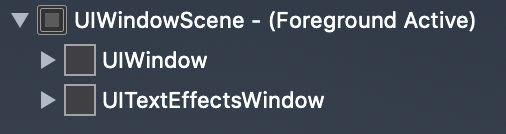
Let's check how a view hierarchy looks when having a single view app created from scratch with a hidden keyboard:
and a visible keyboard:
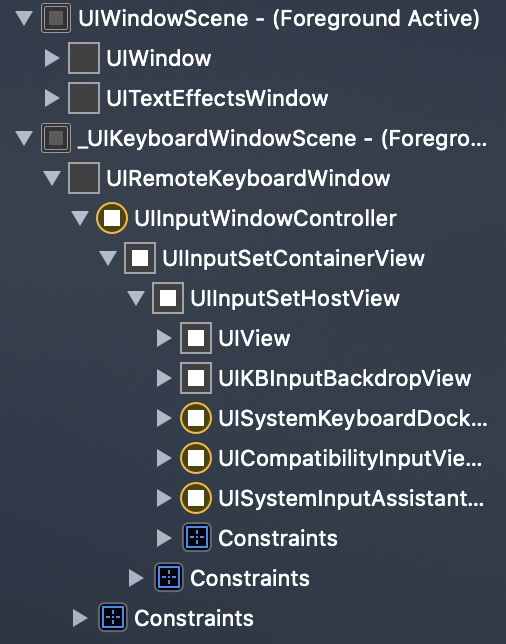
It's easily noticeable that another private window appears over the main window we usually code in. So a keyboard has its own dedicated keyboard. The question is: do they affect each other? Let’s check both window’s frames:
<UIWindow: 0x7fcf9fb08c50; frame = (0 0; 414 896);>

<UIRemoteKeyboardWindow: 0x7fcfa1033200; frame = (0 0; 414 896);>
The frames are equal. It doesn’t matter whether a keyboard’s window is visible or not, the main window frame stays as it was, and the main window’s descendant views’ frames also stay untouched. So how could we know when a keyboard appears or disappears? The answer is NotificationCenter. iOS system sends plenty of notifications. For keyboard handling, we are only interested in three of them:
- UIResponder.keyboardWillShowNotification: posted immediately prior to the display of the keyboard.
- UIResponder.keyboardWillHideNotification: posted immediately prior to the dismissal of the keyboard.
- UIResponder.keyboardWillChangeFrameNotification: posted immediately prior to a change in the keyboard’s frame.
Having this knowledge in mind, let’s build a perfect solution from scratch.
Building a concept
The concept behind a solution is to change a view controller’s view size when a keyboard appears so all descendant views will be notified about the change and will layout appropriately. Before doing so, let’s check the documentation of the UIViewController class:
View Management
Each view controller manages a view hierarchy, the root view of which is stored in the view property of this class. The root view acts primarily as a container for the rest of the view hierarchy. The size and position of the root view is determined by the object that owns it, which is either a parent view controller or the app’s window. The view controller that is owned by the window is the app’s root view controller and its view is sized to fill the window.
Having read this, it might not be a good idea to manipulate a view controller’s view size directly. Instead of that, we will use a UILayoutGuide and set constraints this way to allow automatic adjustment of when a keyboard appears or disappears. Let’s visualize it. The video below shows a UITextField rendered in the middle of the screen. At the bottom, you can see a view with a red background, which has a height equal to two points if the keyboard is not present. If UITextField becomes the first responder, then the keyboard appears and the view with a red background stretches vertically, so it’s still visible two points above the keyboard. You can even notice the keyboard's background is a blurred red.

Magic? Absolutely not. Just a few lines of code.
Building a solution
Let's create a class that inherits from UIView and call it View. Within this class, create a UILayoutGuide instance:
import UIKit

class View: UIView {

    // MARK: Properties

    /// 1
    private(set) lazy var keyboardHeightConstraint = keyboardLayoutGuide.heightAnchor.constraint(equalToConstant: 0)

    /// 2
    let keyboardLayoutGuide = UILayoutGuide()

    // MARK: Initializer

    init() {
        /// 3
        super.init(frame: .zero)
        translatesAutoresizingMaskIntoConstraints = false
        backgroundColor = .white

        /// 4
        addLayoutGuide(keyboardLayoutGuide)
        NSLayoutConstraint.activate([
            keyboardHeightConstraint,
            keyboardLayoutGuide.bottomAnchor.constraint(equalTo: bottomAnchor)
        ])
    }

    /// 5
    @available(*, unavailable, message: "Use init() method instead.")
    required init?(coder aDecoder: NSCoder) {
        fatalError("init(coder:) has not been implemented")
    }

    // MARK: Overrides

    /// 6
    override static var requiresConstraintBasedLayout: Bool {
        true
    }
}
This looks like a lot of code, but it’s pretty simple overall. However, here’s the step-by-step explanation:
- Create a lazily loaded constraint representing the height of the keyboard. It's equal to 0 in the initial state. It will be changed by the corresponding UIViewController later.
- Create a layout guide representing a keyboard's rectangle. The guide's rectangle (height to be precise) changes its value with animation on the keyboard transition.
- Configure the view for auto layout and set a white background color.
- Add a layout guide to the receiver and activate two constraints: the keyboard's height and the keyboard's bottom anchor. Leading and trailing constraints are not relevant in this case because the keyboard only animates vertically.
- For the sake of readability, let's deactivate xibs and storyboards support.
- Tell the Auto Layout engine that the view depends on the constraint-based layout system.
The first part is behind us. Let's dive into UIViewController's business logic. Create a class that inherits from UIViewController and call it ViewController. This controller will be responsible for several things like registering for keyboard notifications, extracting the necessary data from the notification object, making some calculations, and telling the associated view what to do. But let's start from the very beginning:
import UIKit

class ViewController<CustomView: View>: UIViewController {

    // MARK: Properties

    /// 1
    var automaticallyAdjustKeyboardLayoutGuide = false {
        willSet {
            newValue ? registerForKeyboardNotifications() : stopObservingKeyboardNotifications()
        }
    }

    /// 2
    let customView: CustomView

    // MARK: Initializer

    /// 3
    init(view: CustomView) {
        customView = view
        customView.translatesAutoresizingMaskIntoConstraints = false
        super.init(nibName: nil, bundle: nil)
    }

    /// 4
    @available(*, unavailable, message: "Use init() method instead.")
    required init?(coder aDecoder: NSCoder) {
        fatalError("init(coder:) has not been implemented")
    }

    /// 5
    deinit {
        stopObservingKeyboardNotifications()
    }

    // MARK: Overrides

    /// 6
    override func loadView() {
        super.loadView()

        view.addSubview(customView)
        NSLayoutConstraint.activate([
            customView.topAnchor.constraint(equalTo: view.topAnchor),
            customView.leadingAnchor.constraint(equalTo: view.leadingAnchor),
            customView.trailingAnchor.constraint(equalTo: view.trailingAnchor),
            customView.bottomAnchor.constraint(equalTo: view.bottomAnchor)
        ])
    }
}
Similarly to the previous example, let's go step by step:
- Create a computed variable that will add a view controller to or remove it from NotificationCenter observers. We will use this variable later.
- Create a variable that will hold a reference to an instance of View class passed in ViewController's initializer.
- Create a custom initializer, hold a reference to a given view by assigning it to a customView variable, and configure it to support Auto Layout.
- For the sake of readability, let's deactivate xibs and storyboards support.
- Use deinit to unregister from keyboard notifications if a viewController is about to finish its existence.
- Add a customView to a view controller's view hierarchy. Constraint its anchors to layout exactly the same as its superview.
Before moving further, we need to know what data from a Notification object is necessary to make this solution work. Let's take a look at the UIResponder keyboard type properties. We need to obtain only two of them:
- UIResponder.keyboardAnimationDurationUserInfoKey: a keyboard transition animation duration in seconds.
- UIResponder.keyboardFrameEndUserInfoKey: a final (visible or hidden depending on the keyboard transition) frame rectangle of the keyboard in screen coordinates.
So let's embed this logic into the handle extension and place it within the ViewController class.
private extension Notification {

    var keyboardAnimationDuration: TimeInterval? {
        (userInfo?[UIResponder.keyboardAnimationDurationUserInfoKey] as? NSNumber)?.doubleValue
    }

    var keyboardRect: CGRect? {
        userInfo?[UIResponder.keyboardFrameEndUserInfoKey] as? CGRect
    }
}
Having all of the implementation we have already written, let's move to the final part and create the business logic of keyboard handling:
private extension ViewController {

    func registerForKeyboardNotifications() {
        /// 1
        let center = NotificationCenter.default

        /// 2
        center.addObserver(forName: UIResponder.keyboardWillShowNotification, object: nil, queue: nil) { [weak self] notification in
            guard let self = self else {
                return
            }
            /// 3
            if self.automaticallyAdjustKeyboardLayoutGuide {
                let offset = notification.keyboardRect?.height ?? 0
                let animationDuration = notification.keyboardAnimationDuration ?? 0.25
                self.adjustKeyboardHeightConstraint(byOffset: offset, animationDuration: animationDuration)
            }
        }
        /// 4
        center.addObserver(forName: UIResponder.keyboardWillHideNotification, object: nil, queue: nil) { [weak self] notification in
            guard let self = self else {
                return
            }
            /// 5
            if self.automaticallyAdjustKeyboardLayoutGuide {
                let animationDuration = notification.keyboardAnimationDuration ?? 0.25
                self.adjustKeyboardHeightConstraint(byOffset: 0, animationDuration: animationDuration)
            }
        }
        /// 6
        center.addObserver(forName: UIResponder.keyboardWillChangeFrameNotification, object: nil, queue: nil) { [weak self] notification in
            guard let self = self else {
                return
            }
            /// 7
            if self.automaticallyAdjustKeyboardLayoutGuide, let offset = notification.keyboardRect?.height {
                let animationDuration = notification.keyboardAnimationDuration ?? 0.25
                self.adjustKeyboardHeightConstraint(byOffset: offset, animationDuration: animationDuration)
            }
        }
    }

    func stopObservingKeyboardNotifications() {
        /// 8
        [
            UIResponder.keyboardWillHideNotification,
            UIResponder.keyboardWillShowNotification,
            UIResponder.keyboardWillChangeFrameNotification
        ].forEach {
            NotificationCenter.default.removeObserver(self, name: $0, object: nil)
        }
    }

    func adjustKeyboardHeightConstraint(byOffset offset: CGFloat, animationDuration: TimeInterval) {
        /// 9
        customView.keyboardHeightConstraint.constant = offset
        UIView.animate(withDuration: animationDuration) {
            self.customView.layoutIfNeeded()
        }
    }
}
Whoa! That's a lot of code. Here’s the breakdown:
- Assign NotificationCenter.default to a local variable for convenient usage.
- Add self to observe keyboardWillShowNotification.
- Handle received keyboardWillShowNotification when self exists, and a view controller is told not to ignore notification messages. Extract offset and animationDuration from the notification and call the function handling view's height adjustment.
- Add self to observe keyboardWillHideNotification.
- Handle received keyboardWillHideNotification. It does pretty much the same as the third point, however, it passes 0 as a height instead of the keyboard's actual height.
- Add self to observe keyboardWillChangeFrameNotification.
- Handle the received keyboardWillChangeFrameNotification when self exists, a view controller is told not to ignore notification messages and a keyboard's height has changed. Extract offset and animationDuration from the notification and call the function handling view's height adjustment.
- Remove self from previously observed keyboard's notification. It's important to specify the notifications' names because the view controller might be registered for notifications of other types.
- Associate given offset to customView's keyboardHeightConstraint.constant and animate it with the given animation duration.
It might be important to emphasize here a block-based notification still requires applying a weak attribute to self to avoid the retain cycle as opposed to a selector-based notification.
Note: The code snippet above contains some repetitions for the sake of readability. On GitHub you will find an optimized solution.
All right! We did it. Written code makes the view controller automatically react to the keyboard's occurrence. Awesome. Time to push some life into this solution.
Real case scenario
Do you remember the criteria to meet at the beginning of this article? Let me quote:
Ideally, it would be good if a solution could encapsulate this logic into a class or two so it could be written once and used out of the box easily later.
So let me prove that the presented solution meets this 100%. Let's implement a screen that probably all of us have already written more than once: a sign-in screen. It should look as follows:
 |
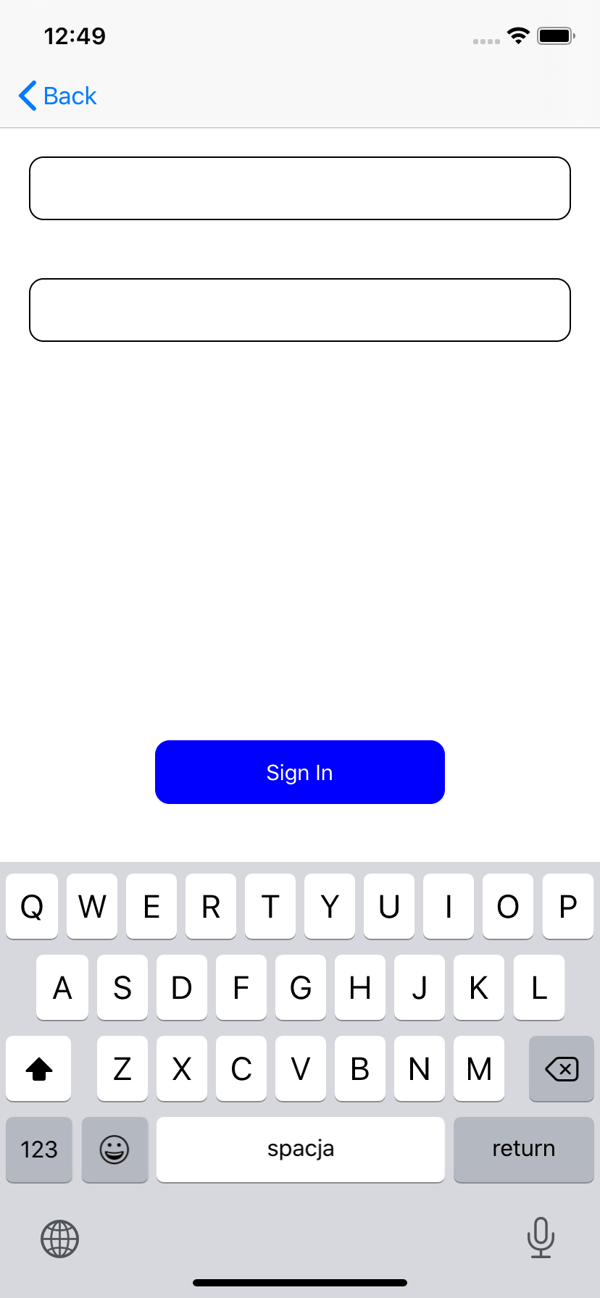 |
Also, when the keyboard appears, then the sign-in button should change its position with animation so that at the end, it will still be visible above the keyboard.
Let's start from creating a view containing UI elements. An implementation looks as follows:
import UIKit

final class SignInView: View {

    // MARK: Properites

    lazy var signInButton: UIButton = {
        let button = UIButton(type: .system)
        button.translatesAutoresizingMaskIntoConstraints = false
        button.layer.cornerRadius = 10
        button.setTitle("Sign In", for: .normal)
        button.setTitleColor(.white, for: .normal)
        button.backgroundColor = .blue
        return button
    }()

    lazy var emailTextField: UITextField = {
        let textField = UITextField()
        textField.translatesAutoresizingMaskIntoConstraints = false
        textField.layer.cornerRadius = 10
        textField.layer.borderColor = UIColor.black.cgColor
        textField.layer.borderWidth = 1
        return textField
    }()

    lazy var passwordTextField: UITextField = {
        let textField = UITextField()
        textField.translatesAutoresizingMaskIntoConstraints = false
        textField.layer.cornerRadius = 10
        textField.layer.borderColor = UIColor.black.cgColor
        textField.layer.borderWidth = 1
        return textField
    }()

    // MARK: Overrides

    override init() {
        super.init()

        addSubview(signInButton)
        addSubview(passwordTextField)
        addSubview(emailTextField)

        NSLayoutConstraint.activate([
            emailTextField.leadingAnchor.constraint(equalTo: leadingAnchor, constant: 20),
            emailTextField.trailingAnchor.constraint(equalTo: trailingAnchor, constant: -20),
            emailTextField.topAnchor.constraint(equalTo: safeAreaLayoutGuide.topAnchor, constant: 20),
            emailTextField.heightAnchor.constraint(equalToConstant: 44),

            passwordTextField.leadingAnchor.constraint(equalTo: leadingAnchor, constant: 20),
            passwordTextField.trailingAnchor.constraint(equalTo: trailingAnchor, constant: -20),
            passwordTextField.topAnchor.constraint(equalTo: emailTextField.bottomAnchor, constant: 40),
            passwordTextField.heightAnchor.constraint(equalToConstant: 44),

            signInButton.heightAnchor.constraint(equalToConstant: 44),
            signInButton.widthAnchor.constraint(equalToConstant: 200),
            /// Important:
            signInButton.bottomAnchor.constraint(equalTo: keyboardLayoutGuide.topAnchor, constant: -40),
            signInButton.centerXAnchor.constraint(equalTo: centerXAnchor)
        ])
    }
}
Important: instead of constraining the bottom anchor of the sign-in button to view's bottom anchor, constrain it to keyboardLayoutGuide.topAnchor, which is accessible because SignInView inherits from View class.
Now, let's move to a view controller implementation:
import UIKit

final class SignInViewController: ViewController<SignInView> {

    // MARK: Initializer

    init() {
        super.init(view: SignInView())
    }

    // MARK: Overrides

    override func viewDidLoad() {
        super.viewDidLoad()

        customView.emailTextField.delegate = self
        customView.passwordTextField.delegate = self
        /// Important:
        automaticallyAdjustKeyboardLayoutGuide = true
    }
}

// MARK: UITextFieldDelegate

extension SignInViewController: UITextFieldDelegate {

    func textFieldShouldReturn(_ textField: UITextField) -> Bool {
        view.endEditing(true)
        return true
    }
}
Important: set automaticallyAdjustKeyboardLayoutGuide to true to tell the view controller to automatically register to the keyboard's notifications so it will adjust the layout appropriately on the keyboard's occurrence.
At this point, you may wonder why ViewController doesn't register itself for the keyboard's notification automatically. It's done this way because sometimes a screen logic requires not to react on keyboard's occurrence. It's always better to explicitly turn on additional behavior, especially when it might not refer to the entire application.
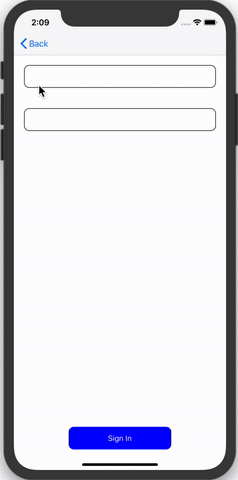
Now embed the SignInViewController into the UINavigationController hierarchy, build and run, and voila! It's time to admire how well it works:
Summary
With minimum effort, we have created a reusable solution for a complex problem. Of course, it has some downsides, like the necessity of View and ViewController inheritance, however, the gain is outstanding. The final code is clear because descendant classes use only two variables: automaticallyAdjustKeyboardLayoutGuide and keyboardLayoutGuide. The whole business logic happens under the hood, so this solution can be easily reused across the entire application. Everything is extremely easy to use, read, and understand.
I encourage you to take a look at the GitHub where you can find more examples:
- handle a scroll view
- handle a table view with content filtering
- invoke own implementation via closures when a keyboard is about to present or dismiss
- and more!
All required classes are already placed within the KeyboardLayoutGuide/KeyboardLayoutGuide folder on GitHub, so if you would like to use this approach, you can download and link them to your project. Happy coding!
Photo by Denisse Leon on Unsplash