Make Your PWA Available on Google Play Store

Contents
PWA (Progressive Web Apps) are with us for some time now.
Yet, each time I was trying to explain it to our clients the same question appeared, “Will my users be able to install the app using App stores?”. So far, the anwser was no, but this changed with Chrome 72 and a new feature called TWATWATWATWA.
Trusted Web Activities are a new way to integrate your web-app content such as your PWA with your Android app using a protocol based on Custom Tabs.
In this article I will use Netguru’s existing PWA (Wordguru) and explain step-by-step what needs to be done to make our application available and ready to be installed straight from the Store.
Note: Some of the things may sound silly and not worth writing about for the Android Developers but this article was written from a Frontend Developer's perspective who has never used Android Studio before and never created an Android Application before.
Step 1: Set up a TWA
Create a new TWA project in Android Studio
- Open Android Studio and click on Start a new Android Studio project.
- Choose Add No Activity
- Configure your project:
- Name: name of your application
- Package Name: identifier for Android Applications on the Play Store must be unique, I suggest using the url of your PWA in reverse order (eg. com.netguru.wordguru)
- Save location: where your project will exist on your machine
- Language: you will not write any Java code (leave a default Java)
- Minimum API Level: API 19 (required by the support library)
- do not select any checkboxes (no Instant Apps nor AndroidX)
Add TWA Support Library
- Add Jitpack configuration - build.gradle (Project: Wordguru) - this is the Project level build.gradle. This allows us to add a dependency in the second file.
allprojects {
  repositories {
    ...
    maven { url 'https://jitpack.io' }
    ...
  }
}
- Add required dependency - this is the Module level build.gradle
// build.gradle (Module: app)

dependencies {
  ...
  implementation 'com.github.GoogleChrome:custom-tabs-client:a0f7418972'
  ...
}- Enable Java 8 - TWA library uses Java 8 features we also need to enable Java 8. To do that we need to add compileOptions as below:
// build.gradle (Module: app)

android {
  ...
  compileOptions {
    sourceCompatibility JavaVersion.VERSION_1_8
    targetCompatibility JavaVersion.VERSION_1_8
  }
  ...
}- Add manifestPlaceholders - variables that will be used in the next step when configuring our TWA
// build.gradle (Module: app)

android {
  ...
  defaultConfig {
    ...
    manifestPlaceholders = [
      hostName: "wordguru.netguru.com",
      defaultUrl: "https://wordguru.netguru.com",
      launcherName: "Wordguru"
    ]
    ...
  }
  ...
}
Add TWA Activity
When required dependency and variables are there, we can continue and set our TWA up. We do that by editing Android App Manifest.
When creating a project we selected Add No Activity option, because of that our manifest is empty and contains only the application tag.
<!-- manifests/AndroidManifest.xml -->

<manifest
    xmlns:android="http://schemas.android.com/apk/res/android"
    package="com.netguru.wordguru">
    <application
        android:allowBackup="true"
        android:icon="@mipmap/ic_launcher"
        android:label="${launcherName}"
        android:supportsRtl="true"
        android:theme="@style/AppTheme">

        <activity
            android:name="android.support.customtabs.trusted.LauncherActivity"
            android:label="${launcherName}">

            <meta-data
                android:name="android.support.customtabs.trusted.DEFAULT_URL"
                android:value="${defaultUrl}"/>


            <intent-filter>
                <action android:name="android.intent.action.MAIN" />
                <category android:name="android.intent.category.LAUNCHER" />
            </intent-filter>


            <intent-filter android:autoVerify="true">
                <action android:name="android.intent.action.VIEW"/>
                <category android:name="android.intent.category.DEFAULT"/>
                <category android:name="android.intent.category.BROWSABLE"/>
                <data
                    android:scheme="https"
                    android:host="${hostName}"/>
            </intent-filter>
        </activity>
    </application>
</manifest>
Step 2: Verify relationship between the website and the app
Establish application to website relationship
// build.gradle (Module: app)

android {
  ...
  defaultConfig {
    ...
    manifestPlaceholders = [
      ...
      assetStatements: '[{ "relation": ["delegate_permission/common.handle_all_urls"], ' +
        '"target": {"namespace": "web", "site": "https://wordguru.netguru.com"}}]'
      ...
    ]
    ...
  }
  ...
}
<!-- manifests/AndroidManifest.xml -->

<manifest
    xmlns:android="http://schemas.android.com/apk/res/android"
    package="${packageId}">

    <application>
      ...
        <meta-data
          android:name="asset_statements"
          android:value="${assetStatements}" />
      ...
    </application>
</manifest>
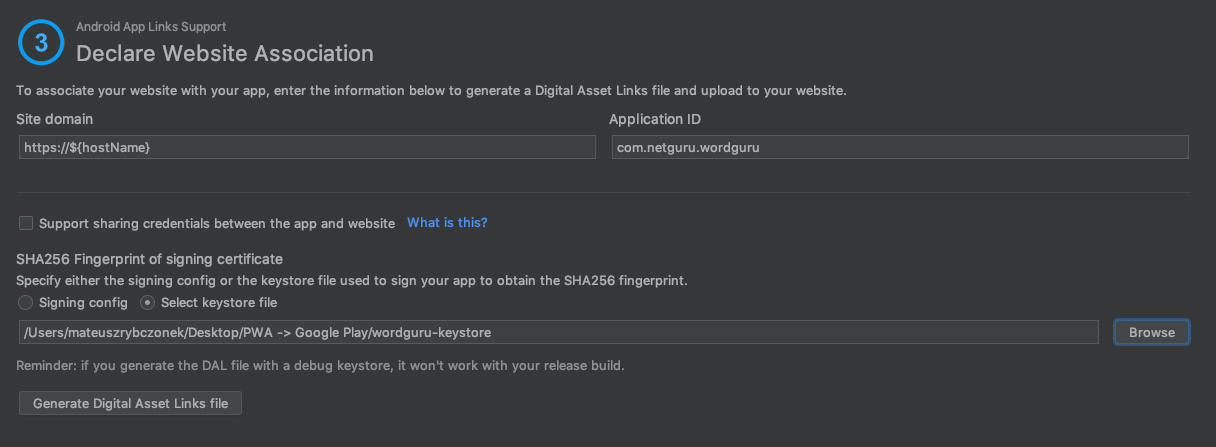
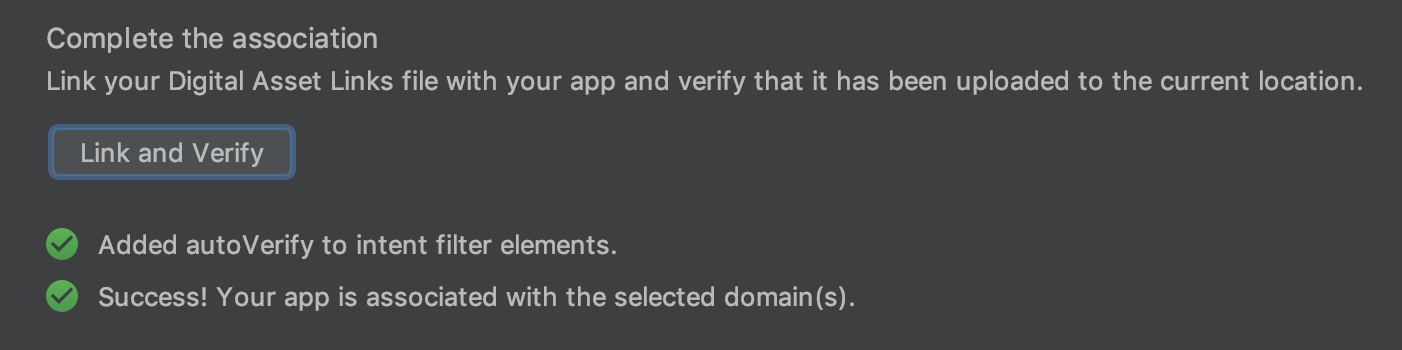
Establish website to application relationship
- hosting site domain - our PWA url (eg. https://wordguru.netguru.com/)
- app package name - our TWA package name (eg. com.netguru.wordguru)
- app package fingerprint (SHA256) - unique SHA256 that is generated based on Google Play Store keystore
- In the Android Studio go to: Build → Generate Signed Bundle or APK → APK
- Use existing keystore (if you already have one) or Create new…
- Fill the form (remember the credentials as those are the credentials that the application will be signed with, they confirm your ownership of the application)
- Select type of bundle (release as we want a production bundle) and signature versions
[{
  "relation": ["delegate_permission/common.handle_all_urls"],
  "target": {
    "namespace": "android_app",
    "package_name": "com.netguru.wordguru",
    "sha256_cert_fingerprints": ["8A:F4:....:29:28"]
  }
}]
Step 3: Get required assets
- Icons with following dimensions: (48 x 48, 72 x 72, 96 x 96, 144 x 144, 192 x 192) or adaptive icon
- Google Play Store logo - image - 512 x 512 32-bit PNG (with alpha)
- Google Play Store banner - image - 1024 x 500 JPG or 24-bit PNG (no alpha)
- Few screenshots from the application for phone and tablet
Step 4: Publish to Google Play Store
Let’s go to the last step and finally push our app to the store.
Using the APK generated before (you can find it in your AndroidStudioProjects folder (eg. AndroidStudioProjects/Wordguru/app/release/app-release.apk) we need to go to the Google Play Console where we can publish our application. I will not describe the process of publishing an application in the store as the wizard makes it pretty straight forward and we are guided step by step during the process.
After the release it may take few hours for the application to be reviewed and approved, only then it will finally appear in the store’s applications list.


