6 Tips To Make Your iOS PWA Feel Like a Native App

Contents
On March 30, the long-awaited iOS 11.3 update was released, with support for basic PWA features on iPhones and iPads, such as service workers and app manifest files.
Although it is great that these are finally supported, the user experience of Progressive Web Applications on iOS is still not perfect.
That means that many existing PWAs still have some serious issues on Apple devices, while providing a near-native experience on Android at the same time. In the frontend community comments of disappointment were already raised, and the list of issues and bugs is long. Don't lose your hope, though! Below you will find a few tips on how to fix these issues and make your PWA as close to a native mobile app as you can, enhancing your iOS development process.
What is wrong with PWA support on iOS?
In the latest iOS update, Apple added support for service workers and app manifest files. You can now leverage caching with service workers and make your PWA work without an internet connection. Let's remember – this is a basic requirement within the PWA definition. And, unfortunately, there are a few drawbacks to Apple's implementation.
The support of service workers is very limited compared to Android. You can only persist app data and cache files, but no background tasks. There is also a 50MB and “few weeks” limit for storage.
iOS 11.3 also introduced support for manifest files. But our tests showed that it is far from perfect. Icons are not working perfectly (or at all) and there’s no support for launch screens - you’ll get only a blank white screen when the app is loading. The app is reloaded each time it is brought back from the background, and there's no support for push notifications and many other functionalities which are essential for a mobile app. To sum up - the overall UX is quite bad.
So what? Is providing a native experience in PWAs on iOS not possible?
Thankfully, there's a lot you can do to improve your app's look and provide a better UX. With a few simple tricks you can build an app which, in a lot of cases, will be indistinguishable from a native one.
I believe that PWAs are the future of an inclusive, performative and intuitive web, which is why I would like to share some tips on overcoming iOS's limitations in terms of PWAs.
#PROTIP 1: Make app icons great again (on every device)
We've noticed that iOS does not use the icons from the manifest file, and that makes the shortcut to your app on the home screen look really bad. There is a simple solution to overcome this issue - just add an apple-touch-icon meta tag with the proper image. Avoid icons with transparency - those will not work.
<!-- place this in a head section -->
<link rel="apple-touch-icon" href="touch-icon-iphone.png">
<link rel="apple-touch-icon" sizes="152x152" href="touch-icon-ipad.png">
<link rel="apple-touch-icon" sizes="180x180" href="touch-icon-iphone-retina.png">
<link rel="apple-touch-icon" sizes="167x167" href="touch-icon-ipad-retina.png">
And now your app will look perfect from the beginning!
#PROTIP 2: Fix the launch screen
A launch screen is normally displayed before an app is fully loaded and ready to use. Unfortunately, iOS doesn't support launch screens generated from the manifest, which is how it works on Android. Instead, it shows a white, blank screen That's definitely not the experience we would like to serve to our users.

Thankfully we've found the solution which is described in apple developer's page. Apple supports custom meta tags to specify a pre-generated splash screen - apple-touch-startup-image. So you just have to generate splash images in the proper sizes, which you can find listed below:

When you have your stunning launch screens ready, the only thing left to do is to link them in the head section like this:
<!-- place this in a head section -->
<meta name="apple-mobile-web-app-capable" content="yes" />
<link href="/apple_splash_2048.png" sizes="2048x2732" rel="apple-touch-startup-image" />
<link href="/apple_splash_1668.png" sizes="1668x2224" rel="apple-touch-startup-image" />
<link href="/apple_splash_1536.png" sizes="1536x2048" rel="apple-touch-startup-image" />
<link href="/apple_splash_1125.png" sizes="1125x2436" rel="apple-touch-startup-image" />
<link href="/apple_splash_1242.png" sizes="1242x2208" rel="apple-touch-startup-image" />
<link href="/apple_splash_750.png" sizes="750x1334" rel="apple-touch-startup-image" />
<link href="/apple_splash_640.png" sizes="640x1136" rel="apple-touch-startup-image" />
Now you can see that ugly white screen on launch is gone:
Our PWA is looking much better thanks to that, isn't it?
#PROTIP 3: Create an “Add to home screen” popup yourself!
On Android, there is a native popup which encourages the user to add an app to their home screen and informs them that our page is a PWA. Unfortunately, there's no such thing on iPhone, so our visitor is not even aware of our app's capabilities. Moreover, as much as 3 taps are required on iOS to add an app to the home screen.

But don't worry, we have a fix for that! We can add a custom popup which will indicate that our app can be added to home screen.
You are free to design that popup as you wish, our example is shown below. The hard part is to display it only in Safari and not in standalone mode (when the app is already added to home screen). You can check if your app is in standalone mode using window.navigator.standalone.
Take a look at this snippet:
// Detects if device is on iOS
const isIos = () => {
  const userAgent = window.navigator.userAgent.toLowerCase();
  return /iphone|ipad|ipod/.test( userAgent );
}
// Detects if device is in standalone mode
const isInStandaloneMode = () => ('standalone' in window.navigator) && (window.navigator.standalone);

// Checks if should display install popup notification:
if (isIos() && !isInStandaloneMode()) {
  this.setState({ showInstallMessage: true });
}
After creating the proper popup component and pasting the detection code into the proper lifecycle method, the final product will look like this:
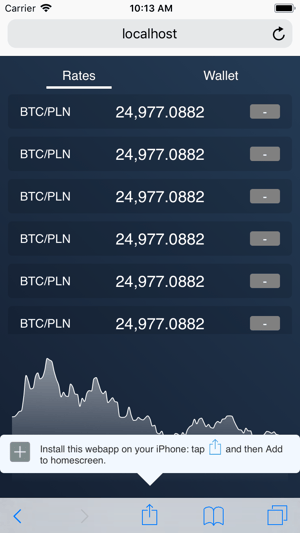
Just bear in mind that on iPad the share button is located at the top of the screen, next to the address bar, so you should change the popup's location accordingly.
#PROTIP 4: Persist everything
Since iOS restarts your app on every launch/going to background, you should take care of persisting its state yourself. If you use React and Redux, there are some great packages to help - redux-persist and react-router-redux. For Vue, you could use the similar vuex-persist and vuex-router-sync. Of course, you can create your own solution, which would be the best fit for your case.
In React, react-router-redux will by default redirect on mount to the route specified in the URL. While it might be OK for regular use, we would like to prefer the route which was persisted in our storage. This is an example of how to achieve that:
import { ConnectedRouter, push } from 'react-router-redux';

class PersistedConnectedRouter extends ConnectedRouter {
  componentWillMount() {
    const { store: propsStore, history, isSSR } = this.props;
    this.store = propsStore || this.context.store;

    if (!isSSR) {
      this.unsubscribeFromHistory = history.listen(this.handleLocationChange);
    }

    //this is the tweak which will prefer persisted route instead of that in url:
    const location = this.store.getState().router.location || {};
    if (location.pathname !== history.location.pathname) {
      this.store.dispatch(push(location.pathname));
    }
    this.handleLocationChange(history.location);
    // --
  }
}

export default PersistedConnectedRouter;
#PROTIP 5: Take care of navigation
To make sure your app will be usable in standalone mode, you have to check if you have implemented your navigation correctly. On Apple devices there's no back button, so you have to make sure that user is able to go back from any screen using navigation built-in to your app.
You can do that by displaying a back button or by adding an additional menu bar for iOS devices.
#PROTIP 6: Prepare for offline
To provide the true native experience you should be prepared for weak or no connection at all. In some simple cases, persisting store data will be enough, but this is where we can leverage our brand new (on iOS) Service Workers API - we are able to cache network requests (eg. API calls) there.
To take advantage of caching with service workers, you could use the example code provided by Google. Make sure that you've read the linked article to be aware of the pros and cons of that template.
// source: https://googlechrome.github.io/samples/service-worker/basic/
/*
 Copyright 2016 Google Inc. All Rights Reserved.
 Licensed under the Apache License, Version 2.0 (the "License");
 you may not use this file except in compliance with the License.
 You may obtain a copy of the License at
     http://www.apache.org/licenses/LICENSE-2.0
 Unless required by applicable law or agreed to in writing, software
 distributed under the License is distributed on an "AS IS" BASIS,
 WITHOUT WARRANTIES OR CONDITIONS OF ANY KIND, either express or implied.
 See the License for the specific language governing permissions and
 limitations under the License.
*/

// Names of the two caches used in this version of the service worker.
// Change to v2, etc. when you update any of the local resources, which will
// in turn trigger the install event again.
const PRECACHE = 'precache-v1';
const RUNTIME = 'runtime';

// A list of local resources we always want to be cached.
const PRECACHE_URLS = [
  'index.html',
  './', // Alias for index.html
  'styles.css',
  '../../styles/main.css',
  'demo.js'
];

// The install handler takes care of precaching the resources we always need.
self.addEventListener('install', event => {
  event.waitUntil(
    caches.open(PRECACHE)
      .then(cache => cache.addAll(PRECACHE_URLS))
      .then(self.skipWaiting())
  );
});

// The activate handler takes care of cleaning up old caches.
self.addEventListener('activate', event => {
  const currentCaches = [PRECACHE, RUNTIME];
  event.waitUntil(
    caches.keys().then(cacheNames => {
      return cacheNames.filter(cacheName => !currentCaches.includes(cacheName));
    }).then(cachesToDelete => {
      return Promise.all(cachesToDelete.map(cacheToDelete => {
        return caches.delete(cacheToDelete);
      }));
    }).then(() => self.clients.claim())
  );
});

// The fetch handler serves responses for same-origin resources from a cache.
// If no response is found, it populates the runtime cache with the response
// from the network before returning it to the page.
self.addEventListener('fetch', event => {
  // Skip cross-origin requests, like those for Google Analytics.
  if (event.request.url.startsWith(self.location.origin)) {
    event.respondWith(
      caches.match(event.request).then(cachedResponse => {
        if (cachedResponse) {
          return cachedResponse;
        }

        return caches.open(RUNTIME).then(cache => {
          return fetch(event.request).then(response => {
            // Put a copy of the response in the runtime cache.
            return cache.put(event.request, response.clone()).then(() => {
              return response;
            });
          });
        });
      })
    );
  }
});
After setting the proper paths to the assets which you'd like to cache and registering a service worker, you should be good to go (offline). It's also good to indicate that the app is offline - you can add online/offline events listeners to display a notification.
componentDidMount() {
    window.addEventListener('online', () => this.setOnlineStatus(true));
    window.addEventListener('offline', () => this.setOnlineStatus(false));
  }

  componentWillUnmount() {
    window.removeEventListener('online');
    window.removeEventListener('offline');
  }

  setOnlineStatus = isOnline => this.setState({ online: isOnline })
That's how the final result looks in our example app:

Issues to be solved
These tips will help you provide a near-native UX for your PWA on iOS. But, of course, there are still some issues that could be solved. We still don't have support for:
- Background synchronization,
- Push notifications,
- Some APIs like TouchID, ARKit, In App Payments, or Split View on iPad,
- Orientation lock,
- Status bar color change,
- Proper app screen in the task manager (which would show the current app screen, not the splash image).
Also, you should keep in mind that caches and any locally-stored data are not shared between Safari, WebView, and Web.App. This means that he user will have to, for example, log in again after adding your app to the home screen, which could cause bad UX in some cases.
The Future of iOS PWAs
While iOS PWAs currently face notable limitations, there is optimism for the future as Apple continues to refine its support for Progressive Web Applications. Industry discussions suggest that future iOS updates may expand PWA capabilities, addressing critical gaps such as push notifications, improved storage limits, and better integration with native APIs like TouchID and ARKit.
Developers are also actively voicing their concerns and sharing solutions through platforms like GitHub, where issues such as cache persistence, standalone mode usability, and manifest file inconsistencies are frequently debated. This community-driven feedback is crucial in shaping the trajectory of iOS PWA development, as it encourages Apple to prioritize features that align with real-world use cases.
By staying engaged with these discussions and monitoring updates, developers can prepare to leverage new enhancements as they become available, pushing iOS PWAs closer to their native counterparts in terms of usability and performance.


