Contents
Introduction
Product usability and performance frequently determine whether users will return to your app or website. In fact, according to Toptal, 90% of users stopped using an app due to poor performance, which further proves the importance of effective digital product design.
In the following guide, we’re going to discuss what digital product design is, how the process should be structured, what skills a digital designer should possess, as well as share recommendations of product design software that will make designing digital products easier. Let’s dive right in!
There is a common misconception that design primarily focuses on the visual aspects of a product, which is far from the truth. As Steve Jobs once said:
Design is not just what it looks like and how it feels. Design is how it works”. Therefore, to make sure we’re all on the same page, let’s start off with a definition of product design.
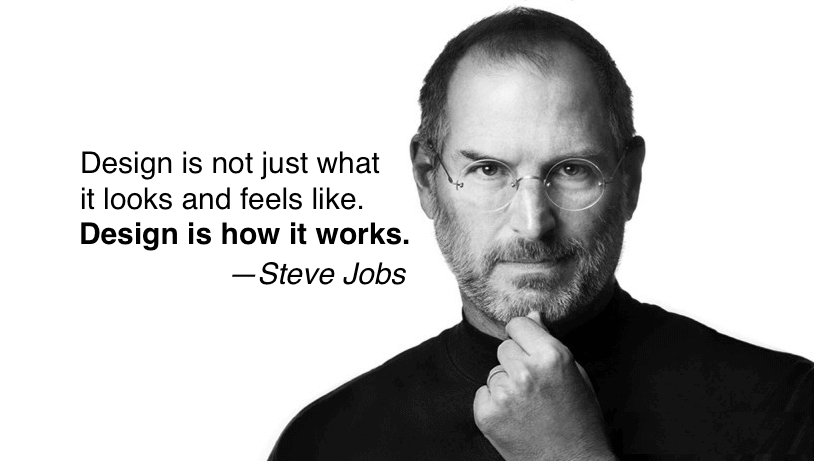
Source: Conferences That Work
What’s Product Design?
It’s the process of imaging, building, and modifying products that respond to specific market needs.
While defining product design, it’s important to note that it requires a deep understanding of the end-users, as effective product design is all about solving real problems for real people.
This calls for a detailed knowledge of their habits, behaviors, needs and wants. There is a common misconception that design is limited to satisfying the end user.
However, in reality, it is about finding the sweet spot between fulfilling user needs, meeting business objectives, identifying market opportunities, and staying in the realm of technological feasibility.
Now that we got the product design definition sorted, it’s worth taking a look at its origins. Product design evolved from industrial design, which – according to the Industrial Designers Society of America – can be understood as:
The professional practice of designing products used by millions of people around the world every day. Industrial designers not only focus on the appearance of a product, but also on how it functions, is manufactured and ultimately the value and experience it provides for users.
Before mass production came into play, products were built manually, which led to scarcity caused by limited processing capacity.
However, with the birth of industrialization, businesses could mass-produce products at a low cost. To improve sales, manufacturers employed industrial designers, who not only made sure that the products were functional, but also visually appealing.
This discipline has evolved into product design, as initially it focused on physical products, such as furniture or cars, while product design can refer to any products – digital included.
Due to the complex nature of product design which is not limited to aesthetics, it requires the involvement of various specialists, including UX, UI, and graphic designers, as well as Project Managers, Business Analysts, Copywriters, and others.
We will return to this topic later in this guide. First, let us take a look at the process of designing digital products.
Digital Product Design Process
Now that we’ve covered the definition of product design, you might be wondering – do all successful projects come to life through following the same product design model?
There isn’t a single, one-size-fits-all template. However, most digital projects follow a similar flow. To give you an overview, below is an example of what the product design process looks like at Netguru:
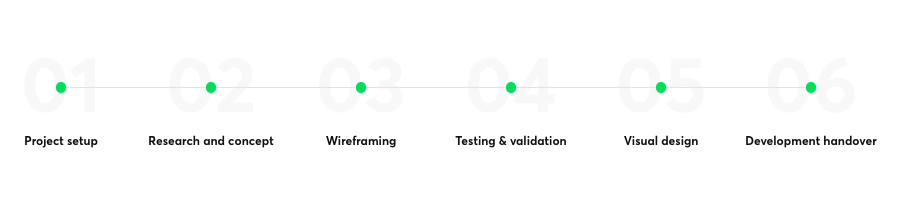
Source: Netguru
Step 1 – Project setup
While it might be surprising, the very first stage of product design takes place well before designers start working on the product.
Before you start designing, you need to gather all the essential information and assets required to set up the project and understand its context and objectives. This entails understanding not just the product’s vision, but also strategy (i.e., not only why you’re making certain decisions, but also how you want to execute them).
This entails talking to various stakeholders, such as the potential target audience, as well as developers and other tech specialists to understand whether there are any technical limitations.
Why can’t you leave these considerations for further stages? Simply put, creating products without a previously established goal and a plan for achieving it can undermine your entire product design project.
Step 2 – Research & Concept
The second step is about conducting product research, which consists of several key areas, such as user research, market analysis, creating stakeholder maps, jobs-to-be-done insights, and more.
Collecting data early on in the product design process will help you make informed decisions. As a result, you will avoid spending time and resources on developing solutions based on false hypotheses.
User research
In order to collect insights from potential users, we recommend that you turn to research methods like in depth interviews (IDIs), online surveys, and observational studies.
Your aim should be to learn about your potential users’ motivations, product usage patterns, and what they expect from a product like yours. This information will help your designers create important assets such as:
- Empathy maps – visualizations of what your target users do, feel, say, and think about products like yours (we discuss them in detail further in this guide).
- Service blueprints – diagrams which illustrate the relationship between components that the service consists of, such as people, props, and processes. All of these are linked to the user journey.
- User journeys – series of steps a user takes while interacting with the product (which we discuss in more detail further in this guide).
User personas, i.e., fictional representations of your target users that display their demographic data as well as information like motivation, goals, or personality traits. Here’s an example user persona:
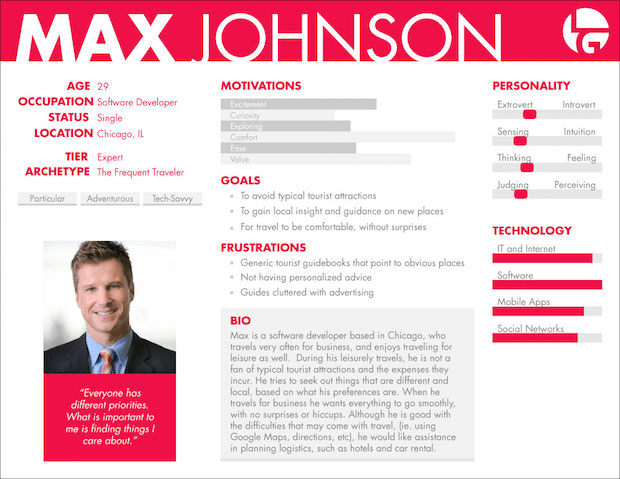
Source: Text Request
Market Analysis
Chances are, when you conduct user research, your interviewees will name a few brands they’ve previously used for a service like yours. This is just one of the reasons why it’s important to understand whom you’re competing with and what the market requires.
You should list down all competitors – both direct and indirect – and compare your planned product with their offering. Here are a few questions you should ask yourself:
- How will my product be different?
- What will be the competitive advantage? Why should users choose my solution over others on the market?
- What do other companies offer that I do NOT want to offer, and why?
Here’s an example of a competitive analysis of travel & commute apps in the London Metropolitan area from Leah Shannon:
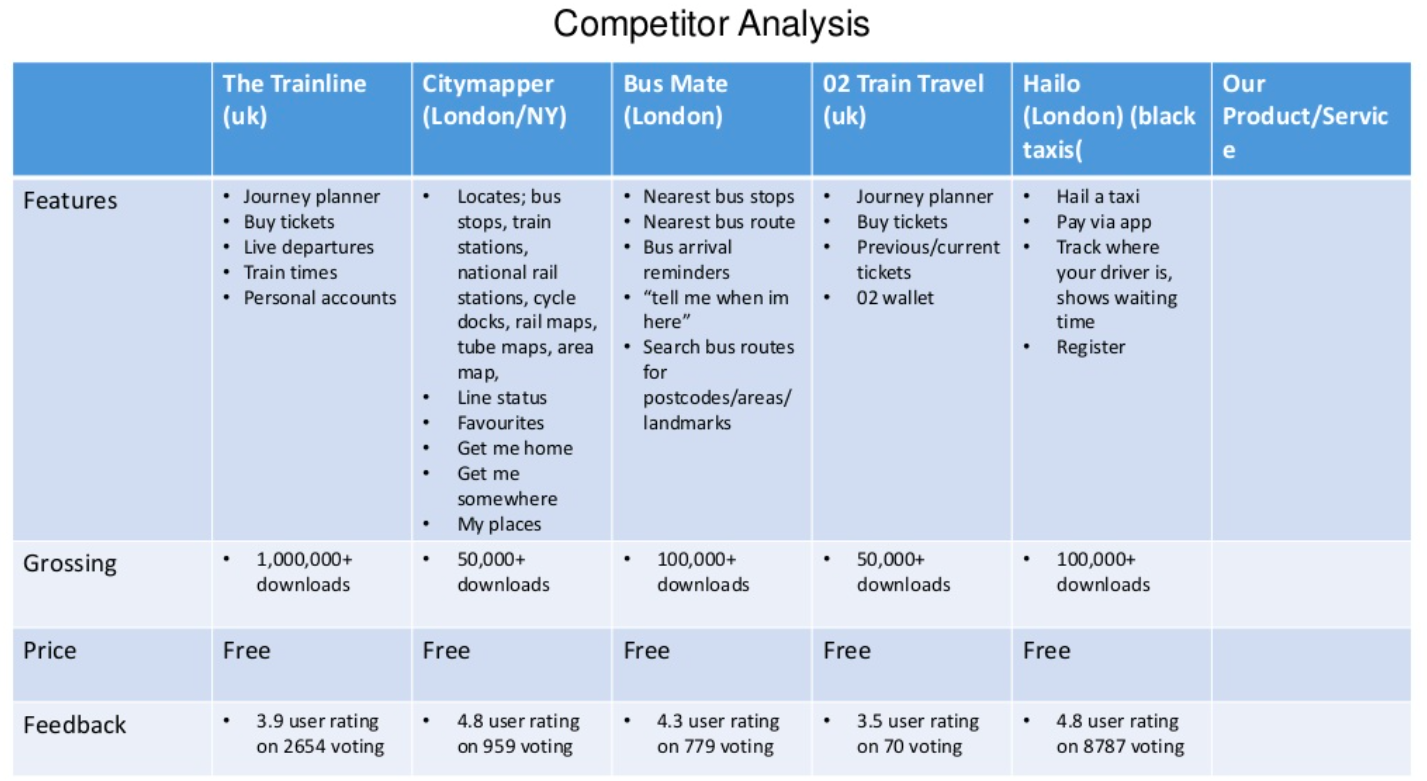
Source: Slideshare
Before proceeding any further, your designers should also make sure that there is a viable business model in place. For this purpose, they should cooperate with the business analysts on the team.
Otherwise, while your designers might know the competitor landscape and target users well, they might fail to design with the product’s business objectives in mind.
Product Ideation
After you’ve conducted research, you can start working on user journey maps, which serve as visual representations of the actions users take to complete a specific task.
A user journey map will, for instance, show all the steps a buyer takes before purchasing an item. It’s important to keep in mind that user journeys start well ahead of the user’s visit to an online store, i.e., as soon as they realize their need for a product or service.
It should mention where, when, and why a person decides to use your product, how they browse through your interface, discover your offer, all the way through to finalizing the payment and post-purchase services.
At this stage, product designers might also write user stories that describe users’ actions, motivations, and context. Most commonly, they follow the template below:
As a [user], I want to [action], so that I can [context].
For instance: As a business owner, I want to see my employees’ schedules in a single view, so that I can choose a suitable time for a team meeting.
Last but not least, at this stage of product design designers can create storyboards – graphical representations that shed light on a fictional user’s life and what role your product plays in it.
Here’s a great example of a storyboard for a communication app:
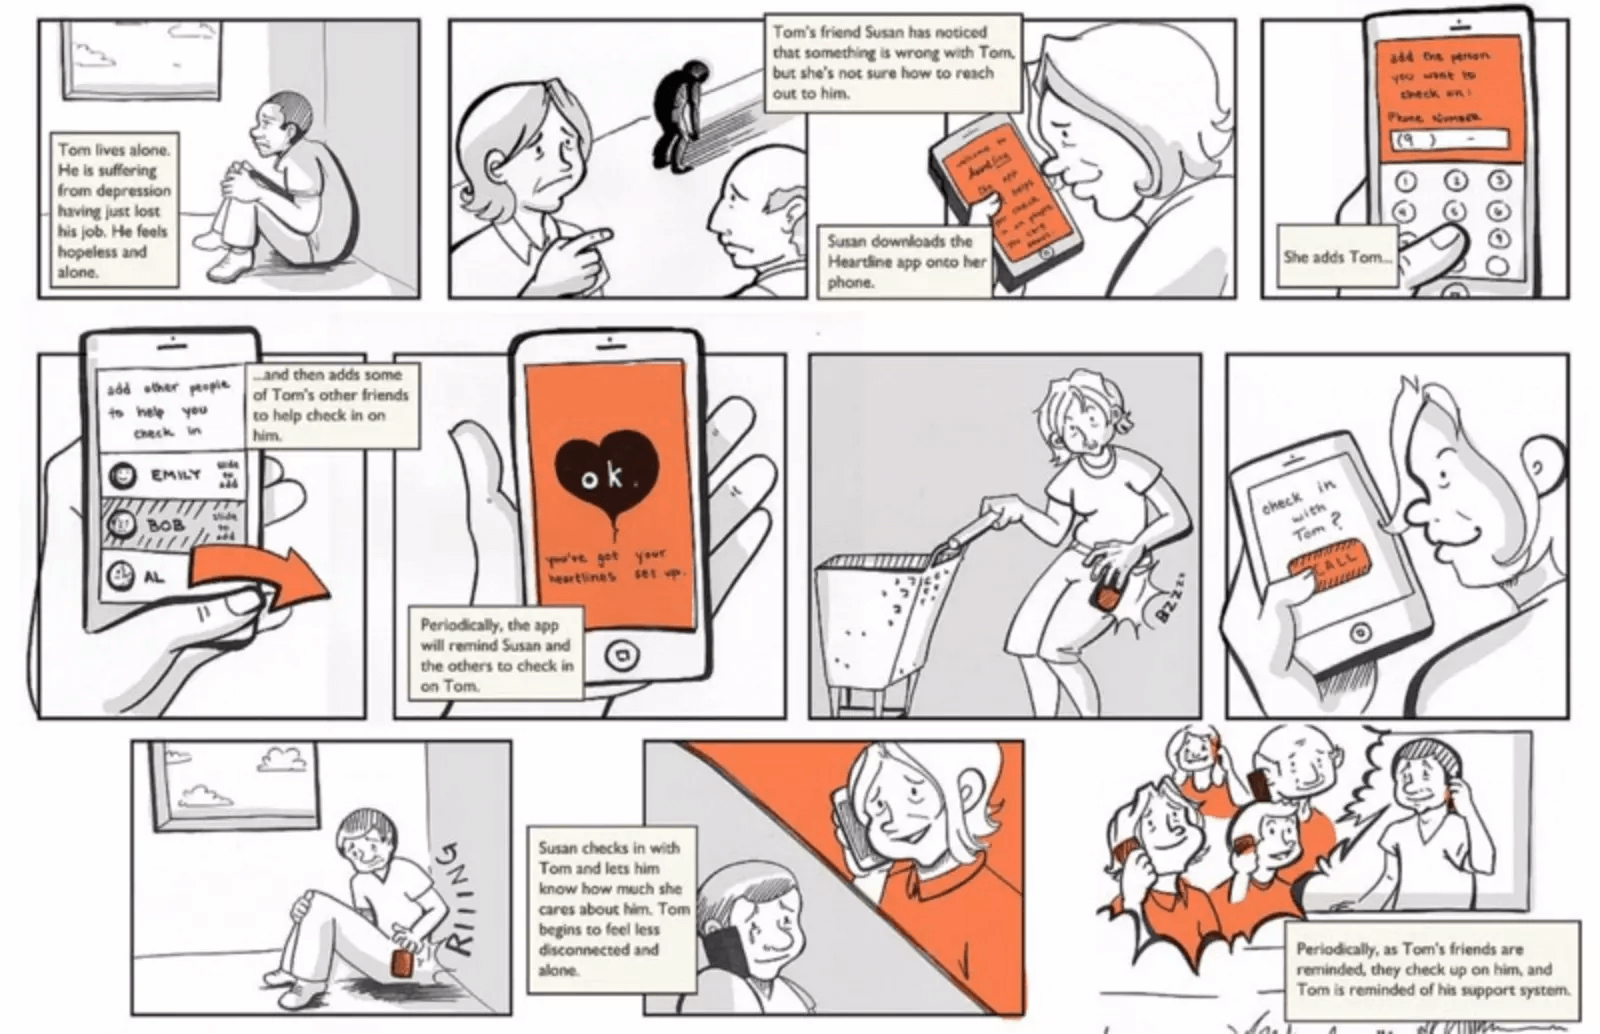
Source: Smashing Magazine
Product Structure – Information Architecture
Before any sketches of the intended product are drafted, designers must also work on its Information Architecture (IA). As explained by Usability.gov, it’s about:
organizing, structuring, and labeling content in an effective and sustainable way.
Among others, designers need to create a sitemap that features a top-level menu and all categories, which should be easy and intuitive to browse through. Below is an example of a sitemap structure from Adobe:
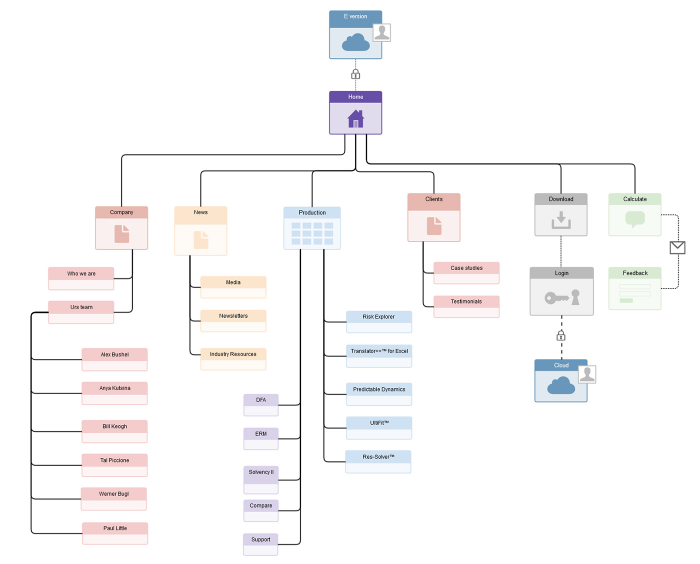
Source: Adobe
In order to establish the particular categories for your product, designers will often conduct card sorting sessions, during which participants are asked to group user tasks or subcategories into thematic batches.
Step 3 – Wireframing
At this stage, the product design team translates their ideas into wireframes, which act as the first visual concepts of the user interface. As explained in our Design Process for Pros ebook:
a wireframe serves as a blueprint that defines a project’s structure, content, and functionality. Wireframes are created before any visual design work starts so that the focus is on the information architecture without the distraction of color or visual elements.
This stage of the product design process, also known as the ideation phase, allows designers to draft as many concepts for the interface as possible so that they can constantly improve the proposed solution.
The wireframes should feature all of the previously drafted product ideas and concepts, such as:
- Navigation (i.e., sitemap concepts),
- Examples of user journeys,
- Fields,
- Content areas (with sample content, if applicable),
- Forms,
- Widgets,
- Calls to action,
- Pop-ups,
- Error handling (for instance, 404 pages or notifications),
- And others.
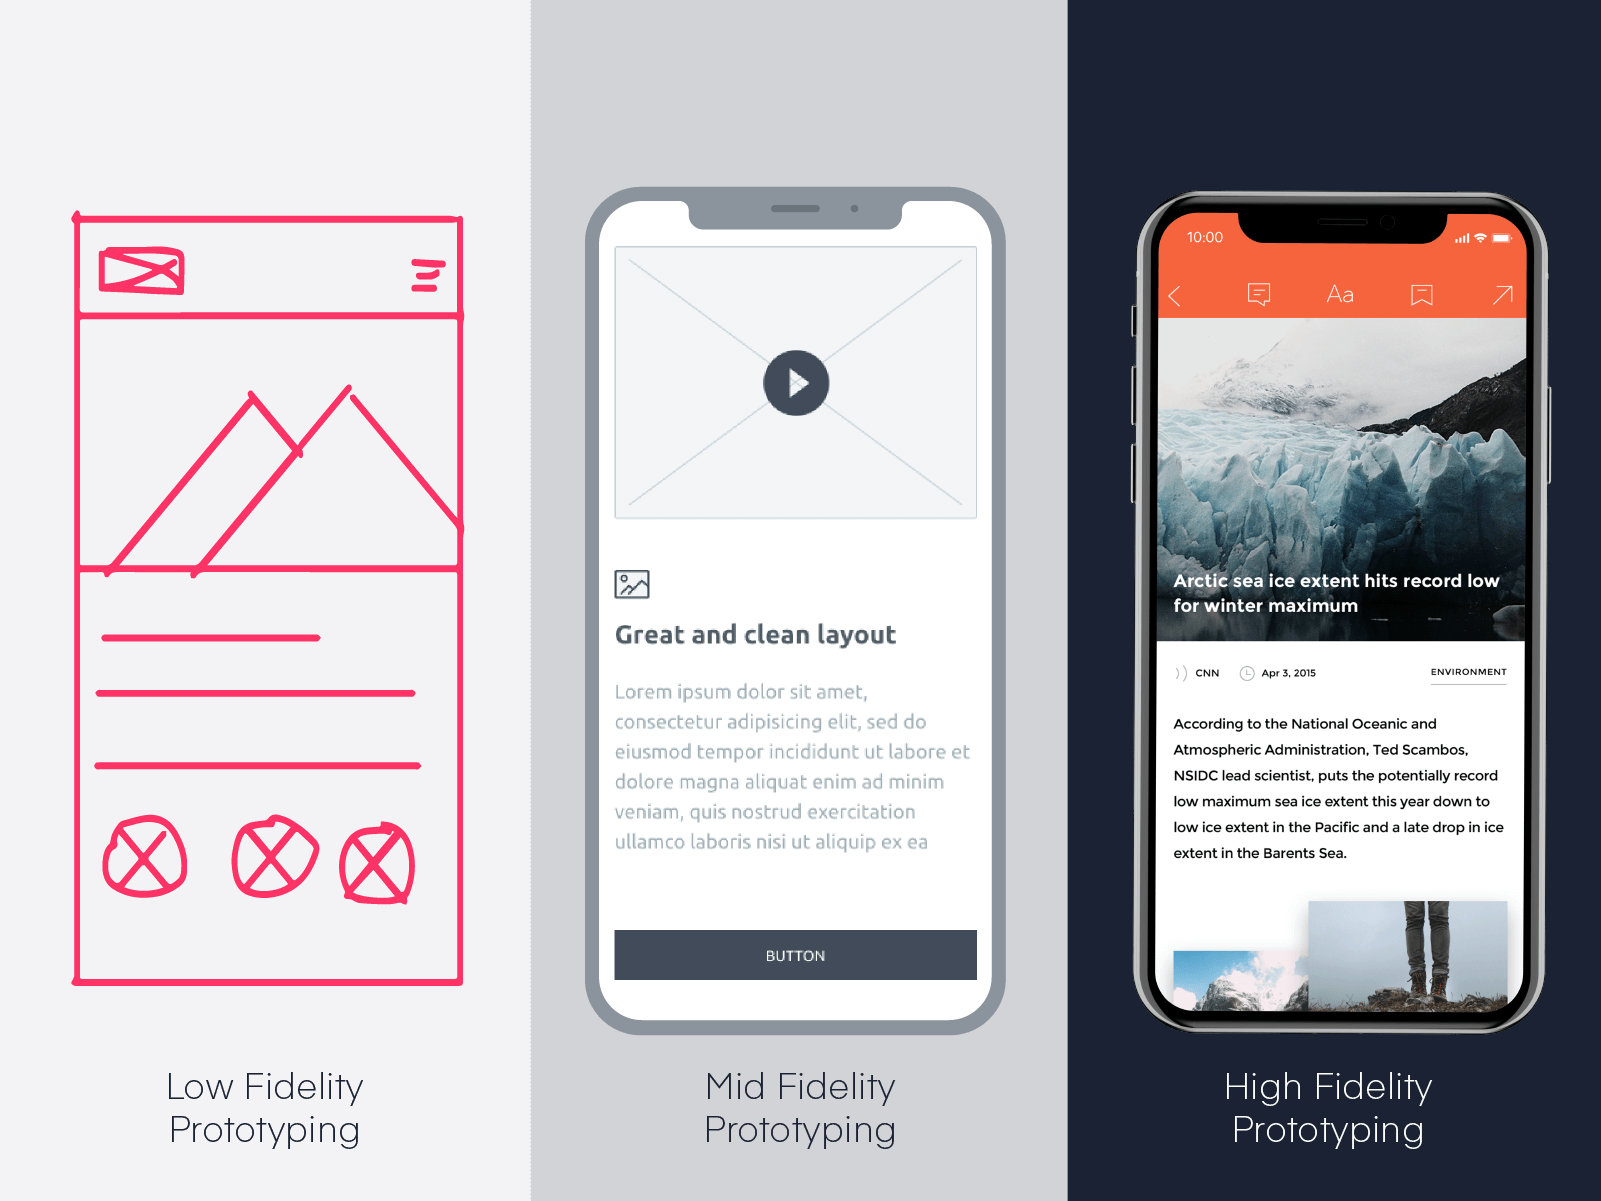
Wireframes (which can be either static or interactive, as well as low-fidelity or high-fidelity) are also used in the next stage to collect feedback beyond the design team.
Step 4 – Testing & validation
In this phase, product designers reach out to test users (for instance, members of other teams) to observe how they interact with the wireframes and to collect feedback.
The tests should be focused on three high-level areas of the design – user experience, user flow, and information architecture. As a result, the product design team will be able to verify their hypotheses and take note of any improvement areas before proceeding to more advanced prototyping.
As explained by Balsamiq:
the validation phase shouldn’t be thought of as the place to get "sign off" or approval to start building right away. If [designs] look too polished and "final" you may not get very helpful feedback. Wireframes should communicate "Here’s what I’m thinking..." when you show them, not "This is what we’re going to build.“
There are several testing methods that can be employed at this step, which include both on-the-spot testing and formalized usability tests. Some examples include:
- Hallway usability testing (also known as guerilla testing), during which a few people are asked, on the spot, to interact with the wireframe and show how they’d perform a given task. They might, for instance, be asked how they’d find a given product on an e-commerce site by browsing through product categories.
- Moderated user testing, in which a small focus group is asked to perform a task and you provide them with information, ask them questions, and explain along the way if necessary.
- Unmoderated user testing. Unlike in the previous testing type, users aren’t guided in any way. The designers observe how they freely explore the wireframe and perform any assigned tasks using the method of their choice. One very popular method is asking testers to engage with a digital wireframe and recording their interactions using session recording software.
Importantly, wireframe testing and validation doesn’t need to be conducted on large user groups – usually, 5 to 7 users will suffice to reveal 80% of the most pressing issues that must be resolved.
However, if you have different kinds of users, for example novices and experts, then this number should be multiplied by the number of user types.
Step 5 – Visual design
After product concepts have been tested and the shape of the product emerges, designers proceed to designing high-fidelity digital prototypes. Unlike wireframes, they include details such as colors, shapes, and interactions, so that they resemble the real-life, operational product.
Nowadays there is a plethora of software for creating high-fidelity mockups which also allow you to export the design specifications, such as fonts, image sizes, and brand colors.
While the Netguru design team uses InVision, there are many other choices to consider. We discuss the various types of product design tools in a section further down in this guide.
Source: InVision
Before the designs are approved for production, like in the wireframing phase, the design team conducts several tests.
Some prototype validation methods include the above-mentioned user tests, guerilla usability testing, as well as A/B tests and design bug bashes (i.e. QA specialists review the designs in search of potential errors/improvement areas).
Once the concept for the product interface is established, designers proceed to the final phase – handing it over to the development team.
Step 6 – Developer handover
In this last stage, product designers cooperate closely with the software development team. They provide the developers with all assets and information needed to translate the designs into working products. That being said, it doesn’t mean that it’s the first time developers lay their eyes on the design.
It is recommended that your designers communicate with developers at much earlier stages in the product design process – for instance, as early as during the wireframing phase – to ensure that the solutions they designed are technically feasible.
While the developer handover stage might seem simple from a layman’s perspective, if insufficiently briefed, the development team can misinterpret the designs. Therefore, it’s essential that they receive precise and easy-to-comprehend documentation.
Design specification
The design documentation should contain detailed information on two areas: the interface and the information structure.
The interface details should specify all the project sizes, shapes, fonts and colors. If, for instance, a developer applies the wrong color hex value or font style, it could undermine the entire branding of a product.
Respectively, the specification should include detailed information on the product’s functionalities, user flows, and behaviors. Conveying these allows developers to understand the context and logic behind specific design decisions and minimizes misinterpretations during the handoff.
Before designers finalize their work in the product design process, they should ensure that the assets:
- Are easy for the developers to navigate,
- Are named consistently, according to the developers’ preferred template,
- Cover all platform-specific sizes (if the product is designed for multiple devices).
At Netguru, we use InVision Inspect as our go-to handover tool. Other tools worth looking into include Zeplin and Sketch Measure.
Now that we’ve covered the steps of the product design process, let us proceed to discussing what a product design sprint is.
What Is a Product Design Sprint
Ideas are born easily, however, translating them into fully functional products that people want to buy is a whole different story. How do you ensure that your future product meets your business goals?
One way is through running a Product Design Sprint, which should be part of every digital product development process.
To put it simply, a Product Design Sprint is a workshop which usually lasts around five days and helps businesses minimize the risks associated with launching new products to market. It also provides answers to complex business questions in a very short timeframe, which contributes to avoiding common mistakes that could have been made otherwise.
The workshop covers ideation, design, prototyping, and testing – overall, it enables companies to condense months of work into a single week, using a fraction of the resources it would normally consume.
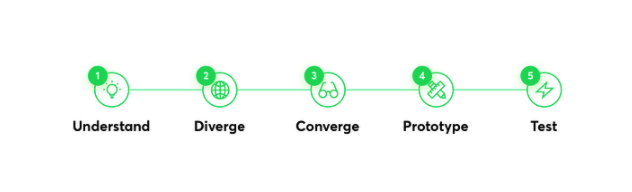
Phases of Product Design Sprint
Before commencing every workshop, it’s crucial to build a team. It’s usually made of 5-8 individuals from different departments; it’s necessary to include the people who’ll own the product. The Product Design Sprint usually involves five stages – each lasts one day. These include:
Phase 1: Understand
The purpose of this phase is to define and understand your problems and business goals. The entire team will be focusing on exploring topics like business opportunities, user base, competition, value proposition, and success metrics.
It’s during this stage that you’ll be able to use the “How might we” methodology, lightning talks, user journey mapping, and user interviews.
Phase 2: Diverge
Day two is all about coming up with as many ideas and “outside of the box” solutions as possible to tackle the problem.
The workshop participants will work together as a team as well as individually during the brainstorming sessions. These discussions are important to creating a sprint roadmap based on which the entire workshop will run.
Phase 3: Converge
It’s time to select the best ideas from those created during the two previous stages. Each idea will be reviewed and objectively criticized to select the ones which will be pushed into prototyping.
Phase 4: Prototype
The best method for testing whether your product really solves the problem it was designed to solve is through prototyping. The purpose of this stage is to turn your idea into a prototype to enable user testing.
Phase 5: Test
This is your moment of truth – you’ve got the chance to test your product with your stakeholders, including users, technical experts, and other individuals who have a say in the success of your project.
Gathering feedback will help you validate your idea and check whether it’s worth pushing it into development, identify any features which are missing, or remove any roadblocks which could have a negative impact on usability. All in all, thanks to product testing you’ll be able to cut your development costs.
Source: Netguru
The Benefits of Running a Product Design Sprint
There are many benefits associated with running a Product Design Sprint (PDS). Some of them include:
1. Providing a simple solution to a complex business challenge
A PDS creates a great environment for an open discussion and collaboration, which would be hard to achieve in a different setting. All stakeholders are in one place, which enables them to talk about the biggest challenges, potential problems, and ways of tackling them.
The main aim of conducting a PDS is to identify all pain points and translate them into valuable solutions, which is done within a really short time.
2. Reduced risk
Within two days you get a prototype or an MVP of your solution that you can use for product testing with users. The feedback you gather, both positive and negative, will help you decide if your solution is worth pushing into development. It will save you from spending lots of time and money on something which there is no market need for or enable you to iterate for market success.
3. Speed
Business success comes down to many factors – including speed. PDS revolves around agility, which lets companies come up with many great ideas/solutions quickly, as different individuals from various backgrounds come together to brainstorm.
4. Effective collaboration
It’s often hard to gather all important stakeholders in one place. A PDS offers a setting where individuals with various skills and backgrounds can work together on a single project. They can freely exchange ideas and opinions as each voice is equally important. Because a multidisciplinary team takes part in a PDS, it leads to a lot of creativity – the workshop itself is short, so there is no room for unnecessary discussions, making the collaboration more effective.
5. Testing ideas with real users
User testing, a concept that businesses often underestimate, is the primary pillar of a Product Design Sprint. This unfortunately leads to product failures, as they don’t address the needs of real users.
PDSs focus on creating products with users in mind. They encourage empathy and demand a clear understanding of your target audience’s needs, behaviors, and problems. All for the purpose of building digital products that will perfectly correspond to your customers’ needs.

Source: Unsplash
6. Improved decision making
During a PDS, you have five days to come up with a solution to a problem and you need to collaborate with people from across departments who – most probably – will have a different perspective to yours.
There is no time for long arguments, decisions must be made quickly. As a result of a PDS you improve your decision-making process. You learn how to prioritize and how to take other people’s opinions into account .
Design Systems
Apart from following the product design process and running a product design sprint, is there anything else you can do to increase the chances of your project’s success? The answer is yes – you must also create the right design system for your company.
According to Forrester, as many as 68% of companies were already using them in 2018, with forecasts projecting a steep growth over the next several years.
What makes it instrumental to business success?
Let’s first shed some light on what it is and provide you with a couple of examples.
What is a design system?
In the most simple terms, a design system comprises the visual and non-visual elements of a project, as well as a list of processes in which they can be altered. It’s built of two key areas – the project library and documentation.
Design systems define the brand’s principal concepts – the user experience guidelines, visual asset requirements (such as the interface grid, typography, or logo). It also features code snippets which allow developers to easily understand and reapply the same rules to other existing projects, whenever need be.
All of the above mentioned assets are designed separately, but are then brought together into a cohesive system that serves as the brand’s “single source of truth”.
Additionally, a comprehensive design system also specifies technicalities, such as how files should be named and structured throughout the company.
In the end, the goal of the design system is to make your designers’ and developers’ work easier – to allow them to speed up their tasks and minimize the effort needed to manage or find information.
Why does your company need a design system?
You might be wondering – if I already have a style guide, do I still need a design system?
The main difference between style guides and design systems is that the latter support an Agile workflow – they are scalable and dynamic and can be constantly iterated on. Moreover, a style guide is more like a one-off effort (i.e., you create a set of rules and pass it on to the team for reference) and only a part of your design system.
Throughout the cooperation of the design and development teams, your design system can be changed as many times as necessary. To put this into relatable terms, take a look at the two graphs below:
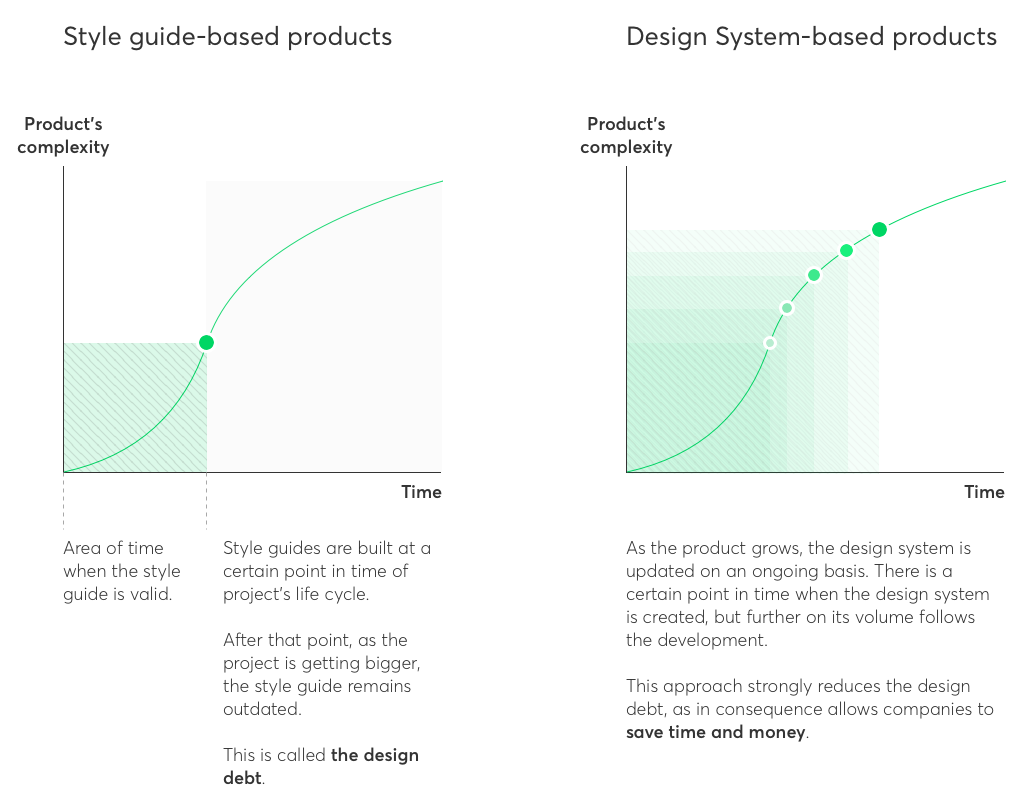
Source: Netguru
As you can see, style guide-based products follow the olden ways – i.e., the Waterfall methodology. By choosing to create a design system, you can save a lot of your time, effort, and resources.
That being said, let’s now return to the above-mentioned report by Forrester. According to the research company, there are three top reasons why companies should switch to design systems. These are:
- They democratize design: By creating a system, the design team can ensure that all of the UX and UI components can be understood by employees who aren’t equally proficient in design. This includes software developers and product owners, who might need to refer to these assets on a daily basis.
- They boost talent retention: Designers don’t have to continuously solve the same design-related dilemmas or problems. If a similar issue was solved in the past, such information will be found in a comprehensive design system. As a result, designers will be able to focus their efforts on new challenges instead of ‘reinventing the wheel’, which will boost team morale and lower the employee attrition rate.
- They improve design accessibility: In a report from 2018, Forrester signaled that trillions of dollars in potential revenue awaits companies that will bring accessibility to design experiences. One way of doing so is by including accessibility guidelines as part of your design system.
Types of design systems
While there isn’t a one-size-fits-all template for design systems, the type of system you decide to build should depend on:
- Your team’s size (i.e., how many people/teams will be using it),
- The number of products your company offers,
- The number of technologies you use,
- Whether you want all of your products’ branding and structure to be cohesive.
Let’s take a look at two examples from world-renowned brands, Atlassian and Mailchimp.
Atlassian
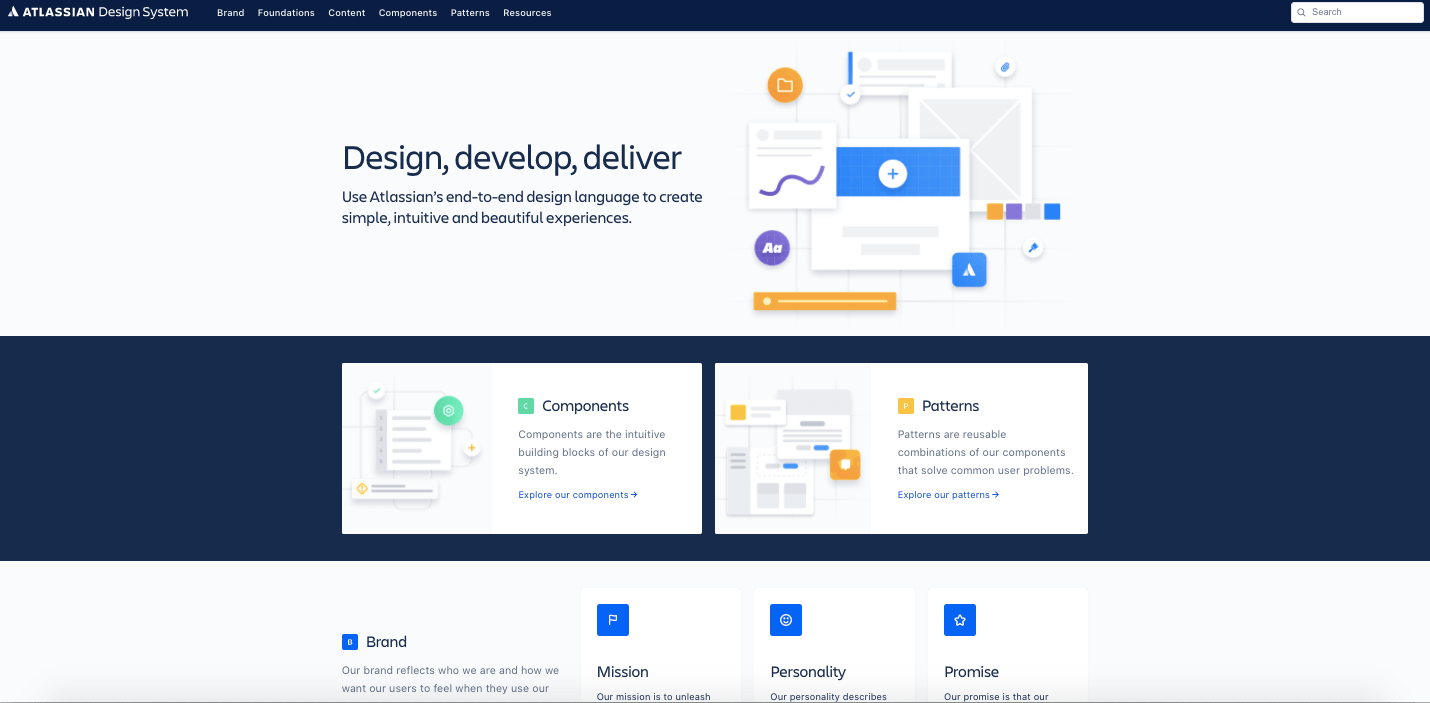
Atlassian (best known for its project tracking platform, JIRA) is a great example of a company with a truly comprehensive design system. Available publicly on their website, it specifies the guidelines for the following areas:
- Components (hundreds of reusable blocks, such as buttons, tabs, tooltips, and text fields),
- Patterns (combinations of components that solve common user issues – for example forms, media pickers, and messages),
- Brand (mission, personality, and the brand’s promises),
- Foundations (color, iconography, and typography),
- Content (glossary, writing style, and language & grammar).
It also features a list of resources, such as Atlassian’s Figma library, templates, illustrations, logos, and fonts.
Mailchimp
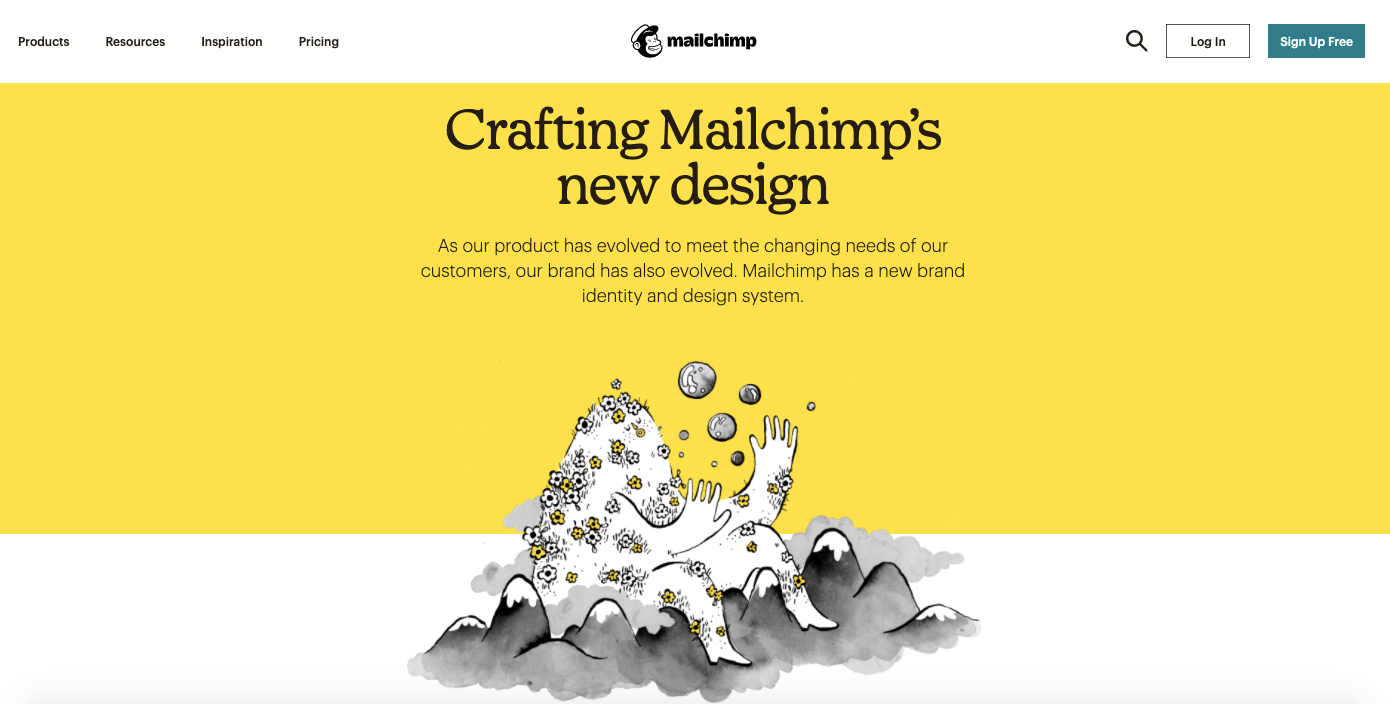
Source: Mailchimp
Mailchimp’s brand has evolved immensely over the years, with the company continuously expanding its services beyond email marketing. Its design system aims to facilitate the work of in-house designers and developers across all their online products.
Firstly, it features core components, such as the brand’s distinct illustration style and instantly-recognizable logo, color palette, and typography.
Secondly, it specifies a consistent workflow and code logic as well as promotes code reusability. As explained on their explained on their website, the design system:
is made up of persistent and expressive elements, which make room for creativity while maintaining visual harmony.
If you’d like to learn more about the process of creating a design system, you can take a look at how we help develop them for our clients at Netguru.
The Role of Design Thinking in Digital Product Design
While the term “design thinking” might indicate that it’s a domain reserved for designers, all great innovators in literature, art, music, science, and engineering have practiced it.
The world’s most successful companies like Apple, Google, and Samsung follow this approach, which proves it’s a concept worth being aware of. But what exactly is design thinking??
What does the term mean?
Design thinking is a systematic approach to innovation. It’s a process which focuses on clear user understanding, challenging current assumptions, and redefining problems. All to find alternative strategies and solutions to problems that are hard to tackle due to a lack of sufficient knowledge about the target group.
No wonder that this approach is used by the greatest companies in the world. Because it revolves around users, it lets them create products and services that perfectly correspond to their needs.
Design thinking encourages questioning of assumptions and implications, which results in creating ideas and solutions we haven’t previously thought of.
Stages of the design thinking process
The design thinking process is made of five stages: empathize, define the problem, ideate, prototype, and test. It’s important to keep in mind that this process isn’t linear: different stages can take place simultaneously and each one can be repeated more than once. On that note, let’s take a detailed look at each phase.
Stage 1: Empathize
The first and the most important step is empathizing with your user base; after all, it’s them you’re designing the product for. Without developing empathy, you won’t be able to put yourself in their shoes and fully understand their pain points and goals. There are a variety of tools which you can use to empathize with your target audience. These include surveys, usability testing, and interviews.
This stage is all about gathering as much information about your users as possible, so you can apply it in the next stage. Learning about your target audience will help you verify your assumptions and approach the problem with a fresh perspective. To better visualize their pain points and needs, it’s worth using empathy maps.
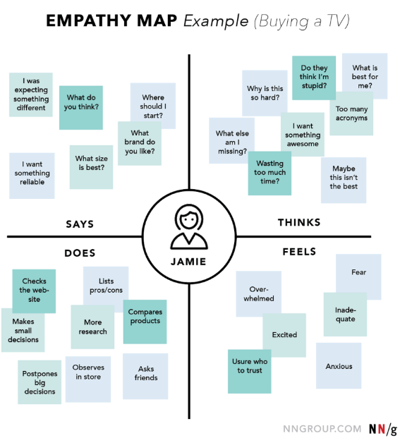
Source: NNGroup
Stage 2: Define the problem
Hopefully, you’ve managed to collect a lot of useful information during the “Empathize” stage. Now is the time to analyze it to identify the main problems. Try to define them in a human-centered way instead of using a product-centered approach to be fully in line with the teachings of design thinking. To better understand the difference between the two approaches, let’s take a look at an example.
You could communicate the same goal, i.e., increasing conversion rates in two ways:
- We have to boost our site traffic by 25% to improve conversion rates.
- Visitors should be able to quickly find all the necessary information on the website.
While the first statement is more product-centric, the second one focuses on the users.
During this stage UX and UI designers should be able to:
- Ask questions to come up with ideas and solutions,
- Approach the problem with a fresh perspective,
- Define the problems in a human-centered way.
Stage 3: Ideate
Now that you know what problem you want to tackle, you can proceed to developing the right solutions. This stage is all about creativity and brainstorming ideas – you have to come up with design concepts that solve users’ problems. Try to be unconventional - it’s the best way to arrive at innovative solutions.
For this purpose, build a multidisciplinary team. Invite product designers, developers, and other business stakeholders so they can exchange ideas and present their perspectives. The main aim of this stage is to create as many innovative and relevant solutions as possible.
Stage 4: Prototype
Select the best ideas and turn them into prototypes. They’ll enable you to effectively test the product with your users. By bringing your ideas to life through prototyping, you can easily decide which solution you should push into further development. At the end of this stage, your product designers should know which solutions should be accepted, disposed of, or improved further.
Stage 5: Test
Use your prototype to test the product's usability among your target audience. Check whether it solves the problems you came up with in the “Define the Problem” stage.
Don’t treat it as the final stage, as the usability issues you identify during testing will lead to further product iterations. These might take you back to the drawing board if they’re serious enough. However, if the problems are minor and you’re able to fully define them, you can move to the “Ideate” stage instead.

Source: Interaction Design Foundation
The role of design thinking in digital product development
You might be thinking: What role does design thinking play in digital product development? It can benefit product designers and product managers in numerous ways, like:
1. Boosting creativity through research
The design thinking process starts with research. By gaining valuable information about your users, i.e., what their needs, pain points, and goals are, you can come up with personalized solutions to tackling their problems in the fastest and easiest way.
2. Organizing work and defining actions
Now that you have a detailed understanding of what solution you need to design, you can better plan your development. Identify all specific actions and assign them to the right team members of the dev team to speed up the development process.
3. Creating prototypes
As mentioned earlier, creating prototypes is a great tool for product testing with your target audience. You can get feedback on what works and which areas require further improvement. Also, you can get a genuine feel of how the product is perceived and if it solves the problem it was designed to solve.
4. Building user personas
Thanks to all the information you collect during research, you can start building your user personas – fictional characters that represent your real users. This will benefit the entire company. While your product designers will be able to design products that revolve around user needs, your marketing team will know how to communicate to appeal to your target audience.
Product Design vs. UX Design
With the various roles involved in the design process, wrapping your head around the differences between product design and UX design can be quite confusing. Where exactly do they overlap and how are they different?
Let’s start off by taking a look at the similarities between the work of a product designer vs a UX designer. For starters, both UX and product design follow the same design thinking process which we discussed in the previous section.
Both require designers to advocate for the absolute best user experience in the product they’re working on as well as for them to have an analytical mindset. They also use the same types of tools and often perform similar tasks – for instance, both product designers and UX designers can be working on wireframes, user maps, or business strategy and goals.
So, where do the differences lie?
While both of these roles require designers to account for the business goals of the project, product design is primarily about focusing on commercial objectives.
A product designer will therefore not only care if a product is easy to use, but also focus on optimizing project costs, reaching company KPIs, and safekeeping the project’s branding. Respectively, UX designers will primarily focus on usability; this means they will take business objectives and design user flows and journeys that support achieving them.
Aaron Travis, UX Director at WEvote.US, has an interesting take on the matter. He describes that, in most cases:
the difference isn’t WHAT they do, but rather WHEN they do it. UX Designers spend most of their time developing products prior to launch, whereas Product Designers spend most of their time updating products that have already been launched.
That being said, let’s zoom in on the Digital Product Designer role.
What is a Digital Product Designer?
As the name clearly indicates, a “Digital Product Designer” is a Product Designer who’s focused on developing digital experiences, as opposed to the term “Industrial Designer”, which refers to those who work on physical products.
As explained by CareerFoundry, a digital product designer’s role:
is largely quite flexible, and can be likened to that of a full-stack designer; a multidisciplinary ‘jack of all trades’ designer who does UX, UI, coding, project management and (perhaps most importantly) problem-solving.
At some companies, they will also be responsible for recruiting other team members, such as UX and UI designers, so that they can work together towards the product design and business objectives.
The specific responsibilities of a Digital Product Designer will vary from project to project; however, in most cases, they will include any of the following:
- Market analysis (including competitive analysis),
- Identifying new revenue opportunities and monetization methods,
- Quality Assurance and usability tests, interviews with users,
- User Experience Design – creating prototypes, user journey maps, user stories, etc.,
- Interface Design – working on the font style, colors, layout,
- Branding – working both on the brand identity and visuals that convey it.
To summarize, a Digital Product Designer is responsible not only for the functional and visual layers of the product. They drive all their decisions through the prism of how the product can be monetized and constantly improved to boost revenue.
Let’s continue by listing the skills you should expect from a successful Product Designer.
What Skills Does a Product Designer Need?
As mentioned earlier, some might think that a Digital Product Designer is another fancy name for a UX Designer, which is erroneous. Being a Digital Product Designer requires a different skillset – a broader one. As stated by InVision:
the best way for product designer candidates to set themselves apart is by having a diverse skill set.

Source: InVision
We’ll now take a look at the skills required to become a Digital Product Designer.
1. Business acumen
Design isn’t purely about aesthetics; it’s not art, it must be sold. Creating products that people want to buy requires a lot of research including target users, competitor research, as well as market and project feasibility.
To come up with ideas that there is a need for, Product Designers must understand the market – it’s useful to know how to use such tools like SWOT analysis or PESTEL.
2. UX Design
Usability, accessibility, information architecture, and good wireframing all constitute the foundation of any project, which is why Product Designers should be able to comfortably navigate around these areas.
They must also be able to define personas, user journeys, understand pain points, and find opportunities.
3. Collaboration
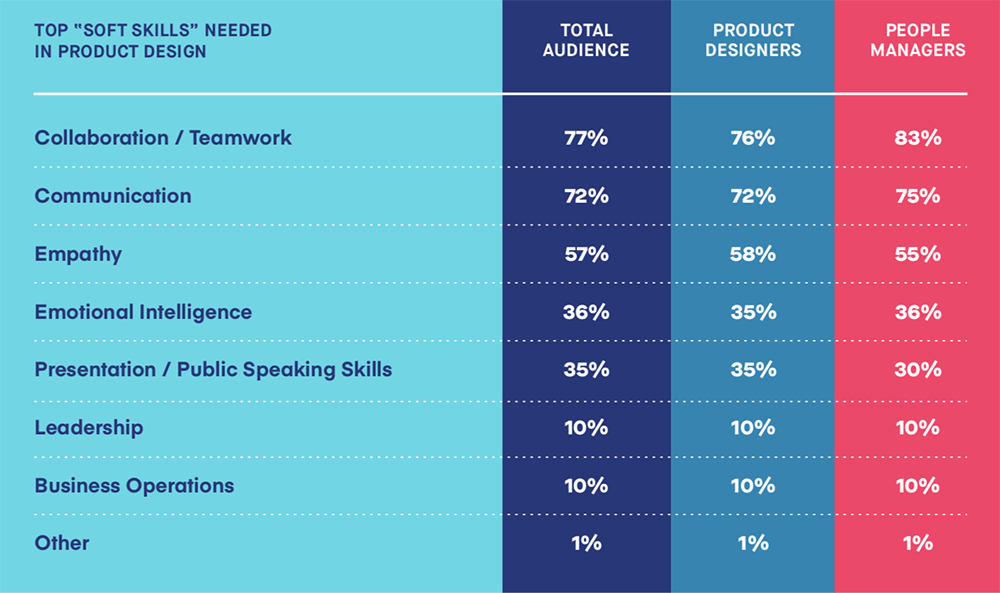
According to research by InVision, 98% of hiring managers mentioned collaboration as one of the top soft skills that a Product Designer should possess. If they want to solve problems, they have to work effectively across teams.
Collaborative success is part of what defines design-mature organizations, leaders in design-mature companies being 3x more likely than those at less mature organizations to collaborate with engineers and product managers. These same design leaders are four times more likely to collaboratively own and develop products and features—making them four times as likely to have a massive, measurable impact on the products they’re designing.
Source: InVision
4. UI Design
More visually appealing products are viewed as more usable – it’s called the aesthetic-usability effect. People believe that products which look better will also perform better – even though it’s not necessarily true. This is the reason why UI Design is among the skills that Product Designers should have, at least at a basic level.
5. Marketing
Marketing often decides upon a product's success or failure. If it’s hard to market, it might indicate that there is something fundamentally wrong with the product or the execution. Product Designers must possess marketing skills to be able to communicate the value their product brings to the target audience.
6. Coding
While designers don’t have to be coding experts, having a basic understanding of how to write code will come handy. It helps with comprehending if a project is feasible or not, as well as holding fruitful discussions with developers and giving them useful feedback.
7. Storytelling
We often buy products from particular brands because we can relate to their stories, not because we fall in love with their products.
Therefore, product designers should be good storytellers to effectively communicate how using their product will help customers solve their problems. Good storytelling evokes positive emotions, which has a great effect on the user experience.
While it might seem like there are a lot of skills required to become a Product Designer, luckily there are also multiple tools which make their job a little easier – we’ll take a look at them now.
Most Popular Product Design Tools
Since product design covers a lot of areas, we’ve split our list of product design software into seven categories, starting with research all the way to design handoff.
1. Research
Google Analytics
The G-Suite analytics tool allows product designers to access a whole range of data on users’ on-site or product activity. Among others, they can:
-
See which pages get the most hits and which note the highest bounce rates,
-
Which processes users abandon and at which point,
-
Where do visitors come from (channels, referrals),
-
Set conversion-related goals to measure the effectiveness of current processes and user paths,
-
Calculate how long users spend on the website per session,
-
And many others.
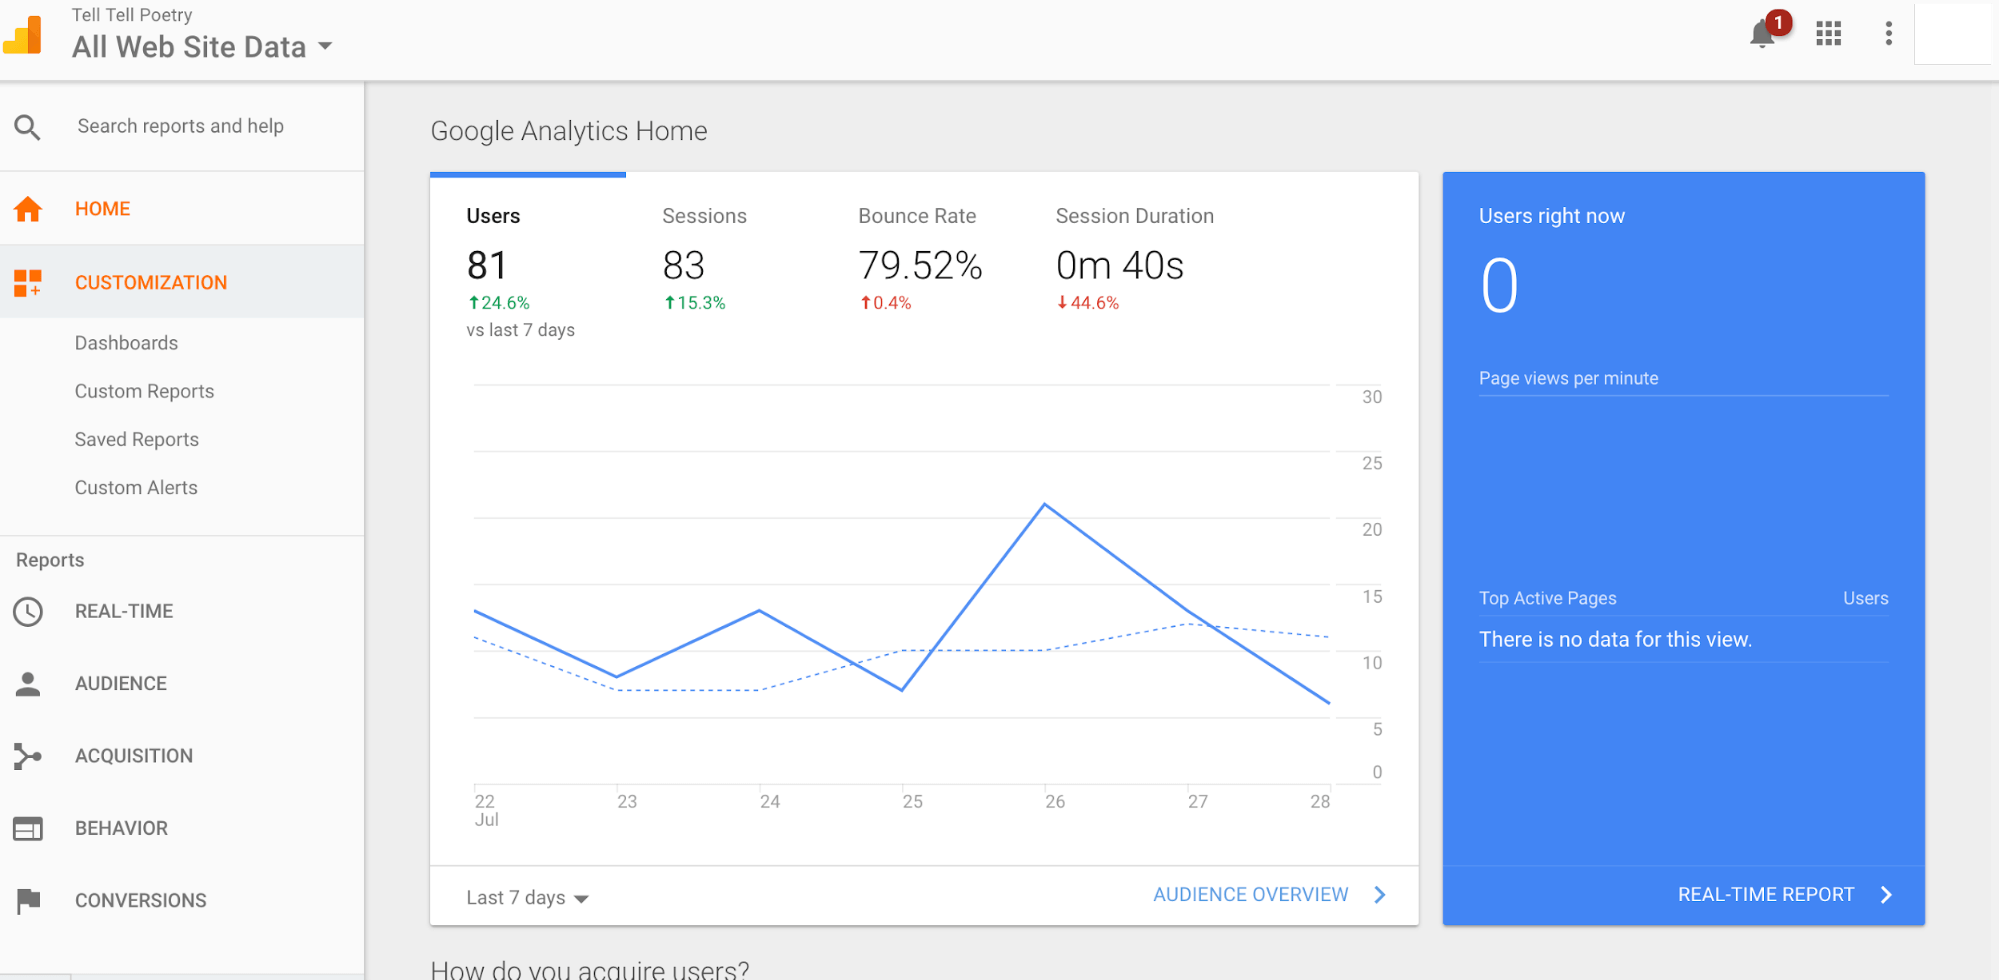
Source: Segment
Google Analytics integrates with other parts of the G-Suite, for instance Google Studio, which allows you to automatically visualize user data and create presentations. It also lets you generate PDF reports that can then be shared with stakeholders and other team members.
Hotjar
Hotjar is a behavior and user feedback platform. Thanks to the use of heatmaps, session recording, and surveys it gives you insights on how your visitors interact with your website. It constitutes a great add-on to Google Analytics.
Hotjar allows you to view data filtered by user device, i.e., desktop, tablet, and mobile, which comes in handy while optimizing user experience for different devices. With the use of heatmaps, product designers can identify areas which attract a lot of attention, as well as those that are problematic and might require improvement.
Session recordings are a great way to get a more detailed overview of how users move around your page – every scroll and click is recorded. You can watch how visitors interact with your website, making it a perfect solution for spotting bugs, like a non-working CTA button which prevents conversion.
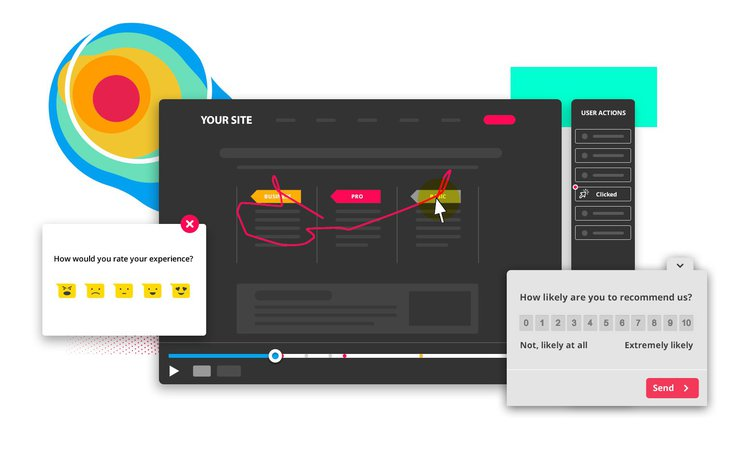
Source: Hotjar
If you’re seeking feedback on your website or a specific feature, you can use surveys, which you can send to your prospects via a pop-up or to your existing user base via email.
2. Information architecture and user flows
Miro
Miro is a team collaboration software used by over 8 million users worldwide. It allows teams to work on projects, run brainstorming sessions, do UX and product design, create Agile boards, and even hold retrospectives.
With Miro, you can make notes, easily move things around, and communicate with your teammates via embedded video calls or online chats.
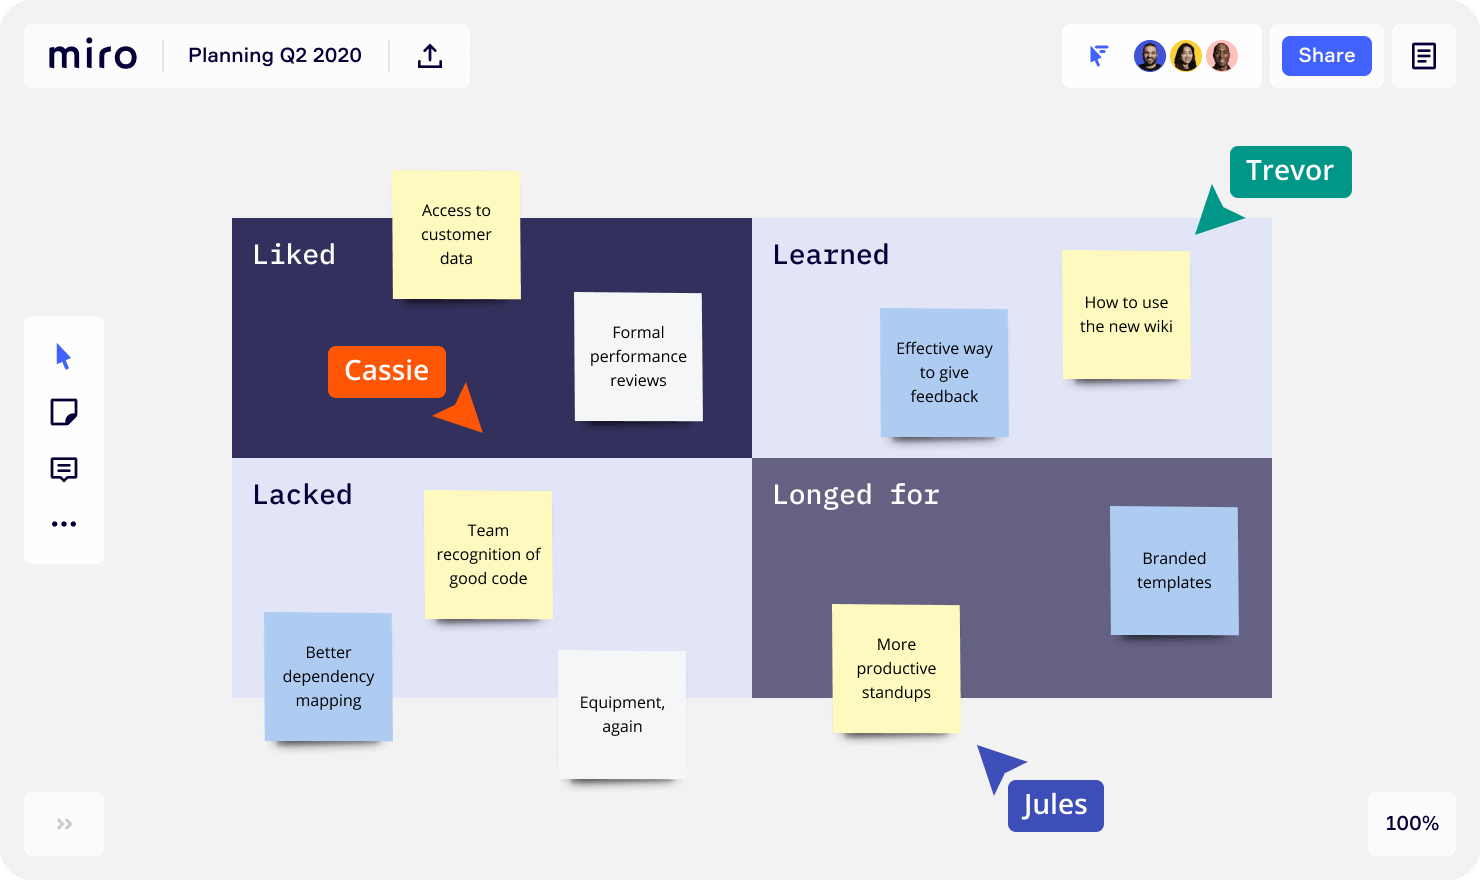
Source: Miro
To speed up work, the software offers a series of pre-built templates which you can treat as a source of inspiration. Designers use Miro to:
- List ideas or topics they should focus on during project work,
- Develop user stories or customer journey maps,
- Wireframe new product concepts,
- Design roadmaps or strategies for workshops etc.
XMind
XMind is a popular mind mapping and brainstorming tool that allows teams to collaborate on design concepts remotely. It allows designers to visualize and work on complex ideas, such as website categories or user journey maps.
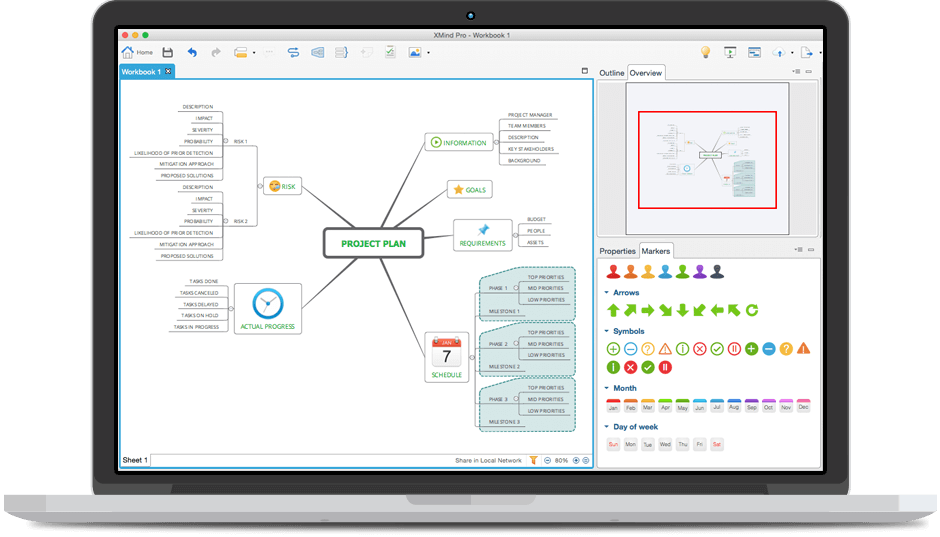
Source: G2
The software offers a variety of chart templates, including Matrix, Fishbone, Timeline, and Brace Maps, which can be exported in JPG or PDF formats. Apart from allowing teams to work on various product ideas, XMind also lets them keep track of their project milestones and schedules.
The tool is lauded by users for its simplicity, making it a good choice for teams that don’t have extensive experience using similar solutions.
3. Wireframing
Balsamiq
Balsamiq is a low-fidelity wireframing tool. It’s useful for translating your ideas into sketches, which constitute a great ground for discussion, before any code is written.
While Balsamiq is good for testing and presenting your work, it’s not designed to behave like a final product. It’s main aim is to demonstrate work in progress, concepts, or early stage wireframes. Many designers treat Balsamiq as a starting point and switch to a different tool after the final design is approved.
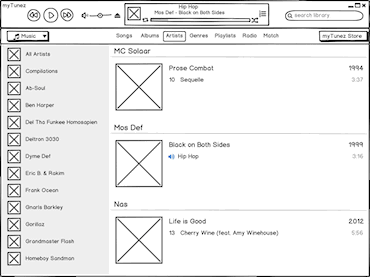
Source: Balsamiq
The software offers the following features:
- Low-fidelity sketch wireframes,
- Click-through prototypes,
- UI components and icons,
- Export to PNG and PDF,
- Importing files,
- Drag and drop for simplicity,
- And the option to work offline.
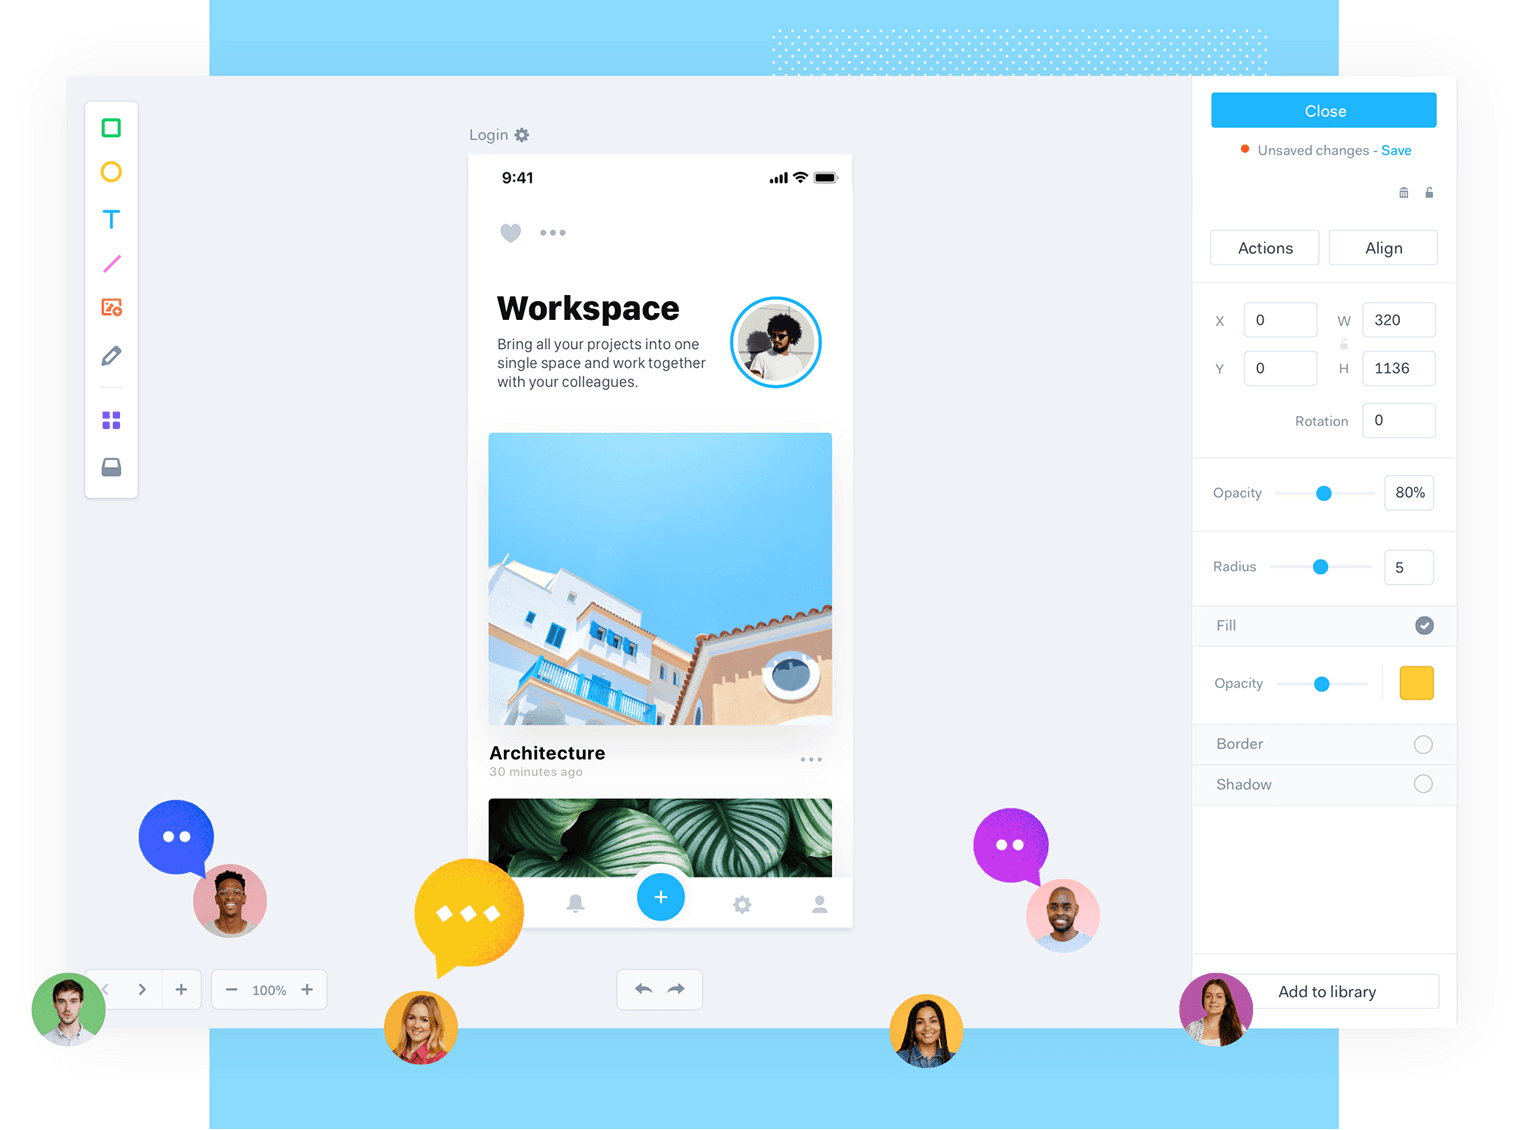
InVision Freehand
InVision Freehand is a free online whiteboard tool that allows designers to collaborate on wireframes in real time.
It functions as an infinite canvas where the product design team can plan product concepts, co-author wireframes, and provide each other with feedback.
The tool is extremely intuitive and user-friendly, with customizable templates and simple commands for drawing, sketching, adding comments, and writing. For this reason, Freehand is often used not just by designers, but also stakeholders and other teams at the company.
.jpg?quality=high&width=500&name=Screenshot%202020-11-17%20at%2012.15.01%20(1).jpg)
Source: InVision
InVision Freehand integrates with a range of other tools, including Slack, Photoshop, and Sketch.
4. Prototyping/Animation
Marvel
Marvel is a collaborative design platform used by the most innovative businesses worldwide, from Fortune 100 companies to startups. Its core functionalities revolve around:
-
Interface prototyping – you can upload your design mockups from Photoshop or Sketch and Marvel will turn it into an interactive app or web prototype. You can also manually add interactions, features and hotspots.
-
Automated user testing – on both mobile and desktop. It offers built-in interaction templates; the software supports Windows, Mac OS, and Linux as well as iPhone, Apple Watch, Apple TV, and Android smartphones.
-
Automated integration with Cloud services and management – Marvel integrates with Google Drive, Box, and Asana, which foster effective collaboration. It also allows for easy link exchange, comment sharing, and invitations.
Source: Marvel
Marvel is considered one of the fastest prototyping tools available. Based on an experiment run by Prototypr, it takes only a minute to create a prototype. In comparison, InVision requires twice the time.
Principle
Principle is a macOS software that allows you to design high-fidelity, interactive prototypes for mobile and desktop. You can build high-quality designs for projects of all shapes and sizes – from simple animations or a three-step user journey, to complex, multi-screen processes, or even entire apps.
You can upload your designs from other prototyping tools, including Sketch and Figma, and “pick up where you left off”.
As displayed on the Principle website, it takes less than five minutes to turn designs into animated, ready-to-test prototypes.
Principle is used by top brands worldwide, including Netflix, Google, and Facebook.
5. Usability Testing
Lookback
Lookback is another product design software worth looking into. It offers extensive user testing possibilities, including live, unmoderated, and face-to-face moderated tests. While participants take the test, Lookback records the screen, face, and audio. The recording can be replayed later. Observers can also watch the test live and chat with the participants. There can be as many observers as necessary, as Lookback doesn’t display their number. You can write notes in Lookback, as well as include timestamps which are linked to the video. They also offer an app which allows you to run your own app tests.
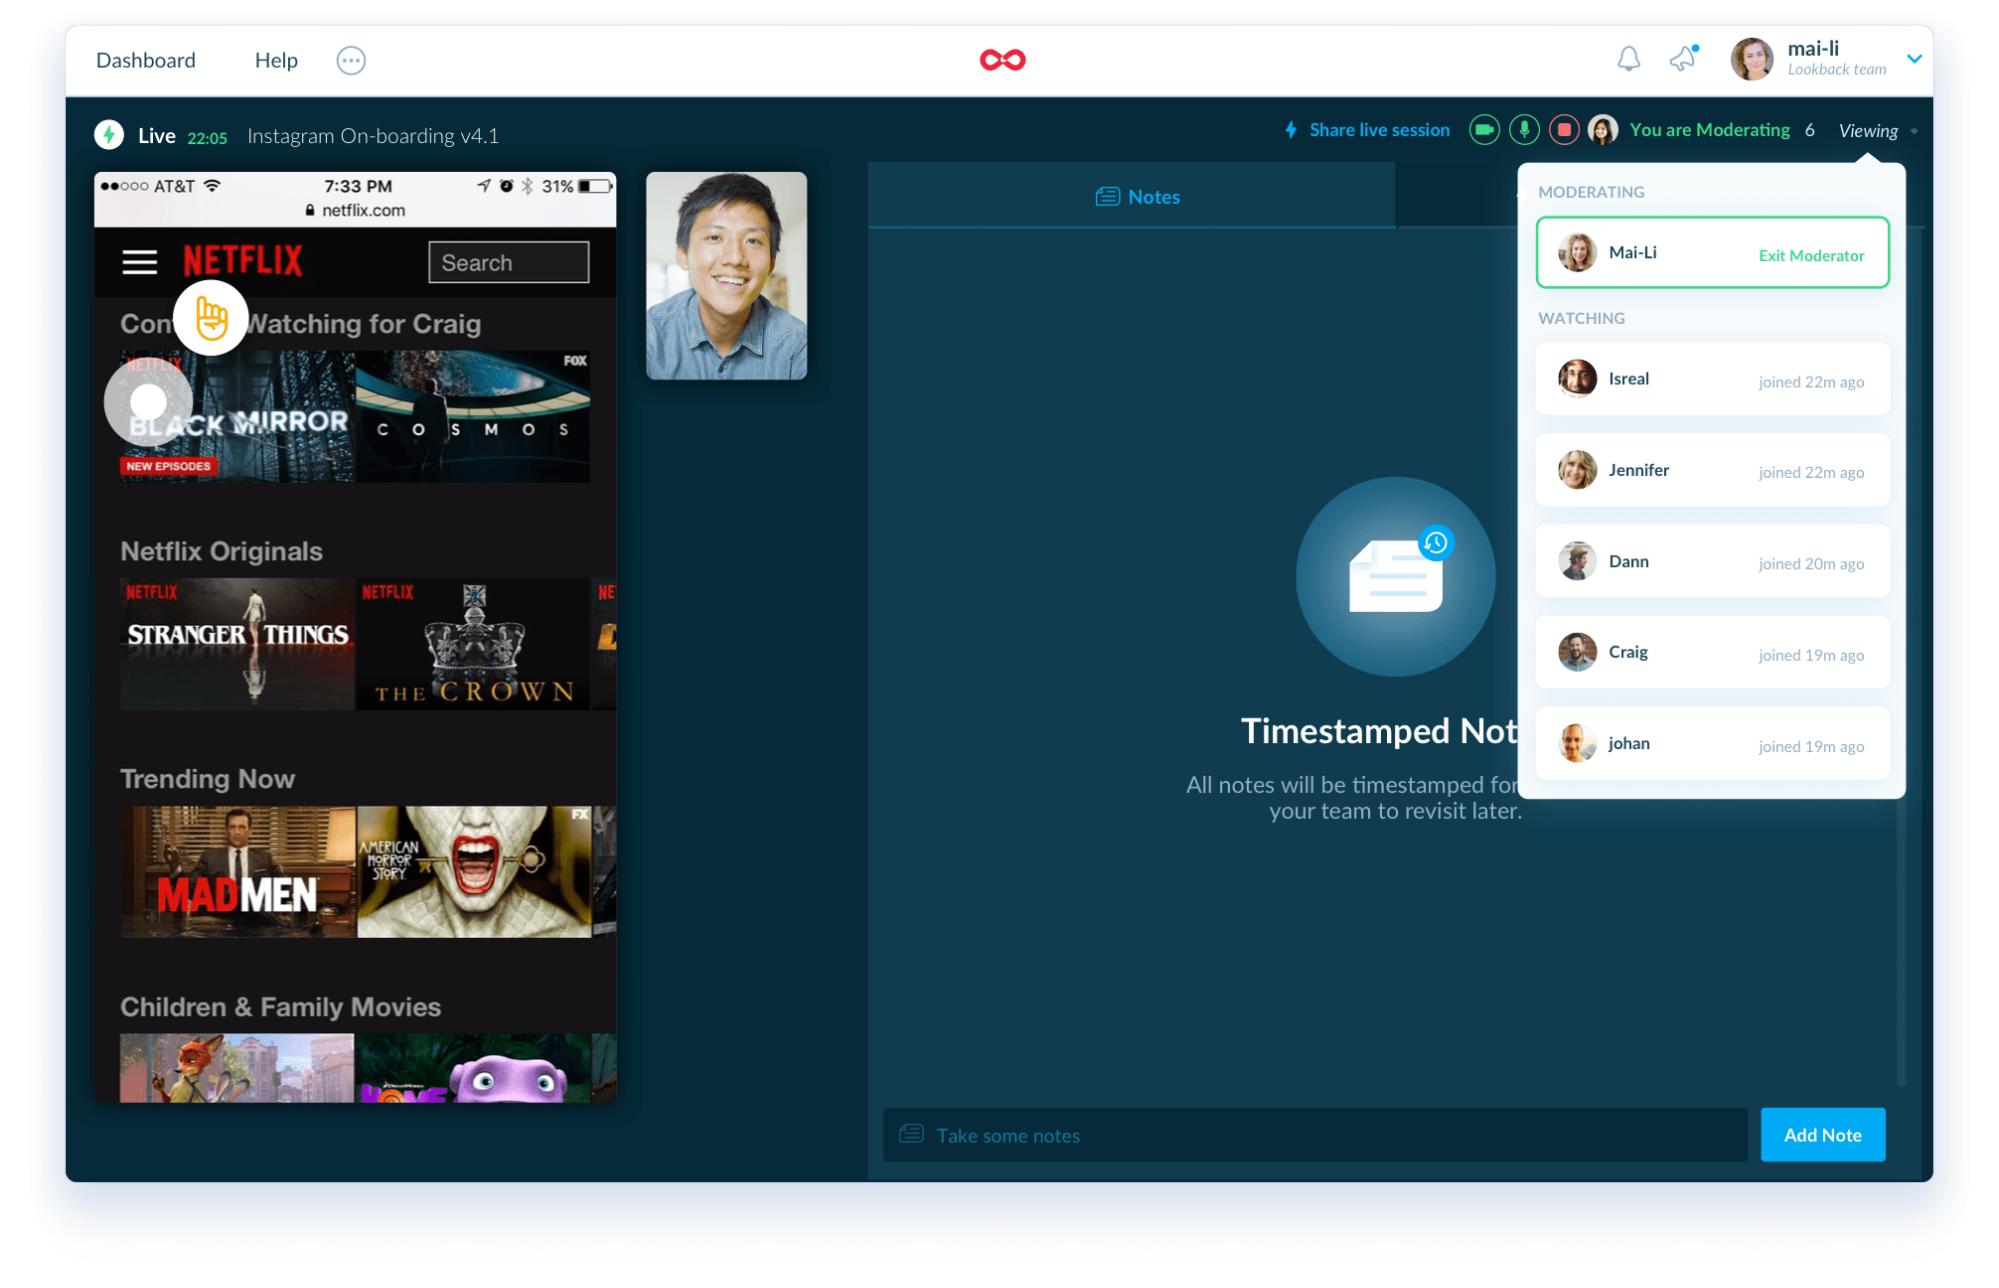 Source: Lookback
It works with all kinds of prototypes – provided that it’s on screen. All sessions are automatically stored in the cloud, so there is no need to upload or manage the files.
UserTesting
UserTesting allows you to conduct live, remote usability tests of your product. Not only can you observe your users as they engage with your product, website, or messaging, but can also see, hear, and talk to them. This gives you the opportunity to conduct both moderated and unmoderated usability tests.
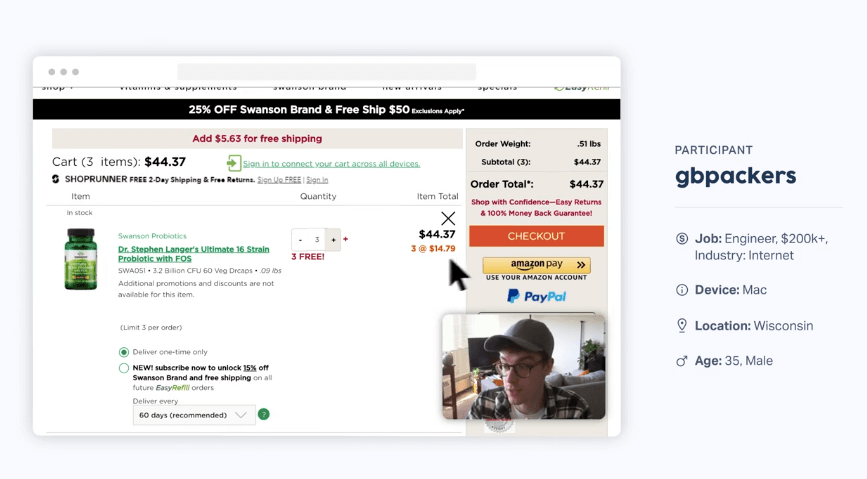 Source: UserTesting
By using UserTesting you can:
- Verify your product hypotheses,
- Spot improvement areas,
- Notice any unnecessary steps in the user journey,
- Observe users’ behavioral patterns,
- Get a list of frequently asked questions,
- And many more.
All of the above let you spot any UX or interface-related issues before you hand the project over to software developers.
UserTesting is used by product designers at global brands such as Walmart, Lululemon, and Domino’s Pizza.
6. UX Design
Sketch
Sketch is a design toolkit that supports designers from the initial concept all the way to the final artwork (it’s targeted at Mac users only). It has an extensive plugin eco-system, which nicely compensates for any features that might be lacking, like additional filters or advanced collaboration options. Some of its most loved features include:
- Artboards and pages – you don’t have to create a new file for every page on a website. It also offers a rich templates library, which covers the most common use cases which you can use as a starting point for projects. They include artboards in the right dimensions, properly named, and sometimes even a basic set of UI elements.
- Layout grids – you can set up layout grids for each artboard individually – they are separate from guidelines and the traditional grid. This saves you a lot of time while designing responsive layouts.
- Symbols and styles – a symbol can be as simple as a CTA button or as complex as an entire calendar with customizable dates, states, and statuses. You can easily convert screens to symbols and reuse them at different stages of the user flow.
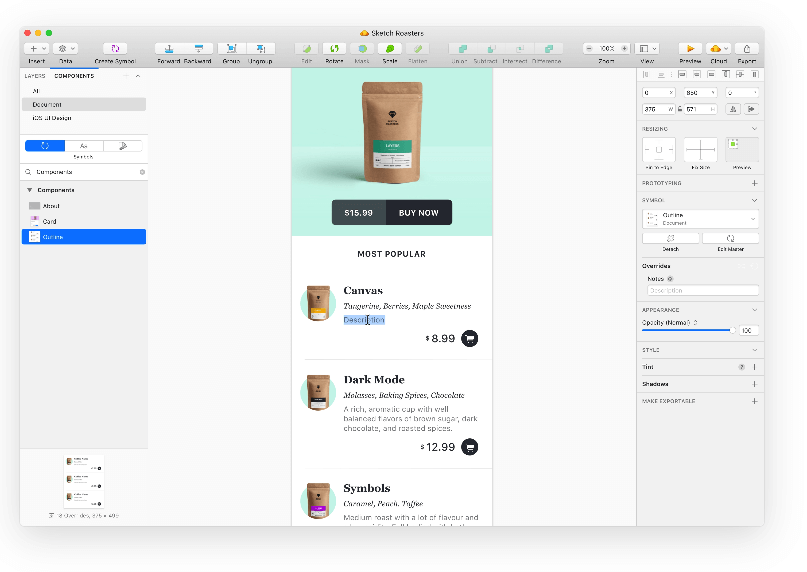 Source: Sketch
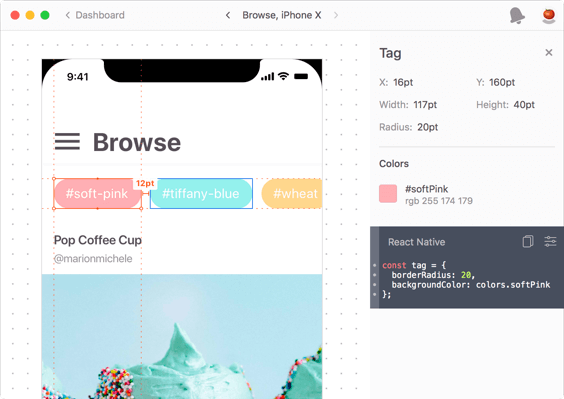
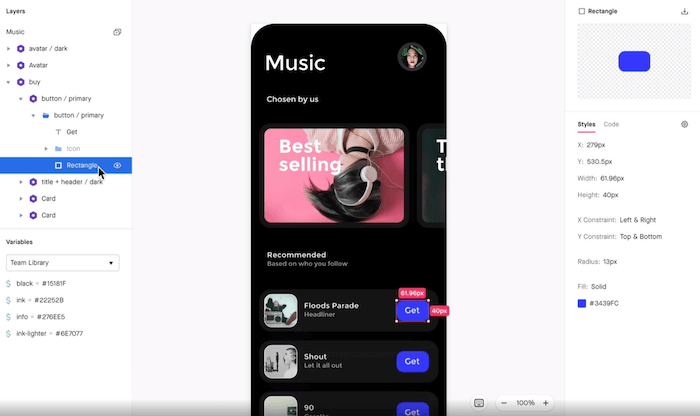
Figma
Figma is a popular, versatile tool used to design user experiences for mobile, desktop, and websites. It offers a variety of design and prototyping options, and – unlike the above-mentioned Sketch – can be used on both iOS and Windows devices.

Source: Figma
Figma is a cloud-based solution, which means that UI, UX, and product designers can all simultaneously work on the same project without the risk of overwriting any data. The tool also lets team members add comments directly on the design and notifies them about new activities on the project via email.
Figma integrates with a wide range of apps, including Slack, Maze, Zeplin, and designer hub Dribbble.
7. Design handoff
Zeplin
Zeplin is a collaboration tool for UI designers and front-end developers, which facilitates easy design hands-offs. Designers can upload their wireframes or visual designs from Sketch and add them to project folders in Zeplin. All filex can be exported in one click.
Source: Zeplin
Zeplin also automatically generates development resources – including accurate tailored specs, assets, and code snippets.
You can easily share your design systems with the rest of the team – organize components, colors, and text styles. You can also link style guides to multiple projects, which allows engineers to incorporate your design system in multiple apps or websites.
InVision Inspect
Like Zeplin, InVision Inspect is a tool that ensures a smooth designer-developer handoff process. It automatically translates files received from designers into detailed tech specifications, which means that developers don’t need to ‘jump’ between exported resources.
Source: InVision
The software team can easily access information on project colors, copy, element measurements, fonts, graphic assets, and code snippets. Furthermore, designers can easily mark the assets required for handoff – all they need to do is tick a box and the developers are then able to download them with a single click.
InVision Inspect integrates with collaboration tools like JIRA and Trello, making it easier to collaborate between software and design teams.
Examples of Digital Product Design Implementation
As we’re slowly nearing the end of this guide, it’s time to discuss how effective product design happens in practice. Below, we share a few examples of successful product design project implementations at Netguru.
1. Moonfare
One of the product design projects worth looking into is Moonfare. It is a Fintech startup based in Berlin, offering a platform which lets individual investors invest in top-tier funds with minimums starting at £100k and low fees.
The team at Moonfare turned to Netguru to help them redesign their platform, making it safe, trustworthy, and user friendly. The project team consisted of three developers, a Project Manager, a QA engineer, and Product Designers.
After taking a closer look at Moonfare’s codebase and their business goals, Netguru suggested using Node.js for the backend and React for the frontend of the platform.
React.js has proven to be a good choice – the developers worked with ready-made components, which are easy to test and document. They also facilitate an easy task division between programmers, who can work on separate components simultaneously.
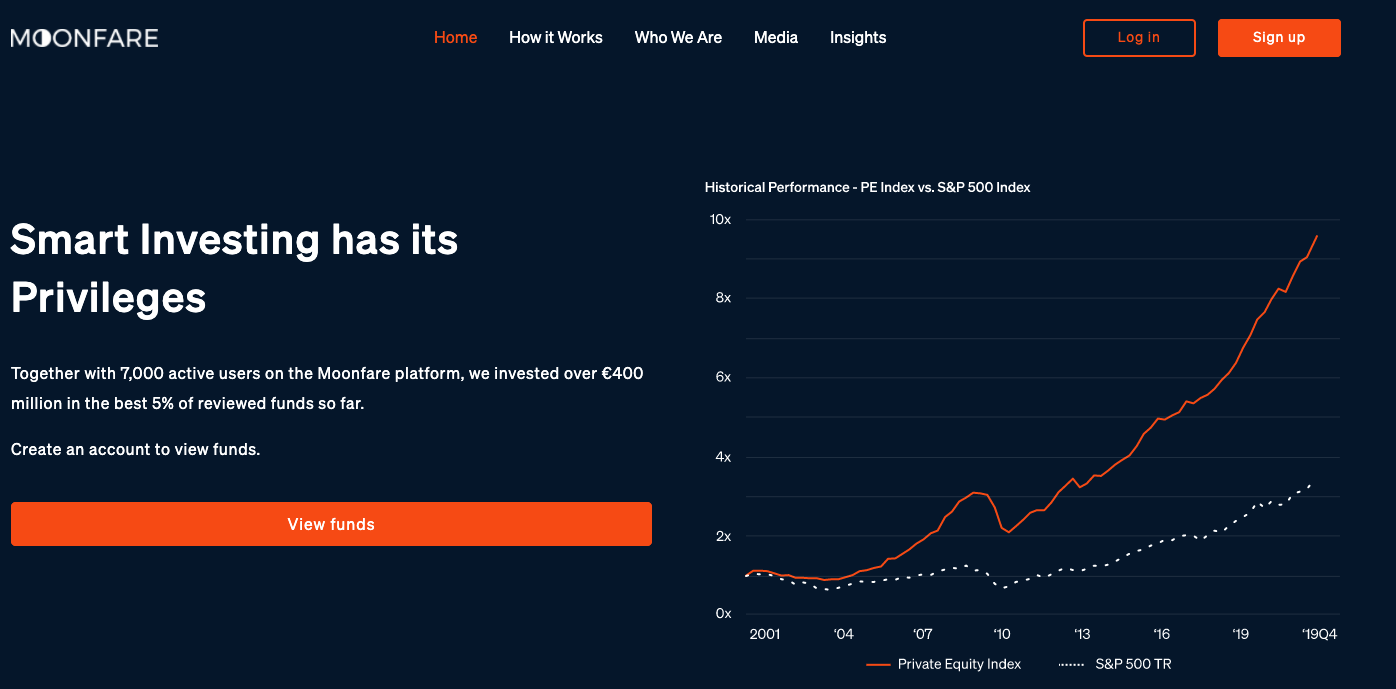 Source: Moonfare
The first version of the product was released only three months from commencing the project, and in August 2018, Moonfare successfully launched the platform. It received a lot of press coverage, including a feature in the global edition of the business daily Handelsblatt.
2. Kunster
Kunster is an augmented reality mobile app which transforms your surroundings based on your chosen painter’s style at an instant! You no longer have to go to an art gallery to admire the works of the world’s greatest artists. You can see:
- Van Gogh and his Starry Night,
- Leonardo da Vinci, the author of Mona Lisa,
- Edvard Munch, famous because of his Scream,
- Pablo Picasso and his The Weeping Woman.
All without leaving your home!
Kunster uses AR to overlay a portal over the user’s physical space so that they can see the world through the eyes of their favourite artists.
Users can also record videos or audio and share them with their friends or post on social media. Additionally, they can take a quiz to learn more about the artists or find a museum where their art is shown.
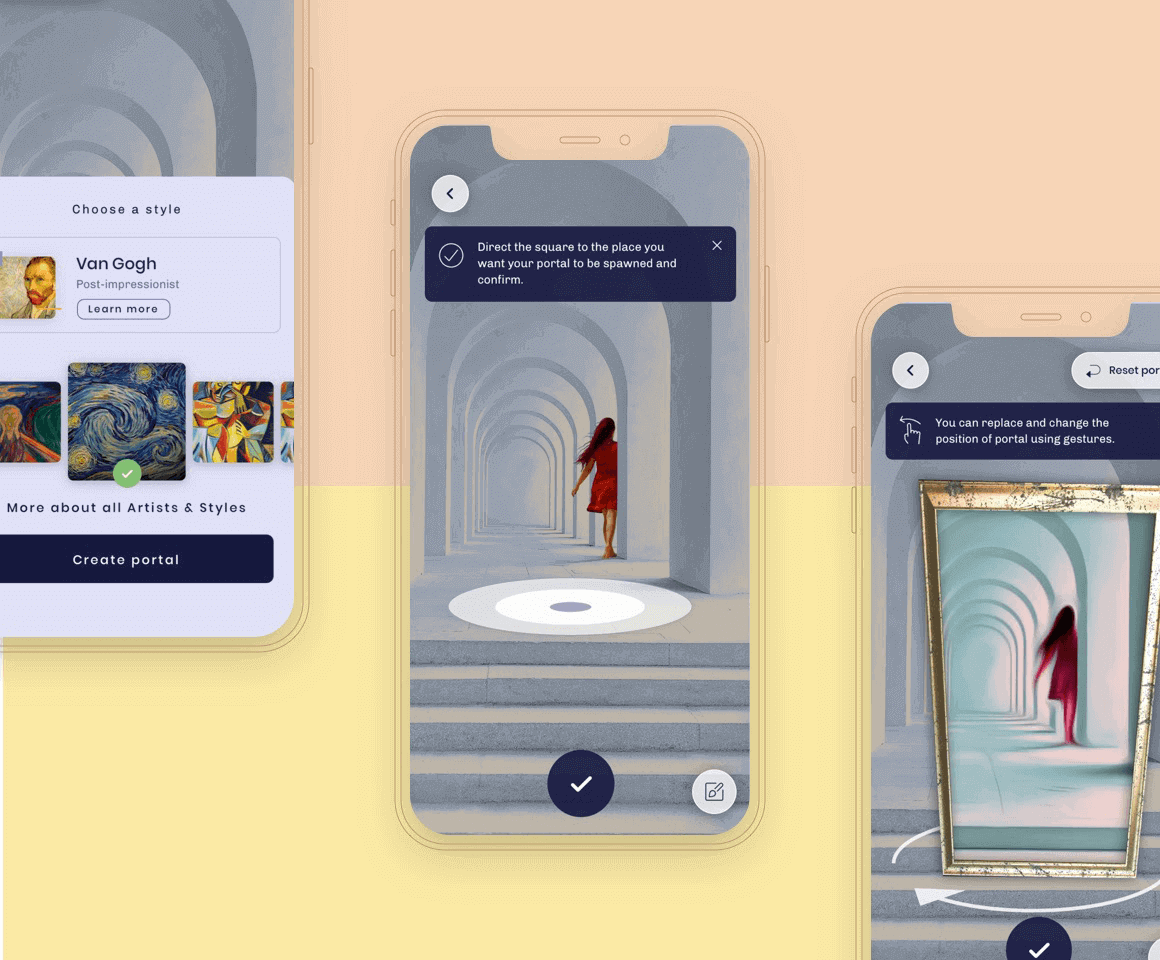
Source: Netguru
3. Herdius
Herdius is a Berlin-based startup that offers a decentralized financial platform which serves “a protocol to access the whole decentralized web”. Their product, called dApp, built on the basis of Ethereum and other blockchain technologies, can be used through a single private key, with no tokens.
When the company first reached out to Netguru, they wanted to raise capital for the project through an ICO. In order to convince investors, Herdius needed to transform a whitepaper on the project into a captivating landing page that evokes emotions and correctly conveys the vision of the service.
The Netguru Product Design team determined that Herdius’ users could be roughly segmented into emotional (i.e. digital currency enthusiasts and newcomers to the field) and rational (experienced fintech players). While the first group could make a quick decision to invest, the latter would likely need more information. However, including all the details from the whitepaper on the landing page was not an option.
For this reason, Netguru designers decided to convey the message through illustrations. To explain how the Herdius service would work, the team turned to isometry – a graphic design technique which is commonly associated with tech brands.
One by one, complex concepts like cryptocurrency, scalability, and decentralization were layered to display how all the areas were intertwined in the product. The illustrations were supplemented with headings and copy that further conveyed the message.
While the resulting landing page couldn’t possibly display all the content a whitepaper could, it could still evoke the exact same emotions among investors.
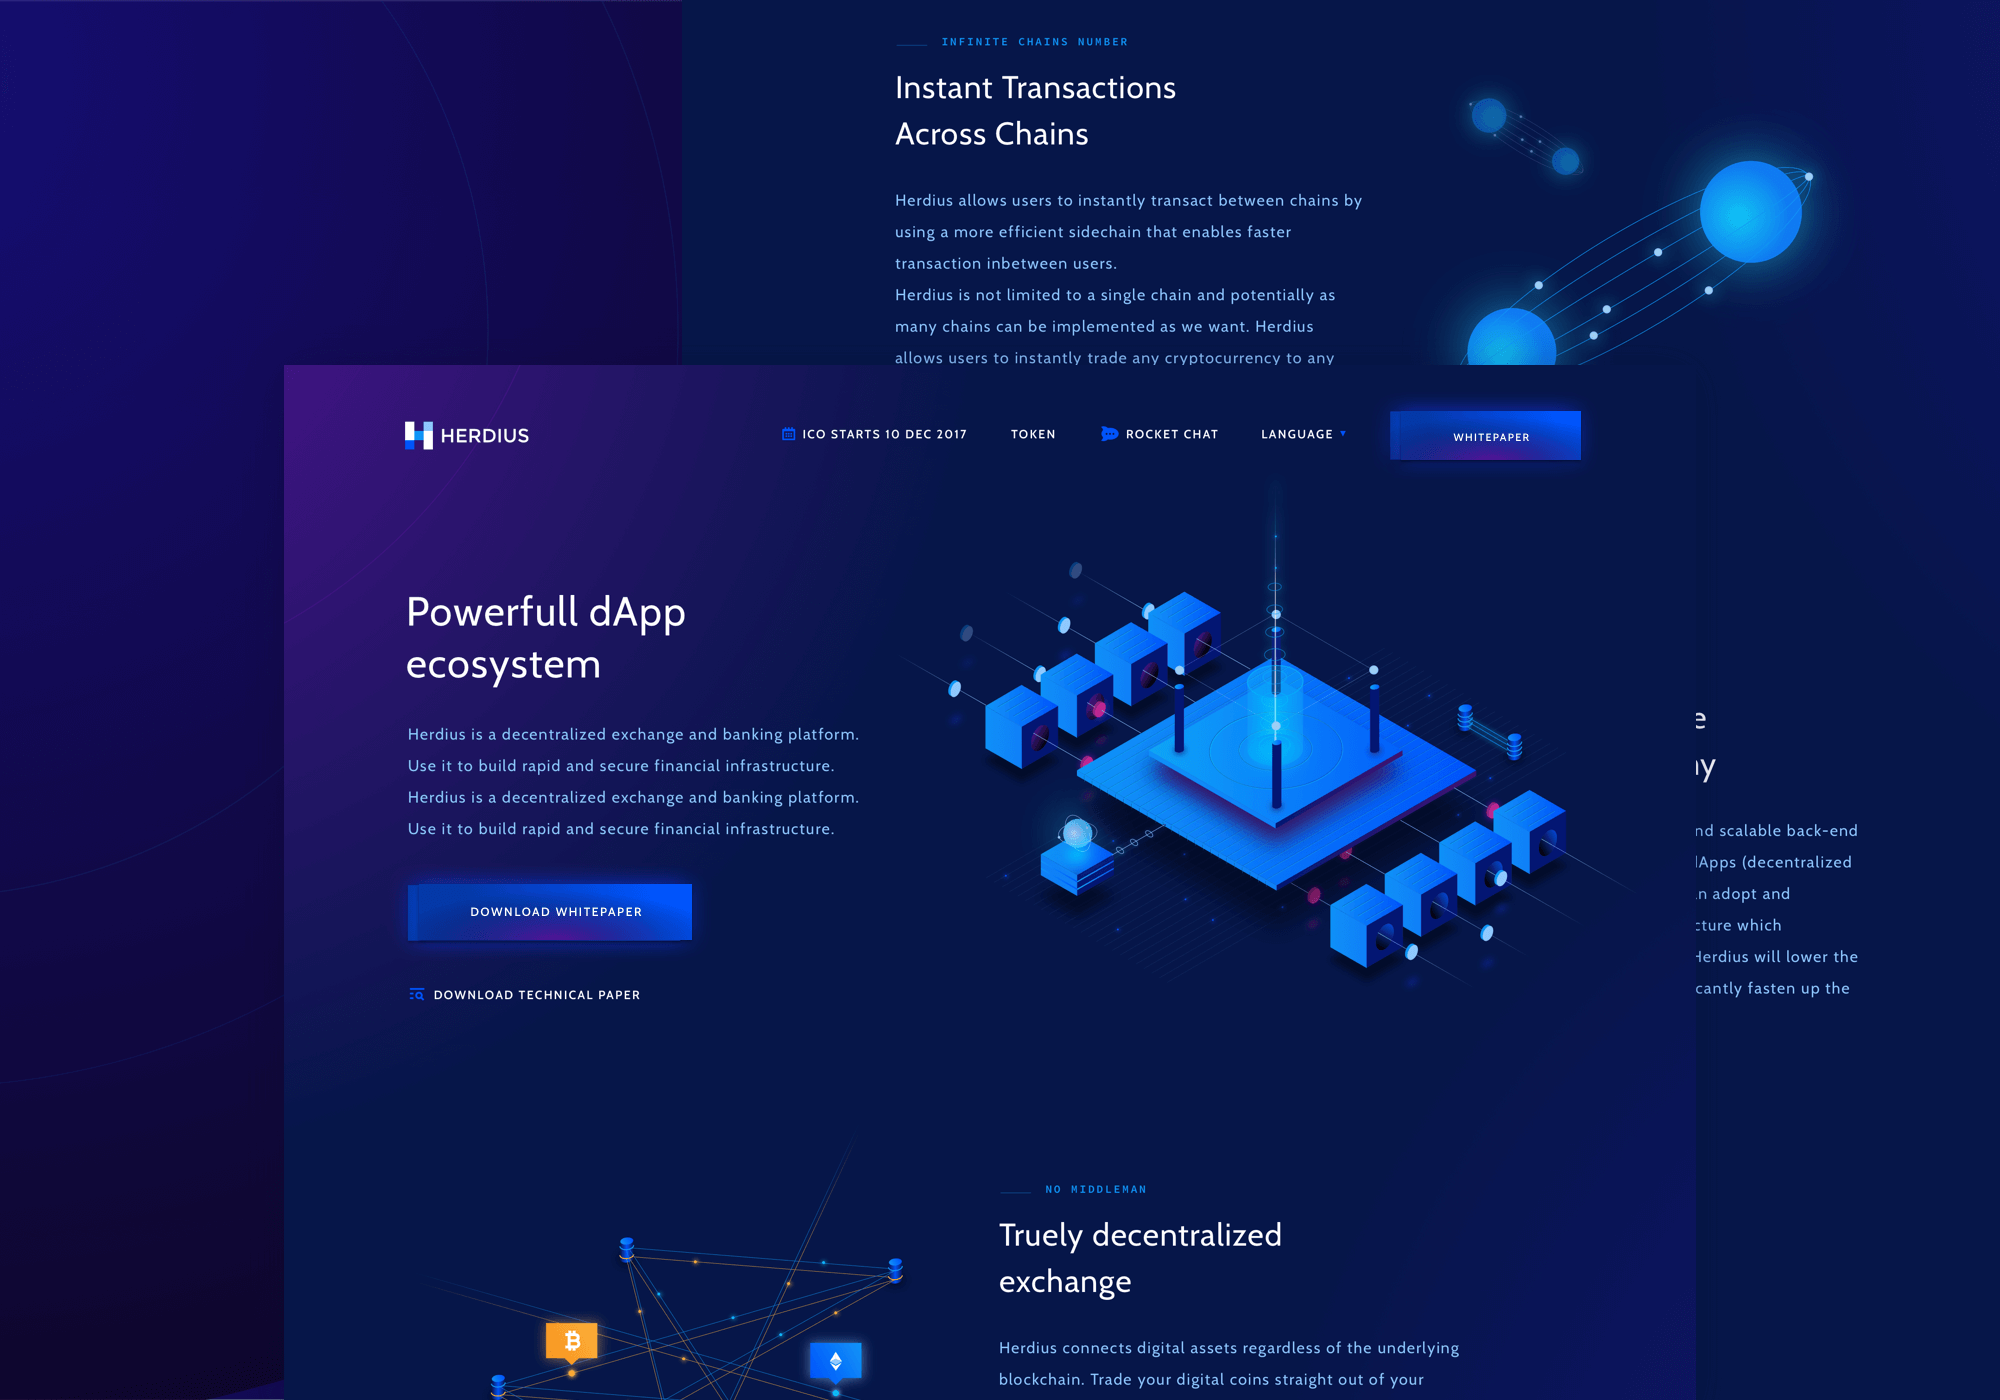
Source: Netguru
4. Artemest
Artemest is an Italian marketplace that offers furniture, home decor, and jewellery created by top Italian artists. The e-commerce’s mission is to support the country’s artisans by offering them a way of finding buyers online.
The platform has two core user types – B2B and B2C customers. The first group comprises mostly interior designers who are looking for items for their clients. Respectively, B2C customers are commonly young couples looking to decorate their homes or to create wedding gift lists.
When the Italian e-commerce first contacted Netguru, they already had an up-and-running product. However, they were looking to expand internationally and adjust their service to the growing user base.
Firstly, they need to offer a product that would be easy to use by its over 350 vendors. Secondly, they needed to attract new buyers by providing an intuitive and pleasing product experience.
As the platform kept growing, with 4-5 submissions from potential vendors each week, Artemest also needed a way to verify applications online.
The product design team worked on the platform’s UX and UI and adjusted the vendor and buyer functionalities so that they were easy to use regardless of tech expertise. The developers implemented their designs and ensured that the platform would be secure and easy to scale as Artmenest grows.
Currently, Artemest serves as the main source of income for many of its vendors. Also, about 75-80% of all listed items can be customized to suit the customers’ requirements.
Since our cooperation with Artemest, the platform has been featured multiple times in media outlets such as Forbes, Elle magazine, and the New York Times.
Popular Digital Design terms to know
Here is a list of digital terms worth knowing.
Accessibility – creating products which can be easily used by people with disabilities. It’s about designing products which can be used in a wide range of situations by all people, irrespective of their abilities.
Adaptive design – design which adapts to different screen sizes.
Branding – a marketing term which refers to creating a name, symbol or design that companies identify with. It’s how they’re perceived in customers’ eyes.
Collaborative design – an approach to design which allows a team to work together. It's a process which incorporates different ideas, roles and team members with various skill sets.
Data-driven design – design supported by data; it reveals users pain points and opportunities. It adds objectivity to design, which enhances chances of market success.
Design animation – the use of digital objects to support a digital design and improve the app’s or website’s overall usability.
Design sprint – a workshop which usually lasts five days, run for the purpose of validating ideas and solving challenges via prototyping and idea testing with customers.
Empathy maps – a tool used to visualize what we know about users in order to create a mutual understanding of their needs and help in decision making.
Flat Design – a user interface design style which incorporates two-dimensional elements and bright colours.
Gamification – the use of game design elements and principles in a non-game environment. It can also be viewed as activities and processes for solving problems by applying game elements.
Human-centered design – a problem-solving approach which develops solutions to problems by ensuring that the human perspective is included in every step of the process.
Information architecture – a term used to describe the process of organizing, labeling, and structuring information within a product or website so that its users can easily find what they are looking for.
Jobs to be done (JTBD) – a marketing outlook in which customers decide to use a product or service not for its features, but to achieve a specific goal that fills their need. This could be anything from a problem they need to solve to an objective they want to accomplish.
Mockup – a basic model used by designers to test their product concept, for instance to demonstrate how a product would function, verify the design, and collect user feedback.
Mood board – a visual composition of images, words, colors, or fonts used to communicate an idea for a product, service, or topic.
MVP – short for Minimum Viable Product, an MVP is a version of a new product that lets the team collect the maximum number of insights from users with the least possible effort.
Prototype – a prototype is a high-fidelity simulation of a product that emulates the real-life experience for its users. Its goal is to test and refine the design before the product concept is passed on to software developers.
Responsive design – an approach to digital design in which a user interface adjusts to various screen sizes and devices without disrupting the UX.
Storyboard – a sequence of images or illustrations that visualizes various user scenarios. By using storyboarding in product design, designers can evaluate how the given product or service fits into the user’s life.
Usability – the degree to which a user interface is easy to use. As defined by the NN Group, in the design process, usability is defined by 5 components: learnability, efficiency, memorability, errors, and user satisfaction.
User stories – a short statement that depicts what the user’s intention for using a product is. Most user stories are created according to the following template: As a [user], [action], so that I can [context]. User stories are the smallest unit of work in the Agile methodology.
User flow – a diagram created by product designers or UX designers to display the path users take in a product or website from the entry point to the completion of a task (for example, finalizing payment in an e-commerce store).
Wireframe – a low-fidelity model of a product or website that helps designers convey their concepts for a user interface. Unlike prototypes, wireframes focus on the layout and information structure and do not depict colors, fonts, or images.
Product design – the key to creating good UX and brand loyalty
Product design is an indispensable element of any commercial digital project and should be prioritized if you want to increase your chances of market success.
It does more than just allow you to create a visually appealing product and an enjoyable experience for users. It also lets you ensure that the product is developed in a way that promotes business goals and strengthens your customers’ bond with your brand.
As described in the above guide, there are several steps to making the most of product design.
Firstly, you should follow the right product design process – i.e., conduct thorough research, create and validate your product’s wireframes, prototypes, and branding, and ensure a sound cooperation between designers and software developers. In order to do this, you must create and follow the right design system and prioritize design thinking – both of which have been explained above.
Last but not least, before you begin your project, you must ensure that you’ve got the right product design team on board. Make sure that the team you select has years of experience in developing successful products and displays an equally creative and business-focused approach to product design.
Bartosz Białek
Bartek is a Design Manager, responsible for quality of delivery and project success, business growth, and team operations and development. Always curious, he likes to write about the relationship between design and business.