Augmented Reality on Mobile with an App Tutorial for Android (Update)


Contents
Augmented reality has become quite a popular term in the past few years thanks to Google Glass, but the idea is older than the first Android phone.
Do you remember the Terminator movie? The main hero’s vision mapped the nearby area and displayed additional information about objects or people.
And that, in essence, was AR.
To show you what AR really is, let me refer to the definition of an augmented reality guru - Ronald Azuma. In late 1997 he established the three main elements that define augmented reality:
- It connects real and virtual worlds,
- It’s interactive in real time,
- It allows movement in 3D.
Basically, augmented reality adds digital components to the real world, often by using the camera on a smartphone to enhance the experience.
Virtual reality vs augmented reality
It is very important that you do not confuse augmented reality with virtual reality because these technologies are just not the same.
The crucial idea of AR is to overlay digitised information on the real (offline) world e.g. by displaying info about the building you are looking at. VR uses computer-generated reality, experienced usually by wearing a headset. Sounds great, doesn’t it?
In the past this seemed like science fiction... And actually it was!
Back then you were only able to check out the possibilities of AR on special devices like the Virtual Fixture. It was heavy, uncomfortable, and had very limited features. Nowadays, AR devices are being pushed out by smartphones, which make the augmented reality experience accessible. Let’s dive deeper and see what are the types of AR with some hot use cases.
How does augmented reality work on mobile?
There are basically 2 types of AR which can be used in mobile apps. Each of them differs in terms of used sensors and technologies, but the basic principle is still the same: they display virtual 3D objects on top of a camera view.
Does Android support augmented reality?
You can build an Android AR app for release on Google Play Store.
However, not every device can support AR. Google certifies whether devices are AR-ready through its ARCore Android studio project. It checks the quality of the devices’ camera, motion sensors, and design architecture to ensure it performs as expected.
Also, the device needs to have a CPU powerful enough to integrate with the hardware design for ensuring good performance and effective real-time calculations.
AR-compatible Android devices need to run Android 7.0 Nougat or later installed with Google Play Services for AR. If it's not installed, users will be prompted to instal it in order to get the full functionality of augmented reality applications.
What software is used for augmented reality?
As augmented reality becomes even more popular, there are multiple software development kits (SDKs) which you can use to integrate AR in your app development.
Here are a few of them:
- Google ARCore - a Google-developed toolkit which works with Java/OpenGL, Unity, and Unreal. It provides environmental understanding (e.g. recognizing horizontal surfaces to place virtual objects on the floor or on shelves), motion tracking and also light estimation, so objects look natural within the space.
- Vuforia - one of the leading augmented reality SDKs, supporting text recognition, 3D geometric map creation, turns static augmented images into motion videos and supports both local and Cloud storage.
- ARToolKit - an open source tool to create AR applications. ARToolKit is free and also contains an extensive library of features, including single and dual camera support, integration with Smart Glasses and GPS support for the creation of location-based apps (like Pokemon Go).
- Apple ARKit - introduced by Apple in 2017. It includes hi-spec face tracking, 2D object interaction, integration with third party tools, and Visual Inertial Odometry (VIO), which allows you to accurately track environments without additional calibration.
What apps use AR?
Now we know which devices support AR development, let’s take a look at some of the apps that support it.
The AR scene is growing quickly, and is becoming a key consideration in mobile development. The range of services and experiences that you can apply AR is growing rapidly, from virtual furniture overlays to face filters and motion tracking. Let’s discuss some of the most popular apps for augmented reality right now.
Marker-based Augmented Reality
Marker-based AR is, in my opinion, the most powerful technology. It uses image-recognition algorithms to specify the position and rotation of markers. After that it displays, for example, a 3D object in the specified place.
You may ask: what can be the marker? Well, at the beginning image recognition wasn’t well developed and the marker was just a QR code. But currently there are tools that can recognize almost everything - from text to human face. Let’s see some cool examples of marker-based AR solutions.
Face filters
 Source: TNW
Face filters are one of the most popular cases where AR is used. The success story of face filters began in 2015 when Snapchat introduced them in their app. People have gone crazy about them and started to heavily use them.
But how is it actually possible to show e.g. dog’s ears or tongue on a human head? The answer is face recognition algorithms and some 3D magic. Recognizing human faces is not a trivial feature, but nowadays there are tools that allow developers to create their own face filters, for example the Firebase ML Kit.
With Firebase it is possible to detect the positions of eyes, mouth, nose, and contours. Such data can then be used to place a 3D mesh with proper graphics over the camera image. Wouldn’t it be great to have your own filters in your app?
Inkhunter
 Source: Bless This Stuff
Have you ever wanted to have a tattoo, but you weren't sure if this or that one would look good on you?
Augmented Reality can help you with this. Inkhunter is another example of marker-based AR which places a virtual tattoo on your body. The first step is to use Inkhunter to draw a smile on your hand or wherever you want to have a tattoo. The smile is used as a marker in this app. Now it’s time to select a piece of art and point your smartphone’s camera at the smile you just drew.
Markerless Augmented Reality
The previous type of AR used image-recognition to place 3D objects in the real world. Image from the camera is processed to fetch information about the position and orientation of the marker.
Markerless AR is less complicated in terms of algorithms used, but more complicated when it comes to hardware sensors. It uses sensors to learn the position and orientation of the device. What sensors, you may ask? There are 3 sensors used in this type of AR:
- Accelerometer - measures the acceleration applied to the device,
- Gyroscope - angular speed around all axes in 3D space,
- Magnetometer - measures the ambient magnetic field in all axes.
Thanks to them it’s possible to calculate the exact rotation of each axis in 3D space. In many cases it’s also necessary to use GPS data to place 3D objects at some distance. Let’s see some examples of such apps.
IKEA Place
 Source: Engadget
IKEA Place is a very useful app for all the people who want to buy new furniture or to arrange their home from scratch. The main feature of the app is the ability to see if a given product fits your interior. Ikea claims that their products are displayed in the app with 98% size accuracy. Thanks to ARCore and Sceneform (currently archived and not developed anymore – check out its replacement: Filament) the experience is smooth and products are shown with really good details.
Google Maps AR
 Source: The Verge
We all know Google Maps, they are great, but I can bet that many of you have been in a situation when you started the navigation in the middle of nowhere and it said “Head north”, so you started walking in one direction and, if you weren’t lucky enough, you had to walk back as you didn’t choose wisely.
In 2018, Google presented a new concept of a Google Maps feature. It uses maps and street view along with device sensors to show routes to the user. What is more, it can display additional info about places nearby and guide you to them.
Pokemon GO AR+ technology
At the beginning of July 2016 the Pokemon Go has been released. Fans all over the world started to catch’em all, causing big concerns about the safety of augmented reality users. Pokemon GO is an example of location-based AR app. It means that despite device rotation sensor it uses also GPS data to display Pokemons in proper position. The hype for Pokemon GO is history, but the technology is still hot.
Tips on how to create an app like Pokemon Go
Backend with Database
Each mobile application needs a server that will manage the users as well as the data flow. In our case, we need somewhere to store information about our Pokemon objects.
At the beginning the following should be enough:
- Object's latitude and longitude can be provided by a pseudorandom generator,
- Name,
- Combat Power (CP),
- Hit Points (HP),
- 3D model of the animated Pokemon.
When you develop an MVP and want immediate prototypes, it’s great to choose cloud solutions instead of developing them on your own. I would recommend giving Firebase a try. It’s a really powerful NoSQL database that can be easily integrated with the Google Cloud Platform and, for example, push notifications. Moreover, Firebase has its own SDK for Android and it’s really easy to start using it.
To populate your database, just use the Pokemon API database with detailed information that can be used for future improvements such as evolution. Maybe you fancy starting up a Water Pokemon for lakes and rivers?
AR Algorithm
An algorithm for displaying augmented information using the camera view.
You can kick off with the one described in the blog post, but it requires some fine-tuning:
- Add the option of working with sets of points instead of a single predefined spot. Probably the easiest approach is to detect the closest Pokemon and bring it up on the display. You need to grab the object that is closest to you from the set, for example by using the distanceTo() method.
- It would probably be necessary to implement a simple low-pass filter to stabilise our Pokemon on the screen. A very nice example is provided here. The formula is written in JavaScript, but it’s quite language-agnostic.
- Additionally, we don’t want to show the Pokemon in the centre of the screen only. That’s why you would need to map the azimuth angle to the screen pixels to make it look smooth on the display.
Map
One of the key features of Pokemon Go is that you actually need to walk around to catch Pokemon. To pull this off, we can use Google Maps with the first-person view — really simple to set up in your app. Thanks to markers you can place the nearby Pokemons or Pokestops on your map. You can also set a custom location icon with your avatar.
UI
The most interesting part of the UI/UX in Pokemon Go is the Pokeball throwing animation.
As you may well expect, there are as many ways to implement this as there are developers and everything depends on how accurate and sophisticated you want it to end up.
As a starting point, you might want to check out ObjectAnimator from the SDK. This tool allows you to animate a bitmap of a Pokeball. After some user interaction that involves hitting the Pokemon, just play the pre-programmed animation of catching it.
Remember! This Is Just the Beginning!
Challenges with Augmented Reality on Mobile
So, we went through the basics of augmented reality. You know what are the types of augmented reality and learn about some examples and how they work.
But is this technology mature and devoid of flaws? It does have a few, but not many.
- Accuracy - mobile device sensors are prone to bias. It means that the accuracy of displayed objects will be lower minute by minute. In newer devices the sensors are much more accurate, but keep in mind that they are not perfect.
- Battery - display on, camera on, orientation sensors, image recognition, GPS. These are considered the most energy consuming hardware in every mobile device. This means that playing with augmented reality for even a few minutes can significantly drain your battery.
- Accessibility - in 2018 Google released ARCore, the framework for creating AR apps. Although it’s well optimized and really cool, it’s supported on a limited number of devices. The list is growing, but currently it contains about 100 devices. It is currently the easiest way to create augmented reality apps.
App tutorial: how to create augmented reality apps on Android?
Have you ever thought about how the implementation of a location-based augmented reality app looks in the code? You’ll have a chance to see how to build a simple app that displays some objects in the real world. But let’s start with a bit of theory.
What’s an azimuth and why do we need it?
*Geodesy theory is based on the book: A. Jagielski, Geodezja I, GEODPIS , 2005.
Wikipedia explains the azimuthal angle as:
“The azimuth is the angle formed between a reference direction (North) and a line from the observer to a point of interest projected on the same plane as the reference direction orthogonal to the zenith” 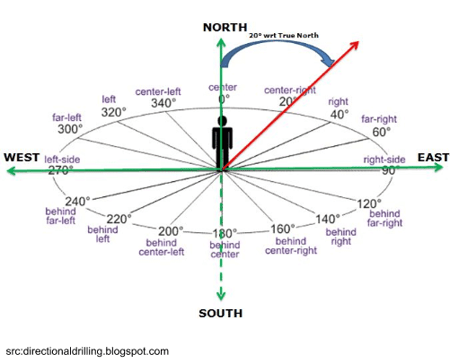
Azimuth is a special type of heading angle (angle between two points in reference to the north). In case of azimuth, one point is your location and the second point is based on the direction you are facing.
Calculating heading angle
We will use a formula based on the “haversine formula” where the heading angle from point A to B can be calculated as:
β = atan2(X,Y),
∆ = LongitudeB - LongitudeA
X = cos LatitudeA * sin ∆
Y = cos LatitudeA * sin LatitudeB – sin LatitudeA * cos LatitudeB * cos ∆
This is how it looks in code:
private fun calculateHeadingAngle(
  currentLocation:
  LocationData,
  destinationLocation: LocationData
  ): Float {
  val currentLatitudeRadians = Math.toRadians(currentLocation.latitude)
  val destinationLatitudeRadians = Math.toRadians(destinationLocation.latitude)
  val deltaLongitude =
      Math.toRadians(destinationLocation.longitude - currentLocation.longitude)
  val y = cos(currentLatitudeRadians)
          * sin(destinationLatitudeRadians)
          - sin(currentLatitudeRadians)
          * cos(destinationLatitudeRadians)
          * cos(deltaLongitude)
  val x = sin(deltaLongitude) * cos(destinationLatitudeRadians)
  val headingAngle = Math.toDegrees(atan2(x, y)).toFloat()
  return (headingAngle + 360) % 360
}
I’m returning values in the 0 to 360 degrees range, which is why the heading angle is modified before being returned.
Sensors and low pass filter
In this tutorial, I will not describe how to get the location and azimuth orientation of the device because this is very well documented and there are a lot of tutorials online. Mainly for reference, please read Sensors Overview (especially TYPEROTATION_VECTOR) and Location Services.
One thing that you need to remember is that sensor readings can return values that change fast. There are lots of different variables that impact the data you receive (lots of devices around you, calibration of your phones sensors). In order to harness them you can use something called a “low pass filter”. It will smooth out the readings.
private fun lowPassDegreesFilter(azimuthRadians: Float): Float {
  lastSin = alpha * lastSin + (1 - alpha) * sin(azimuthRadians)
  lastCos = alpha * lastCos + (1 - alpha) * cos(azimuthRadians)
  return ((
  	Math.toDegrees(atan2(lastSin, lastCos).toDouble()
  )+ 360) % 360).toFloat()
}
This is a version adjusted to our 0-360 degree case. You can try different alpha values to get different smoothness results.
Camera Preview
Once you’ve prepared data from the sensors, it’s time to prepare the camera preview. We will use the CameraX API as it really simplifies the whole process.
You need to add a view in your XML:
TextureView
android:id="@+id/texture_view"
android:layout_width="match_parent"
android:layout_height="match_parent" /
And after that in your fragment/activity :
private fun startCameraPreview() {
  val preview = AutoFitPreviewBuilder.build(
  				PreviewConfig.Builder().build(),
  				texture_view)
  CameraX.bindToLifecycle(lifecycleOwner, preview)
}
And that’s it! Your camera preview is bound to the lifecycle and you don’t have to worry about it anymore. AutoFitPreviewBuilder is taken from the Google CameraX sample.
Showing the destination
Now the data you need to show the destination on the screen:
- Your orientation azimuth from sensors;
- A heading angle calculated using the formula we discussed earlier.
Once we have these, we can get a “destination azimuth” :
val currentDestinationAzimuth =
(headingAngle - currentAzimuth + 360) % 360
This is the angle that shows how you should be oriented in order to reach your destination. Long story short: when the destination azimuth is equal to zero, that means that you are heading in the right direction and the destination point should be displayed in the center of your view!
ArLocalizerView library
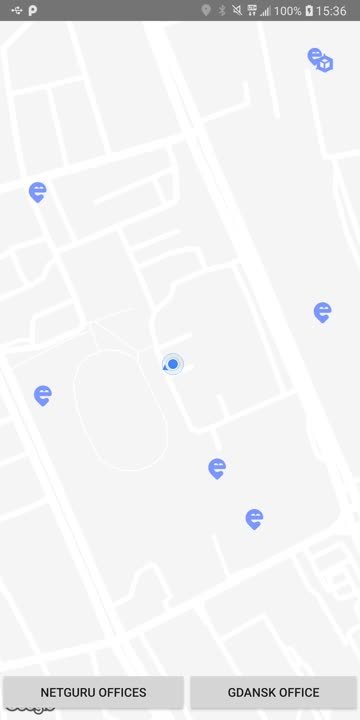
Since Google and Apple presented their AR engines (ARCore and ARKit), augmenting views via phone cameras became more popular. Both solutions are really powerful and you can do magic with them. On the other hand, you do not need a sledgehammer to crack a nut. This is especially true when you need only a simple AR view that will not drain the battery. That’s why we’ve implemented location-based augmented reality and published it as an open source library: ARLocalizerView available on GitHub.
The library characteristics
ARLocalizerView is a simple tool to display points of interest like ATMs, landmarks or bus stops overlayed on the camera view of a smartphone. Our engine automatically calculates the azimuth to a given point and maps it on the screen. The library also automatically calculates the distance between the point of interest and the user’s location. Thanks to our algorithm the solution will not drain the battery, is really lightweight, and super easy to use.
The Library in Action
To show you the library’s features we’ve created a showcase app that allows you to find the nearest ATMs (which can be a great solution for banking apps). Check it out on the video below.
How to use it?
Add the repository to your project’s build.gradle file:
repositories {
  maven { url 'https://dl.bintray.com/netguru/maven/' }
  ...
}
Add the library dependency:
dependencies {
  implementation 'com.netguru.arlocalizerview:arlocalizerview:0.1.0'
}
Add the view to your layout:
co.netguru.arlocalizer.arview.ARLocalizerView
android:id="@+id/arLocalizer"
android:layout_width="match_parent"
android:layout_height="match_parent"
/
In the arLocalizerView’s onCreate method, provide:
interface ARLocalizerDependencyProvider {
  fun getSensorsContext(): Context
  fun getARViewLifecycleOwner(): LifecycleOwner
  fun getPermissionActivity(): Activity
}

fun arLocalizerView.onCreate(
	arLocalizerDependencyProvider: ARLocalizerDependencyProvider
)
In order to process the permission request, you need to provide permission results to the view:
fun onRequestPermissionResult(
  requestCode: Int,
  permissions: Array<out String>,
  grantResults: IntArray
)
Finally, in order to display the destination labels on the camera preview, use:
arLocalizerView.setDestinations(destinations: List<LocationData>)
This article was first published on Nov 4, 2017


