Starting a New Compose Multiplatform Project


Contents
Compose Multiplatform (CM) was a result of the collaboration between Google and the company behind Android Studio and IntelliJ.
It’s a UI framework that simplifies and speeds up desktop app development with the use of Kotlin. CM uses part of the same technology as Jetpack Compose but extends it to work across platforms.
The Compose Multiplatform framework brings the declarative UI model known to Android developers to other platforms, including:
- Desktop apps (Linux, macOS, and Windows)
- Web apps
- iOS apps (currently under development)
This technical guide aims to explain how you can create your own Compose Multiplatform project, add modules, and perform basic setup.
Compose Multiplatform app template
To start a new Compose Multiplatform project, you first need to install IntelliJ IDEA
After selecting New Project, proceed to select Kotlin. Then, pick Compose Multiplatform Application… from the available templates.
Note that your JDK must be at least JDK 11. Furthermore, to be able to use native distribution packaging, you must use JDK 15 or later.
After choosing a name and location for the new project, click Next.

New project creator
When using this for Android, you’ll be prompted to provide a path to Android SDK. You can use the one that was bundled with your Android Studio installation, which should be located in /Users/<your name>/Library/Android/sdk.
|
If you’re having trouble locating it or want to use a standalone SDK, you may want to check out this guide: Finding Android SDK on Mac and adding to PATH. |

Module setup
At this stage, you can also click on your modules and targets. You can modify them to your needs.
 You can also include additional modules, such as Web or iOS, by selecting
 Project in the menu and clicking (or right-clicking) the + button.

List of available modules
After adding the browser module, you can proceed to add a js target to the common module if you want to reference it in the browser module.
You can also remove any unwanted modules and targets by right-clicking on them and selecting Remove …:.
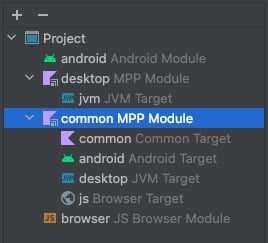
If you’re ready with the configuration, click Finish to jump into your new project. This should be the result of your template configuration:
 Project structure straight out of configuration phase
Modules and their purpose
Now, a module directory for each platform — Android, browser, and desktop — has been generated. They are what you might consider as entry points to the application. For example, the Android module could be thought of as a traditional app module in an Android multi-module project. You’ve put the main Activity there and from inside it, you can set the content from the common module.
These platform-specific modules each reference the common module, where you can put common code like Compose Multiplatform composables, domain, and data code.
Out of all the directories that were generated inside the common module, the main one that you should take interest in is commonMain where you'll be putting most of the multiplatform code. I’lll explain the other directories further down in this guide.
How is Compose for Web different?
Although Compose for Web works in a similar manner to classic Jetpack Compose (i.e. view is made out of composable functions that recompose when their parameters' value changes), it has unique elements that create the layout.
As of writing, it’s not possible to use Compose’s Column(), Row(), and Box(). Instead, the view in Compose for Web needs to be made out of the DOM elements, which can be added using composable functions like Div(), Span(), and Button(), which is different to the classic Compose Button(). To theme these elements, you would need to use the style builder to apply CSS in Compose.
Div({ style { padding(25.px) } }) {
    Button(attrs = {
        onClick { console.log(“Clicked”) }
    }) {
        Text(“Click me”)
    }
}
Due to these reasons, I’m skipping web implementation and pushing it further down in this article.
Add platform-specific Composable
Let’s say that in the common module inside the commonMain directory, that you’d like to have some common code for a dropdown menu. The problem (as of the time of writing this guide) is that there’s no common dropdown composable for these two platforms. Because of this, we need platform-specific code for each. How do you do that? In commonMain, you can create a CustomDropdown.kt file. Inside it, use the expect keyword:
@Composable
expect fun  CustomDropdownMenu(
    expanded: Boolean,
    onDismissRequest: () -> Unit,
)
In desktopMain, you can create DesktopCustomDropdown.kt.
@Composable
actual fun  CustomDropdownMenu(
    expanded: Boolean,
    onDismissRequest: () -> Unit,
) {
    DropdownMenu(
        expanded = expanded,
        onDismissRequest = onDismissRequest,
        focusable = false // Example of a parameter available only on desktop implementation
    ) {
        // desktop dropdown content
    }
}
This DropdownMenu composable looks identical to the one for Android. Take note that this could be deceiving. They are separate implementations and are platform-specific. They’re not the same.
After creating these three files, you can now use a common composable CustomDropdownMenu() in the commonMain directory.
In the androidMain subdirectory, you also need to always have an AndroidManifest.xml file with the name of the package inside like so:
<?xml version=“1.0” encoding=“utf-8"?>
<manifest xmlns:android=“http://schemas.android.com/apk/res/android”
package=“com.netguru.common” />
The directories with the Test suffix are, of course, for testing the code in corresponding directories. For example, you should have tests for the androidMain code inside androidTest.
Manually add new target (with web example)
If you need to add the web module after setting up your project in IntelliJ IDEA, you can do it following these steps:
- In IntelliJ IDEA, select
File>New>Module. - Select the
Compose Multiplatformgenerator, pickWebfor the platform, and fill out the other fields.

- Click
Createto create the web module. - In the common module that you’re going to reference in the web module, add js target and the proper source sets in
common/build.gradle.kts.
kotlin {
    ...
    js {
        binaries.executable()
        browser {
            commonWebpackConfig {
                cssSupport.enabled = true
            }
        }
    }
    sourceSets {
        ...
        val jsMain by getting
        val jsTest by getting
    }
}
- Add the following directories to the common module:
- src/jsMain/resources
- src/jsTest/kotlin
- src/jsTest/resources
|
If you want to manually set up the web module from scratch, consider following the official guide: Getting Started With Compose for Web. |
iOS module
While writing UI in Compose is on the horizon for iOS, for now you can strive to achieve universal domain/data application layers with Kotlin and import them to your iOS module as XCFrameworks.
Declaring dependencies
Holding a single source of truth for the dependencies in a multiplatform project is no different from a regular multimodule Android application - you can opt in to use Kotlin objects from buildSrc, or Gradle version catalogues if you prefer.
Common dependencies with platform-specific implementations
Some libraries (such as mockk) don’t have one common dependency. They require adding platform-specific dependencies next to the common one. In a multiplatform project that uses mockk, you should add the following dependencies in the common module build.gradle.kts:
...
kotlin {
    ...
    sourceSets {
        val commonMain by getting { ... }
        val androidMain by getting { ... }
        val desktopMain by getting { ... }
        val commonTest by getting {
            dependencies {
                ...
                implementation(libs.mockk.common)
            }
        }
        val androidTest by getting {
            dependencies {
                ...
                implementation(libs.mockk)
                implementation(libs.mockk.agentJvm)
            }
        }
        val desktopTest by getting {
            ...
            implementation(libs.mockk)
        }
    }
}
...
You need to keep this in mind when deciding to use a new library in your multiplatform project.
Conclusion
While this Compose Multiplatform template is at this time available only in IntelliJ IDEA, once you have created the desired initial configuration you can return to Android Studio to develop your application. Different targets, such as Desktop or Web, can be run via appropriate gradlew commands.
As Compose Multiplatform evolves, I’ll be more than happy to share new approaches that will surface. For more technical notes similar to this guide, you may check out our library of resources at Netguru. If you’re looking for an extra hand with Kotlin or Compose Multiplatform, reach out to us, and tell us more about your project.


