Getting Started With Flutter BLoC
Contents
I have to admit it. My first experience with Flutter was not great.
It was very unstable when I started working with it, and what put me off was the lack of architecture patterns. It was hard for me to easily structure my app, and I had to create custom logic for good communication between components. So I abandoned my Flutter projects and waited for what the time will bring.
Recently, I had to create a multiplatform application. So it was either Flutter or React Native. Since my skills in web development ended on writing "Hello World" in HTML, I decided to give Flutter another chance. I saw that a lot of things have changed, and a lot of new architecture patterns came into play. I have tested some of them in simple projects, and the one I immediately fell in love with was BLoC.
BLoC introduction
BLoC stands for Business Logic Controller. It was created by Google and introduced at Google I/O 2018. It is created based on Streams and Reactive Programming.
If you want to start creating apps with the BLoC architecture I would strongly recommend two libraries that make working with it much easier: bloc and flutter_bloc. I would also recommend the official documentation of these libraries. It is well-written, with tons of examples that could be applied to most use-cases. I will describe briefly all BLoC components, but if you want to dive deeper, the documentation is the best place to go.
In the BLoC pattern, we can distinguish four main layers of application:
UI. It holds all the application's components that are visible to the user and could be interacted with. Since in Flutter all parts of the User Interface are Widgets, we can say that all of them belong in this layer.BLoC. These are the classes that act as a layer between data and UI components. The BLoC listens to events passed from it, and after receiving a response, it emits an appropriate state.
Repository. It is responsible for fetching pieces of information from single or multiple data sources and processing it for the UI classes.
Data sources. These are classes that provide the data for the application, from all the data sources, including the database, network, shared preferences, etc.
.png)
So now, when we know all the basic structures, we should understand how these layers communicate with each other. The BLoC pattern reliess on two main components, presented below.
Events that are passed from UI, which contains information about a specific action that has to be handled by the BLoC.
States that show how the UI should react to change of data. Every BLoC has its initial state, which is defined upon creation.
For example, if we wanted to implement a login screen, we would need to pass LoginEvent with login details when the user clicks on the appropriate button. After receiving a response, the BLoC should show the SuccessState when the login has been completed successfully, or ErrorState when the user has entered the wrong credentials, or a different error has occurred.
App specification
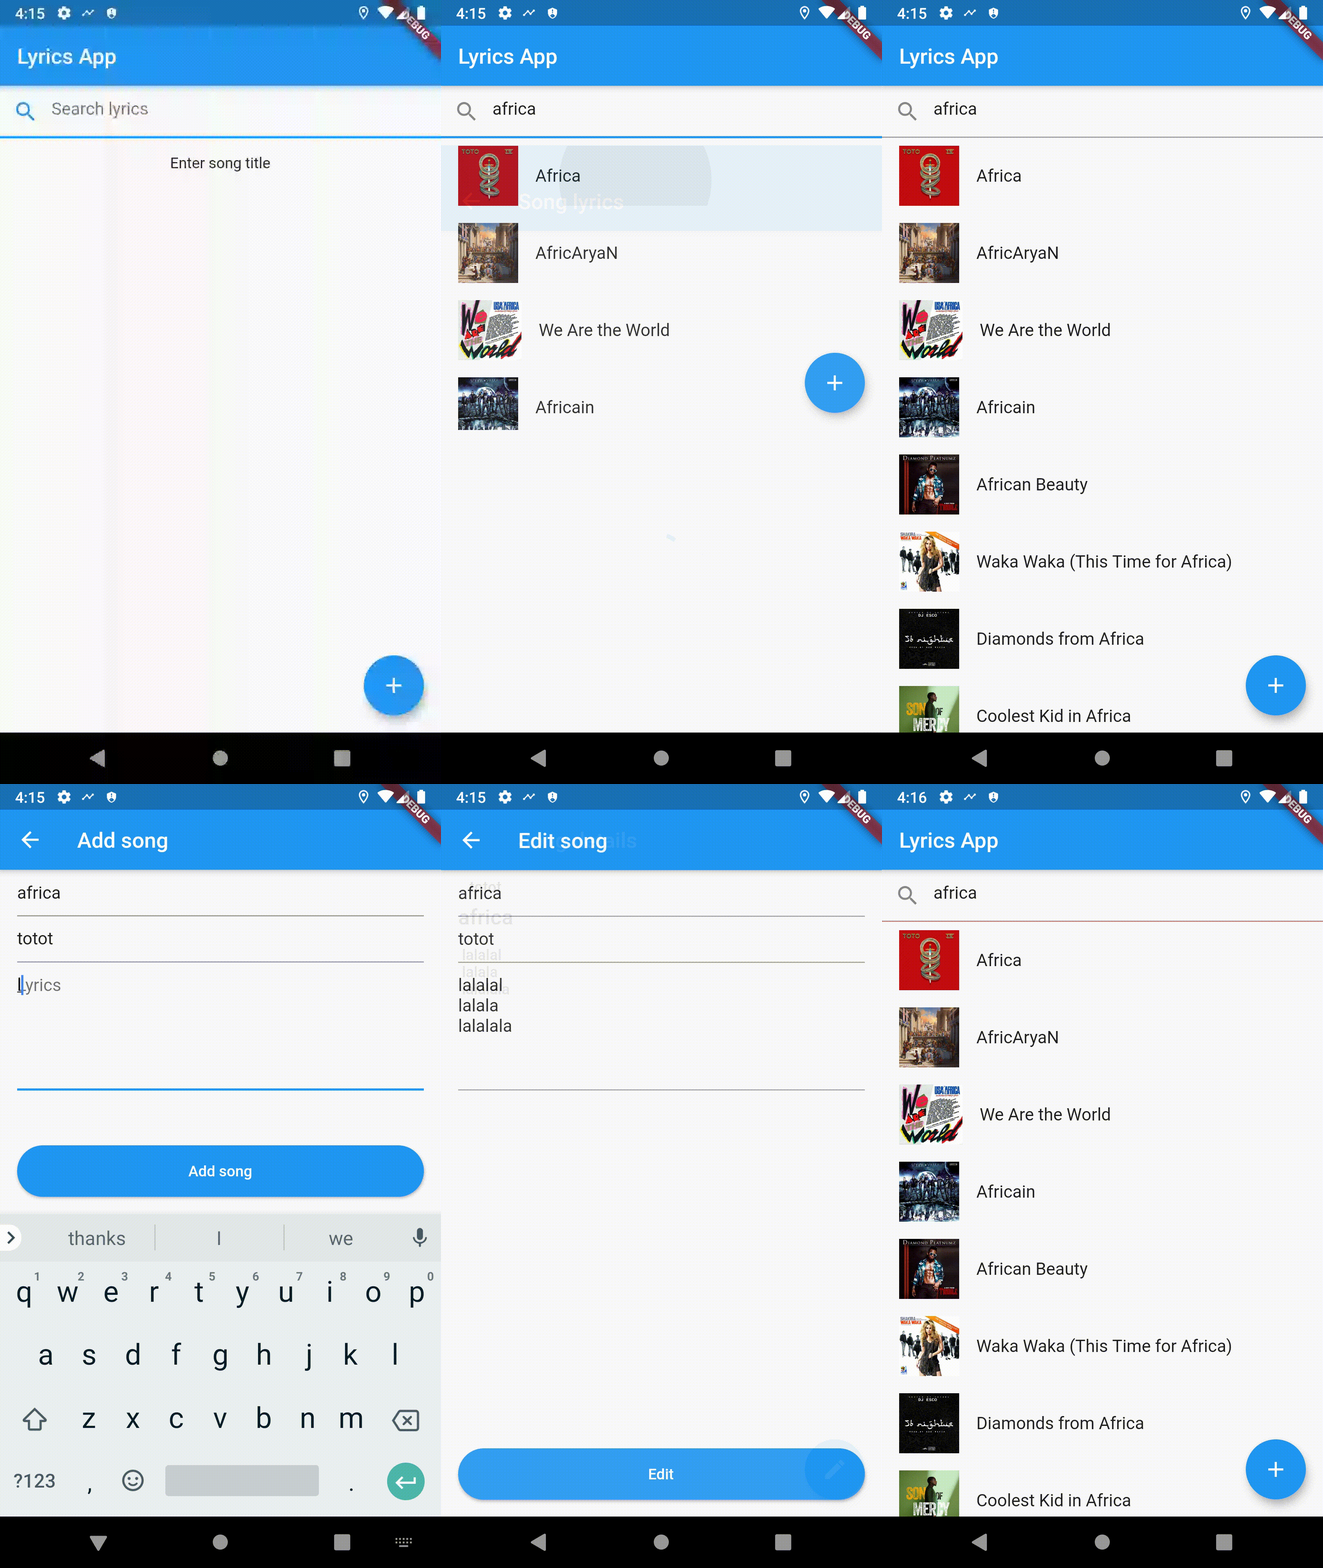
Let's tackle BLoC by example. I have created a simple app for fetching song lyrics. It should enable the user to search for lyrics from the Genius API. I have also decided to allow a user to create, update and delete their lyrics to test how the BLoC pattern will work with multiple data sources. The source code can be found here. And since I will only describe some specific BLoC components, you can see how I have implemented the Data Source and Repository layer there.

The lyrics fetched from the Genius are displayed on the Webview, and those added by a user are shown on the custom screen with an option to edit them. Removing items is done by swiping them off the list.
Getting started
To start working with Flutter’s BLoC library I had to add two dependencies to the pubspec.yaml file.
dependencies:
  flutter_bloc: ^7.0.0
  rxdart: ^0.27.0
RxDart is optional, but it was removed from flutter_bloc in version 4.0.0 and I wanted to use it for some Reactive debounce
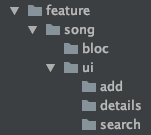
My first approach to creating this app was by following the TODOs example. It looked very similar to my application and had similar functionalities. Following this example, I created one BLoC class for all operations on my lyrics data and three screens. My project structure looked like this:

It turned out not to be the best solution. It was hard to handle state changes in screens properly, and update them depending on states of other screens.
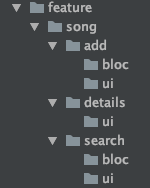
I found out that the best solution for structuring a BLoC app is to create one BLoC for one screen. It will allow you to always know which state a UI component is currently in, just from the BLoC that is assigned to it.
Keeping this in mind, I refactored my project, and afterwards, its structure looked like this:

You can see that not all the screens have a BLoC assigned to it. Take the song details screen as an example. It will only display information about the song, which will be passed to it. So it is unnecessary to track this screen state information.
While working with BLoC it is up to you to decide whenever each screen should have its BLoC component. Some complicated screens could even have multiple BLoCs that will communicate with each other.
Events and states
Now, when I knew how the project will be structured I could define states which every screen could be in, and which events it will send.
I will demonstrate the process of implementing the BLoC architecture by a Search Screen with the option to search for song lyrics. Firstly, I have to define the event that this screen will send.
TextChanged: shows that input in the search field has changed, and new song list should be fetched.
Now I have to define states that this screen could be in.
StateEmpty: it should be active when there is no user input in the search bar, it would be the BLoC’s initial state.
StateError: the state should be passed with an error message when something goes wrong.
StateLyricsLoaded: this state will be passed, with a list of songs, upon the successful fetching songs from the repository.
StateLoading: defines that the repository is waiting for the response from the server, or is processing data.
Putting it all together
I now know how the main screen of the application will behave, and I can start implementing app functionalities. Let's start with the app’s main functionality: searching for lyrics.
When working with the BLoC pattern you should always start from the bottom layer and then move to the upper ones based on the flow of data. So after I implemented the data sources and repository, the next step was to create BLoC.
To hold the states for the main screen of the application I need to create a file song_search_state. It defines all the states that the search screen could be in.
abstract class SongsSearchState extends Equatable {
  @override
  List<Object> get props => [];
}
As you can see, this class extends the Equatable. It will help to check if the new state differs from the current one. It simply allows us to compare objects by the list of props, which are passed in the constructor.
But why do we need to check if the new state differs from the current one? If a passed object is equal to the previous one, we don't want to rebuild our screen, and this solution does that for us. So for example, if StateLoading is passed two times, one after another, the UI widget that listens to it will only receive it once.
class SearchStateEmpty extends SongsSearchState {
  @override
  String toString() => 'SearchStateEmpty';
}

class SearchStateLoading extends SongsSearchState {
  @override
  String toString() => 'SearchStateLoading';
}

class SearchStateSuccess extends SongsSearchState {
  final List<SongBase> songs;
  final String query;

  SearchStateSuccess(this.songs, this.query);

  @override
  List<Object> get props => [songs, query];

  @override
  String toString() => 'SearchStateSuccess { songs: ${songs.length} }';
}

class SearchStateError extends SongsSearchState {
  final String error;

  SearchStateError(this.error);

  @override
  List<Object> get props => [error];

  @override
  String toString() => 'SearchStateError { error: $error }';
}
As you can see, I created states I discuessed earlier. Every state can also hold and pass different objects. For example, ErrorState holds an error message and SuccessState holds a list with the fetched songs.
It is also good practice to override the toString method. It will describe the state and will be printed after a transition from one state to another. More on that later.
abstract class SongAddEditEvent extends Equatable{
  SongAddEditEvent([List props = const []]) : super(props);
}
class TextChanged extends SongSearchEvent {
  final String query;

  TextChanged({this.query}) : super([query]);

  @override
  String toString() => "SongSearchTextChanged { query: $query }";
}
Now I could create an event that will inform BLoC that the user has changed the search query. Event classes look very similar to state classes, and similar rules apply to them.
As soon as states and events were created, I could finally start implementing song_search_bloc.
class SongsSearchBloc extends Bloc<SongSearchEvent, SongsSearchState> {
  final LyricsRepository lyricsRepository;

  SongsSearchBloc({
  	@required this.lyricsRepository,
    @required this.songAddEditBloc})

  @override
  SongsSearchState get initialState => SearchStateEmpty();

  @override
  void onTransition(Transition<SongSearchEvent, SongsSearchState> transition) {
    print(transition);
    super.onTransition(transition);
  }

  @override
  Stream mapEventToState(SongSearchEvent event) async* {
    if (event is TextChanged) {
      yield* _mapSongSearchTextChangedToState(event);
    }
  }
}
The song search BLoC holds an instance of LyricsRepository, which is responsible for combining network and local data source, and doing all operations on the fetched data.
As stated before, I had to override the getter for the field initialState, to show in which state BLoC will be after its creation.
Remember when I advised you to override the toString method in every state and event? The place where such an overridden will be useful is the onTransition. It is called whenever the BLoC changes its state. And thanks to the toString method of every state, after each transition, the terminal will print nice output.
I/flutter (22988): Transition { currentState: SearchStateEmpty, event: SongSearchTextChanged { query: never gonna give }, nextState: SearchStateLoading }
I/flutter (22988): Transition { currentState: SearchStateLoading, event: SongSearchTextChanged { query: never gonna give }, nextState: SearchStateSuccess { songs: 10 } }
I/flutter (22988): Transition { currentState: SearchStateSuccess { songs: 10 }, event: SongSearchTextChanged { query:  }, nextState: SearchStateEmpty }
The next thing to override in BLoC is mapEventToState method. It will be called every time a new event is added to the BLoC, and it should do what its name suggests: react to a particular event with a specific state.
Every event should have its corresponding method. So, as stated before, TextChanged should produce a state depending on the result of search.
Stream _mapSongSearchTextChangedToState(TextChanged event) async* {
  final String searchQuery = event.query;
  if (searchQuery.isEmpty) {
    yield SearchStateEmpty();
  } else {
    yield SearchStateLoading();
    try {
      final result = await lyricsRepository.searchSongs(searchQuery);
      yield SearchStateSuccess(result, searchQuery);
    } catch (error) {
      yield error is SearchResultError
          ? SearchStateError(error.message)
          : SearchStateError("Default error");
    }
  }
}
One new thing for me was the yield keyword. It adds value to the stream that was called by the yield statement*. You can think about it that it acts as a return, but it doesn't stop the execution of code that comes after, thanks to which the state could be changed to multiple values in one method.
One last thing that should be done is to provide the created BLoC, so that it could be accessed by UI widgets. To achieve this main.dart file should be modified.
  @override
  Widget build(BuildContext context) {
    return BlocProvider<SongAddEditBloc>(
        create: (context)
            SongAddEditBloc(lyricsRepository: lyricsRepository),
        child: MaterialApp(
          //main app code
        ));
  }
Working with BLoC from the UI
After a BLoC is implemented, the next thing to do is to make use of it in the UI. Firstly, I need to show an appropriate widget depending on the state:
@override
Widget build(BuildContext context) {
  return BlocBuilder<SongsSearchBloc, SongsSearchState>
    bloc: BlocProvider.of(context),
    builder: (BuildContext context, SongsSearchState state) {
      if (state is SearchStateLoading) {
        return  CircularProgressIndicator();
      }
      if (state is SearchStateError) {
        return Text(state.error);
      }
      if (state is SearchStateSuccess) {
        return state.songs.isEmpty
            ? Text(S.EMPTY_LIST.tr())
            : Expanded(
                child: _SongsSearchResults(
                  songsList: state.songs,
                ),
              );
      } else {
        return  Text(S.ENTER_SONG_TITLE.tr());
      }
    },
  );
}
Then in the TextField, where the user types song search query, I needed to send the new event to the created BLoC. It could be achieved by calling the add(Event) method.
TextField(
  onChanged: (text) {
     _songSearchBloc.add(TextChanged(query: text));
  }
)
If you take a look at the project’s source code you will see that these functions are placed in separate files. And this is where the power of BLoC lies in. You can get the same instance of a single BLoC in any Widget.
Transforming events
Now the search is working as desired. But there is one thing that could be improved. Right now, each time the user changes the text input, a new request is sent. So when the user types the name of the song very quickly there will be as many requests as the letters this title contains. A good practice in this situation is to wait for a small amount of time and cancel the previous request when a new one is send. This method is called debounce – you can find more information about it in ReactiveX documentation.
@override
  Stream<Transition<SongSearchEvent, SongsSearchState>> transformEvents(Stream<SongSearchEvent> events,
      TransitionFunction<SongSearchEvent, SongsSearchState> transitionFn) {

    final nonDebounceStream =
        events.where((event) => event is! TextChanged);

    final debounceStream =
       events.where((event) => event is TextChanged).debounceTime(
         Duration(milliseconds: DEFAULT_SEARCH_DEBOUNCE),
       );

    return super.transformEvents(
        MergeStream([nonDebounceStream, debounceStream]), transitionFn);
  }
As I mentioned before, we can extend Equatable in the event class of the BLoC to know whenever the state changed to new. This enables us to override the transformEvents function in BLoC and manipulate the incoming stream.
Communication between BLoCs
Let's fast-forward a little bit. I implemented the second BLoC with an option to add and edit a song. Analogically to what I showed before, I added events state and assigned them to the screen.
Everything worked great until I added a song and went back to my search screen. When a search query of what newly added song should contain was inputted, it would not appear on the list.
My first solution was to update the list after adding and removing the song. But it generated unnecessary API calls. I found a better solution, which is listening to my second BLoC state changes in the first one.
First, I had to add new events to SongSearchBloc – SongAdded and SongUpdated – which will pass the instance of an added or changed song. Then, I create something called StreamSubscription, which is responsible for listening to changes from other BLoCs.
final SongAddEditBloc songAddEditBloc;

StreamSubscription addEditBlocSubscription;

SongsSearchBloc(
    {@required this.lyricsRepository, @required this.songAddEditBloc}) {
  songAddEditBloc.listen((songAddEditState) {
    if (state is SearchStateSuccess) {
      if (songAddEditState is EditSongStateSuccess) {
        add(SongUpdated(song: songAddEditState.song));
      } else if (songAddEditState is AddSongStateSuccess) {
        add(SongAdded(song: songAddEditState.song));
      }
    }
  });
}
It is also very important to remember to cancel a subscription when it is not needed anymore. Every BLoC can override the method close, which is called if the BLoC will no longer be used.
@override
Future<void> close() {
  addEditBlocSubscription.cancel();
  return super.close();
}
Because I created the second BLoC, and because the first one depended on it, the main file should be modified once again.
@override
Widget build(BuildContext context) {
  return MultiBlocProvider(
    providers: [
      BlocProvider<SongAddEditBloc>(
        create: (context) =>
            SongAddEditBloc(lyricsRepository: lyricsRepository),
      ),
      BlocProvider<SongsSearchBloc>(
        create: (context) => SongsSearchBloc(
            lyricsRepository: lyricsRepository,
            songAddEditBloc: BlocProvider.of<SongAddEditBloc>(context)),
      ),
    ],
    child: MaterialApp(
        //main app code
        ),
  );
}
Testing with BLoC
As I stated before, BLoC helps you to create tests easily. Since this topic is really broad and could be a topic for another article, I will show a simple example, and if you want to see more of them, you can always have a look at the source code, where I prepared few tests.
Firstly, we need to build the mocked classes used in tests.
class MockLyricsRepository extends Mock implements LyricsRepository {}
class MockSongBase extends Mock implements SongBase {}
Afterwards, we can start implementing the main function of our tests. We should remember to initialize the BLoC in the setUp method and close it in tearDown.
void main() {
  SongsSearchBloc songsSearchBloc;
  MockLyricsRepository lyricsRepository;

  String query = "query.test";
  List<SongBase> songsList = List();

  setUp(() {
    lyricsRepository = MockLyricsRepository();
    songsSearchBloc = SongsSearchBloc(lyricsRepository: lyricsRepository);
  });

  tearDown(() {
    songsSearchBloc?.close();
  });
}
Then, we can write simple tests that will check whenever the BLoC’s initial state is correct and it does not emit any state after being closed.
test('after initialization bloc state is correct', () {
   expect(SearchStateEmpty(), songsSearchBloc.initialState);
});

test('after closing bloc does not emit any states', () {
   expectLater(songsSearchBloc, emitsInOrder([SearchStateEmpty(), emitsDone]));

   songsSearchBloc.close();
});
When writing tests for BLoC, you need to know in which states the BLoC is expected to be after specific events. Let's take the search functionality as an example. After a user inputs text, the state should change from empty to loading; after a song list is fetched, the state should change to success.. These states should be defined in this order in an array and passed as an argument to the function expectsLater, which checks if a BLoC’s states have changed accordingly.
test('emits success state after insering lyrics search query', () {
	List<SongBase> songsList = List();
    songsList.add(MockSongBase());

    final expectedResponse = [
      SearchStateEmpty(),
      SearchStateLoading(),
      SearchStateSuccess(songsList, query)
    ];
    expectLater(songsSearchBloc, emitsInOrder(expectedResponse));

    when(lyricsRepository.searchSongs(query))
        .thenAnswer((_) => Future.value(songsList));

    songsSearchBloc.add(TextChanged(query: query));
});
Then, we only need to tell the instance of mocked LyricsRepository to return the list with the mocked songs, so that when our BLoC calls this function it will work as expected.
The last thing to do is to add an event to our BLoC that will produce the desired state, and that's it. Now we have a working test for the implemented functionality.
Summary
I think that BLoC is a great pattern, which could be used in every type of app. It helps to improve the quality of your code and makes working with it a real pleasure.
Since it uses advanced techniques like Streams and Reactive Programming, I think that it would be hard for the beginners to try it. But after you get the hang of the fundamentals, it is really simple to create a simple app using this architecture.
Photo by David Pisnoy on Unsplash
