Practical Guidelines For Using Kubernetes On AWS


Every technology has its own disadvantages, which very often can’t be adjusted. Kubernetes comes with flexibility as an embedded attribute. How can you leverage that when using Kubernetes on AWS cloud?
Have you faced a situation when your applications need more or fewer resources, some users need permissions, or you want to unify a process of microservices deployment?
Every one of these actions needs to be actioned in different places and ways. A lot of maintenance overhead, dependencies, tools, and money.
In this article, I present the Kubernetes approach using AWS-managed services, and how to use the potential of Kubernetes on AWS cloud. It leads to a unified environment, defined Infrastructure as Code (IaC) with high potential to fit small and huge infrastructures. Let's dive in!
What is Kubernetes?
Kubernetes is an open-source container orchestration system for automating software deployment, scaling, and management.
Managed Kubernetes service allows you to perform different types of actions like:
- Deploying your applications
- Adjusting the number of servers (nodes) beneath and replicas of applications
- Granting permissions
- Managing storage, secrets, and other resources around the environment
Imagination is your limit. Kubernetes is very extendable.
How does Kubernetes work?
It uses a continuous feedback loop. Very similar to the DevOps loop. Kubernetes reconciliation loop looks like this:
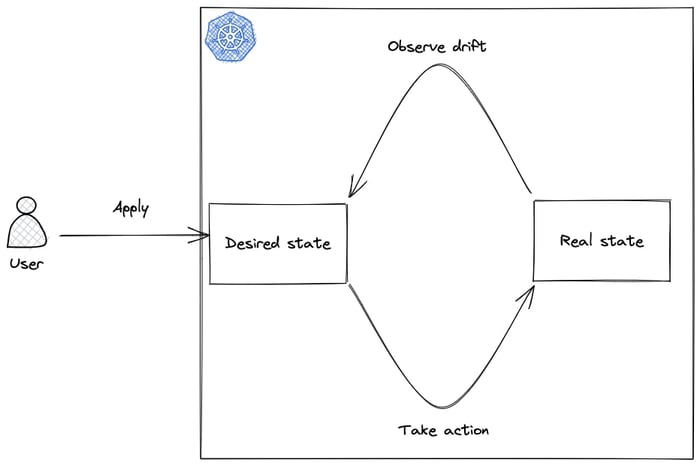
This is saved in the Kubernetes database (etcd), and after that the whole mechanism will take care of providing requirements and keep the application in a running state.
This is a loop, because if something happens outside YAML (outside intentional data change in etcd), for instance, the application crashes or there are not enough CPU/memory resources – Kubernetes will lead to the desired state by adding more nodes.
Kubernetes can also remove over-provisioned nodes to save costs and rearrange containers again without downtime. The ability to recognize and repair failures in elements of the whole system is called self-healing.
What is Kubernetes used for?
Kubernetes, like other similar technologies, is used to put dynamic behavior into an environment. What’s more, Kubernetes deployment creates one unified layer between the developer and the application.
You can imagine Kubernetes as an API that we can use with a declarative approach. For this purpose, we use YAML which is used as input for Kubernetes API. Everything that is needed can be defined via YAML.
Can Kubernetes run on AWS?
Each Kubernetes cluster can be installed in different ways. Manual installation on bare metal or virtual servers gives the most control, but is also the most complicated.
In this area, cloud providers do a good job by reducing the entry threshold. According to statistics, Amazon EKS is the most popular solution used for running Kubernetes.

How to use Kubernetes on AWS
The main benefit of using the combination of Amazon and the Elastic Kubernetes Service (EKS) is that it manages the underlying infrastructure for us. Provisioning nodes, managing control planes, doing updates, integrating with other AWS services, and much more.
EKS allows us to start very quickly without spending too much time on configuring core elements. They are preconfigured and ready to use. We can adjust it when our infrastructure is growing.
In this guideline, we will build a simple cluster using Terraform and community modules.
Here you have a basic implementation:
module "vpc" {
   source  = "terraform-aws-modules/vpc/aws"
   version = "3.13.0"

   name = "my-vpc"
   cidr = "10.97.0.0/16"

   azs             = data.aws_availability_zones.available.names
   private_subnets = ["10.97.1.0/24", "10.97.2.0/24", "10.97.3.0/24"]
   public_subnets  = ["10.97.4.0/24", "10.97.5.0/24", "10.97.6.0/24"]


   enable_nat_gateway   = true
   single_nat_gateway   = true
   enable_dns_hostnames = true
  }

  module "eks" {
    source  = "terraform-aws-modules/eks/aws"
    version = "18.15.0"

    cluster_name    = "my-cluster"
    cluster_version = "1.22"

    vpc_id                          = module.vpc.vpc_id
    subnet_ids                      = module.vpc.private_subnets
    cluster_endpoint_public_access  = true
    cluster_endpoint_private_access = true

    eks_managed_node_groups = {
      main = {
        instance_types = ["t3.small"]
        disk_size      = 50

        desired_capacity = 1
        max_capacity     = 2
        min_capacity     = 0

        create_iam_role = true
        iam_role_name   = "eks-managed-node-group-main"
      }

      spots = {
        capacity_type = "SPOT"

        instance_types = ["t3.small"]
        disk_size      = 50

        desired_capacity = 1
        max_capacity     = 3
        min_capacity     = 0

        create_iam_role = true
        iam_role_name   = "eks-managed-node-group-spot"

      }

    }
  }
Let’s describe what we’ve done. First of all, we are using two community modules. Scalable Kubernetes clusters with their nodes need to be put inside a VPC. That’s why we are creating one with private and public subnets. Nodes are placed in a private subnet because we won’t directly expose their ports outside (line 26).
AWS gives us the possibility to use three types of node groups:
- Fargate – it is a serverless approach. AWS takes our CPU/memory needs and provides servers. We don’t manage them.
- Self-managed nodes – we create EC2 instances and connect them to EKS. This is the most complicated way, but it gives full control.
- EKS managed node groups – we define which instances we need and AWS provides them, but we are able to customize. That is our way to go for this article.
As you can see on the code, we created two EKS-managed node groups. Both are very similar, but the second one (spots – line 43) is made from spot instances. This is a very good option for cost optimization. If you don’t know spot instances, please take a look at Amazon EC2 Spot Instances.
Parameters, max and min capacity, are about how many nodes we want to have. There is a range, because thanks to some mechanisms, like the Kubernetes cluster-autoscaler, we are able to control those numbers. Anyway, scaling is a huge topic that we will raise another time.
After applying the above code, the EKS cluster will launch with two node groups. Now, we are able to connect and create some Kubernetes objects. This is not the end of our journey. We have a working Kubernetes cluster, but to see the full potential, we will associate cluster resources with AWS services. This is the main advantage of Kubernetes in the cloud.
Imagine, that we have one deployment with a simple nginx application. We’ve created Pod and Service to expose the application to the Internet.
Example code would look like this:
  apiVersion: v1
  kind: Pod
  metadata:
    name: simple-app
    labels:
      app: simple-app
  spec:
    containers:
      - image: nginx:latest
        name: my-app
        ports:
          - containerPort: 80
  ---
  apiVersion: v1
  kind: Service
  metadata:
    name: simple-app
    labels:
      app: simple-app
  spec:
    type: LoadBalancer
    selector:
      app: simple-app
    ports:
      - protocol: TCP
        port: 80
        targetPort: 80
We are defining Pod just for simplicity. Best practice would be to configure Deployment that manages Pods. The main thing here is the Service definition. Thanks to Kubernetes tightly coupled with AWS, we are able to define type: LoadBalancer (line 21) which informs EKS that we want to expose that service.
EKS will spin up (in a few minutes) a load balancer and configure it to route to our application. By default, it will be the Classic Load Balancer, but there are many other possibilities. Take a look at the AWS Load Balancer Controller and try out your ideas. This is the proper playground for such tests.
First steps with Kubernetes on AWS
Less than an hour was enough to create an EKS cluster, deploy the first application, and expose it to the Internet. There are a lot of optimizations that should be addressed, but it depends on our use case. Anyway, it’s enough for a first contact with Kubernetes and to feel how it works.
The final thought is that the AWS-managed EKS service is doing an amazing job. It gives the opportunity to develop an environment with Kubernetes that fits your business in terms of needs and costs.
Combine that with Netguru’s expertise and hands-on experience in this area and there you have it – a fully managed and maintained Kubernetes ecosystem built on top of AWS services.


