Stay Safe With SafetyNet Attestation API in Android

As engineers, we have to make sure that valuable data in our applications will not be compromised. We should, of course, follow good practices like communicating with our server via https and other common approaches. However, as Android Developers, we also have to remember other vulnerabilities that our applications are facing every day.
Threats from Android Developers perspective
Aside from typical threats, for example, related to network requests, we need to keep in mind that our applications are running on different devices. This is not a service running on an ecosystem that is under our control – we have to be aware of this and try to find problems related to it. Maybe you’re wondering, “Ok, but why?”. These threats are unpredictable and they can damage the device but also make our applications work slower or maybe not work at all. When these threats are present, the sensitive data stored in our app is only protected by a thin wall and can be easily compromised. I have some examples of possible threats that I want to cover here.
Users can do a lot of things with their devices that decrease their level of security. They can, for example, root devices or install custom ROMs. Both of these examples are based on the same possible problem. When the device is rooted, the whole security of the device is in the hands of the user. This is also applicable to custom ROMs (firmware created by the community based on Android’s AOSP), most of them require root. With root privileges, it is possible to access the application’s internal data which would not be accessible without the root. This is just one problem, but there are many that we, as developers of applications, want to avoid. The next possible threat can come with uncertified devices. Google created a Compatibility Definition Document with a list of guidelines and requirements that every Android device manufacturer must follow to pass the Compatibility Test Suite (CTS). When the device doesn’t pass this test, it can’t be shipped with any important Google apps pre-installed. However, there is still a way to bypass this and have the Google Play Store on such a device. If we’re letting our apps run on uncertified devices, we’re losing some of the guarantee that Google provides around device consistency. This can lead to unexpected behavior and crashes that wouldn’t be an issue with certified devices.
Meet SafetyNet
Now, if we find possible threats, we have to find solutions for them. Fortunately, Google provides us with a set of tools to make our work easier.
SafetyNet is a set of APIs from Google Play Services for developers to ensure that apps are running in a safe environment. With these, you can verify several levels of security:
- The Safe Browsing API allows your app to check whether a URL used in the application is marked by Google as a threat.
- The reCAPTCHA API provides the engine to protect an application from spam or other abusive actions.
- With the Verify Apps API, you can check whether any potentially harmful applications are installed on a user’s device or whether the user has enabled the Verify Apps feature.
- The last is the Attestation API, which I want to write more about in this codestory.
SafetyNet is not very popular; only a small percentage of applications in Google Play are using it. For example, Android Pay, Pokemon GO, and Netflix are using SafetyNet. It should be implemented especially in applications handling sensitive user data, like banking apps, games, or e-commerce.
Device attestation
SafetyNet Attestation is an anti-abuse API used to validate the integrity of the device on which your application is running. Using this tool as part of the security system, we can include an additional layer of security and make sensitive apps as secure as possible. On the other hand, people that use a modified version of Android won’t be able to use apps that implement the check.
How it works
Before we dive into details of the Attestation API, it’s important to introduce some related things that we’ll need. First, every API request needs a special value called a nonce. In cryptography, it’s a random number that can be used just once in communication. The nonce is used in an authentication protocol to ensure that old communications cannot be reused in replay attacks. If you want to read more about nonces, check out this article. The second thing is the response from the API. It’s a signed JSON object in the JWS (JSON Web Signature) standard. A JWS is built from three parts: header, payload with actual response, and signature.
Payload part:
{
	"timestampMs":9860437986543,
	"nonce":"R2Rra24fVm5xa2Mg",
	"apkPackageName":"com.package.name.of.requesting.app",
	"apkCertificateDigestSha256": [
    	"base64CertificateHash"
    ],
	"ctsProfileMatch": true,
	"basicIntegrity": true,
}
Let’s analyze every item from the payload:
- timestampMs – time when request was handled on Google’s servers.
- nonce – nonce that we added to request encoded in base64.
- apkPackageName – package name of requesting app.
- apkCertificateDigestSha256 – SHA-256 hash of certificate used to sign app in base64.
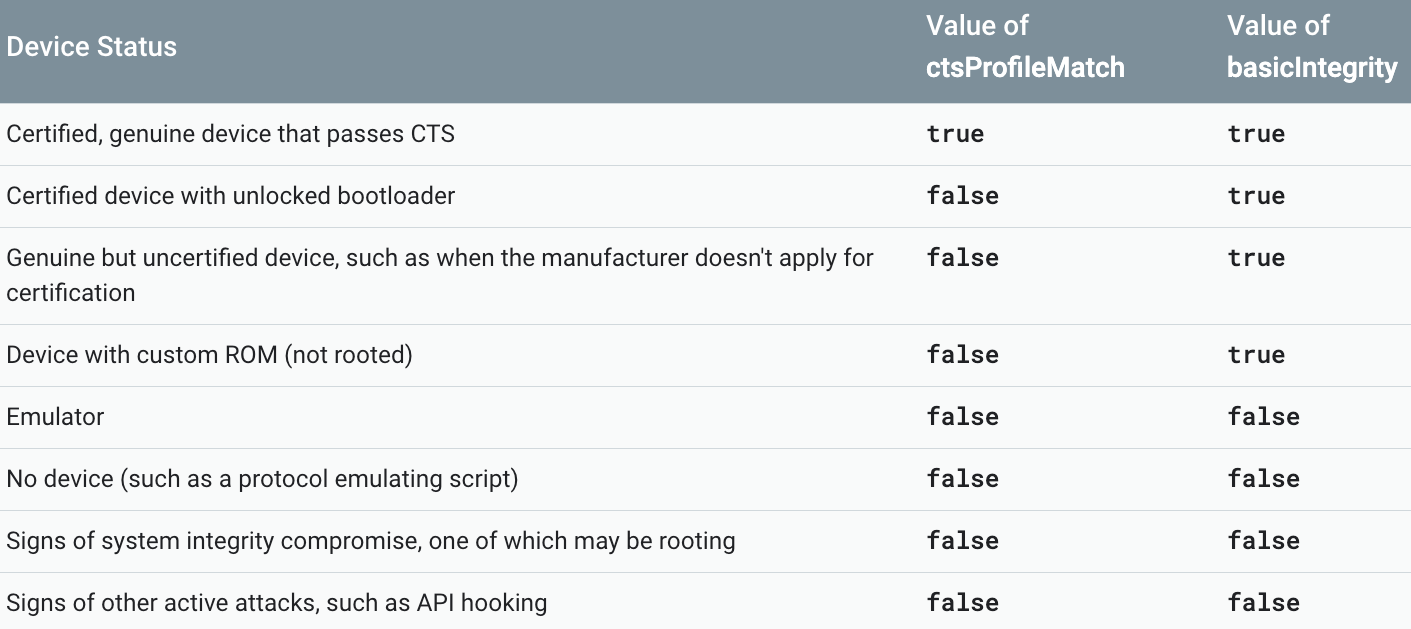
- ctsprofilematch – flag that is indicating whether device passed Compatibility Test Suite.
- basicIntegrity – this flag is about root/emulator check.
To properly validate the attestation result, it’s good to verify at least three fields (other than ctsProfileMatch and basicIntegrity) to check whether anything interrupted our flow.
Below, you can find some variations of results and what can have an impact on the attestation status. You can find more details about the attestation responsehere.

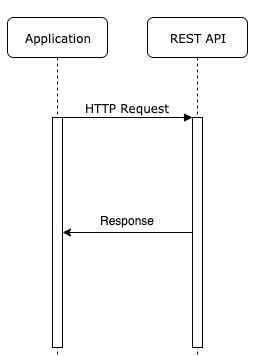
With that knowledge, we can move forward. In a typical application that is connected to an API, the networking layer looks really simple. The app is just sending an HTTP request and expecting a response. So the networking layer looks more or less like the diagram below.

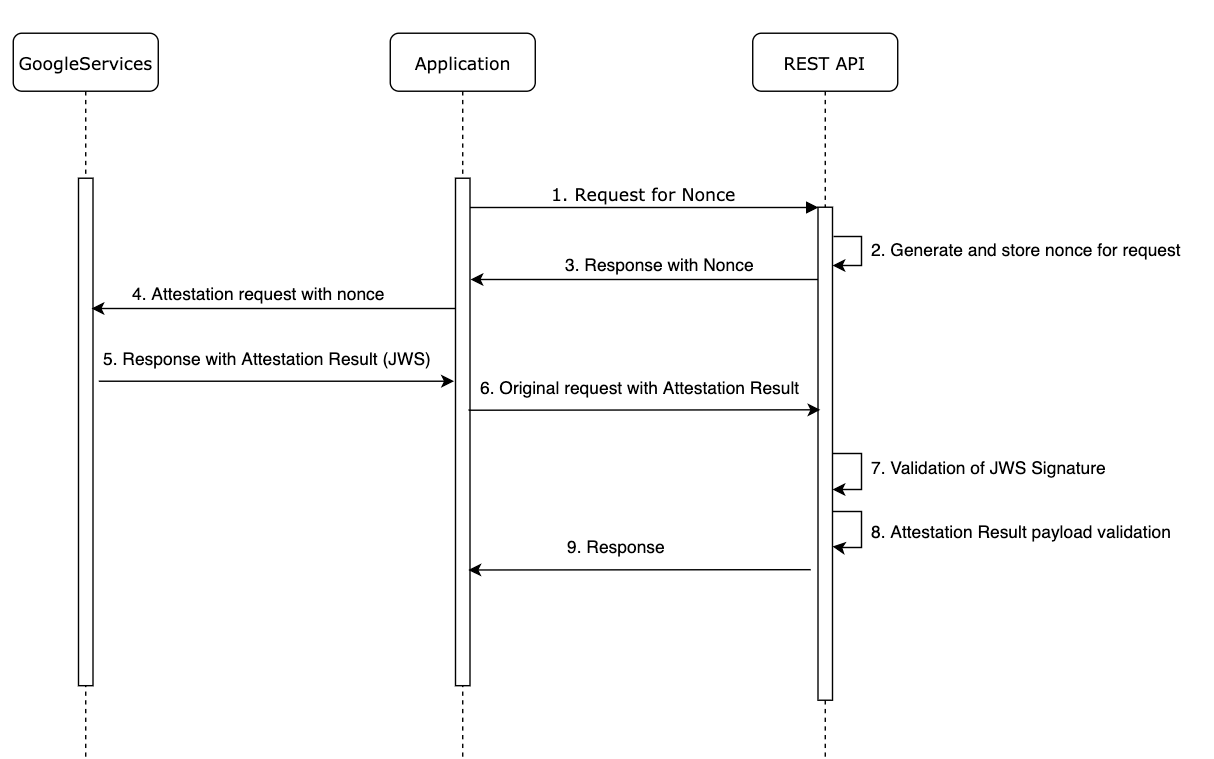
If we want to add a security layer to this flow using the SafetyNet Attestation API, we need to extend this flow. So it will look like the graph below.

(1-3) In the first step, the application is asking our API for a nonce. This should be generated (for example as a hash with a timestamp and user session) and stored on the server-side.
(4-5) The SafetyNet Attestation API is receiving a call from the app and starts evaluating the runtime environment of the device. When it’s done, the API requests the assessment results from Google’s servers. The servers send back the signed attestation to the SafetyNet service on the device, which is forwarded to our application.
(6-9) The result is sent to our server. The server validates the response and uses it to determine an anti-abuse decision, if the app can be trusted.
Introducing Attestation API to application
Now I want to show you how you can easily add the SafetyNet Attestation into your application.
- Obtain an API key
As in every API from Google Play Services, we need to obtain an API key fromdeveloper console. Enable Android Device Verification in the project and get a key from the credentials section. - Add dependency
implementation "com.google.android.gms:play-services-safetynet:$safetyNetVersion" - Make an attestation request
To check the state of the device, we need to make a request using the Google Play Services client
val client = SafetyNet.getClient(context) client.attest(nonce.value, BuildConfig.SAFETYNET_API_KEY) .addOnSuccessListener { response onSuccess(response) } .addOnFailureListener { onError(it) } - Send result to server
The last step is to provide the attestation result to the backend to make a decision about the integrity of the device. It can be done by sending the original request to the server with the result in a header, for example. If the server decides that the attestation result is ok, then it sends the requested response, otherwise, it sends an error message.
Limitations
The SafetyNet API has some limitations. One of the most important is that it can be bypassed (but what can’t), for example, using Magisk. It's a never-ending game of cat and mouse. So it’s good to join the forces of SafetyNet with another API for detecting rooted devices. Also, like any Google Play Service, SafetyNet has limitations on requests per day/minute, etc, which can be extended for an additional price. The Attestation API also leads to latency, and increased network and battery usage, so it’s important to find a balance between security and usability.
Example project
A working example of both android and server-side can be found here.
Conclusion
As we can see in this article, SafetyNet itself is pretty easy to implement on the applications side. When an app handles sensitive data, processes payments, or does anything important, it’s good to keep in mind that tools like these exist. It shouldn’t be the only layer of security in an application, but it’s definitely worth adding since it’s pretty simple to implement in an application.
Photo by Clint Adair on Unsplash


