Bridging Native UI Components in the React Native

Contents
Introduction
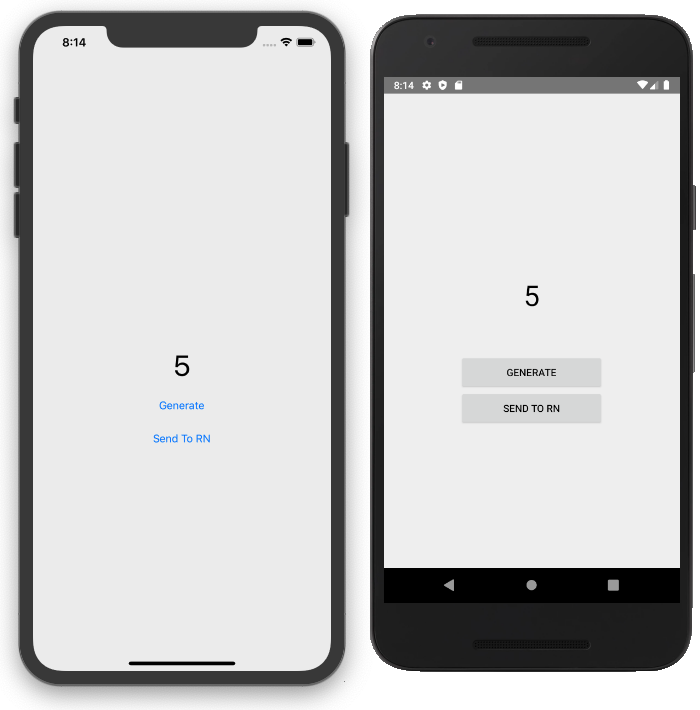
For the tutorial’s purposes, I’ve created a simple React Native app that displays the Swift/Kotlin native UI view and the React Native text label component at the bottom of the screen.
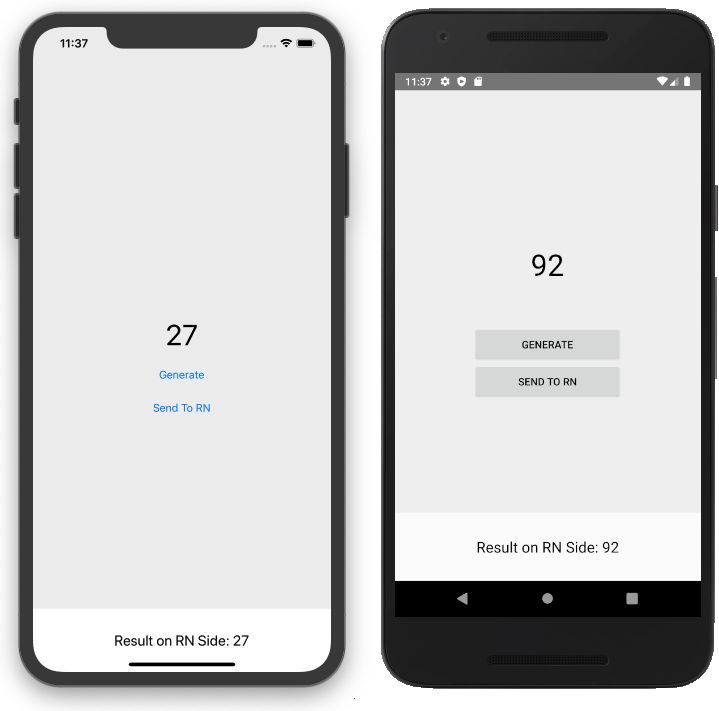
The native view, the one with gray background, contains 3 UI elements:
- Label with a generated random number,
- "Generate" button - every time the button is tapped, a new random number is displayed,
- "Send to RN” button - every time the button is tapped, the currently displayed number is passed to RN and displayed on the React Native label.
This tutorial contains 4 sections:
- Initial setup,
- Displaying a native view in a React Native app,
- Passing props from React Native to native,
- Passing callbacks from React Native to native.
The easiest way to create a native module for a RN app is to use bob.
Bob is a simple CLI to scaffold and build React Native libraries for different targets.
To create a new project, run the create command. In my case, it is:
npx @react-native-community/bob create native-number-generator
The CLI asks a few questions about the author, repository, etc.. The most important one is about the stack that you want to use. In the provided example I use Kotlin and Swift. Bob creates the initial directories for iOS and Android modules as well as JS files and the whole config. It also creates an example directory where you can test your solution.
You can read more about Bob in this medium article by Satyajit Sahoo.
Displaying Native view in the RN app
This step’s goal is to display a native view inside a React Native view. Moreover, the “Generate” button should update the label above it with the next random number - fully on the native side.

Android
In the android/src/main/res/layout directory, create a generator_layout.xml file with the following code:

The next step is to inflate this layout in the native class. In android/src/main/java/com/reactnativenativenumbergenerator/ create a Kotlin file named NativeNumberGeneratorView.kt with the following code:

There is not much React Native-related code here. The exception is the context variable with the type ThemedReactContextType. In general, the code above is responsible for setting up the class, handling the "Generate" button action, and displaying the random number.
In order to use this view in a React Native app, you need to create another Kotlin class which serves as the manager to the project. Create a file named NativeNumberGeneratorViewManager.kt in the android/src/main/java/com/reactnativenativenumbergenerator/ directory. Add the following code:

This manager class sets the component name that will be used on the React Native side. The overridden creatingViewInstance method returns our previously created view.
The last thing to do is to “register” the created manager with the generated package. Open android/src/main/java/com/reactnativenativenumbergenerator/NativeNumberGeneratorPackage.kt and change the createViewManagers method:

iOS
First of all, adjust the bridge header file to include the RCTViewManager header. Change the ios/NativeNumberGenerator-Bridging-Header.h to:
In the ios/ directory create a file named NativeNumberGeneratorView.swift. This file contains code responsible for setting up the UIView with the Swift code. There is no React Native-related code here:

Then, similarly to Android, you need to create a manager for the created View. In the ios/ directory, create a NativeNumberGeneratorViewManager.swift file and add the following code:

Similar to the Android one, the iOS manager is responsible for handling the previously created view.
The last thing to do is to register the manager with the package. Open ios/NativeNumberGenerator.m file and add a declaration of the new interface using lines 12 to 14.

We do not declare the name of the component directly in the code as a string. The iOS bridge uses the manager class name to define the React Native component’s name. In our case, it is NativeNumberGeneratorViewManager.
JS/TS
To use the previously created native component, the first thing you have to do is to wrap it using the requireNativeComponent function. Additionally, if you use Typescript, you have to define the types. Create a RandomNumberGeneratorView.tsx file in the src/ directory and add the following code:

Then export the newly created component from the src/index.tsx file:

Finally, you are able to use the component in the app. Edit example/src/App.tsx to display the native view:

Passing props from RN to Native
The goal of this step is to establish communication from native to the JS/TS side by passing props. The initialNumber prop should set the initially shown number on the native label.
Android
First, set up the prop in the manager (lines 17-20) using the following code:

The setInitialNumberProp method uses @ReactProp annotation. It means that it will be fired with each new prop value. The method takes two arguments, the view and the prop.
In the method body, we call the method setInitlaNumber from the NativeNumberGeneatorView class.
At this stage, you don’t have that method, so the next step is adding it to the NativeNumberGeneatorView.kt file - lines 18-21:

After that, each time the component receives a new initialNumber prop, the label text is updated.
iOS
First, you need to declare the new view property in the previously declared interface. Open NativeNumberGenerator.m and add the code from line 14:

The next and final step is adjusting the NativeNumberGeneratorView class. Declare the Obj-C variable with the same name and type as declared in the previous step. Thanks to the didSet observer, you can dynamically respond to the prop change. So, if the new initalNumber prop is passed, the number variable gets updated. Each time the number variable updates, the label text changes. Lines from 5 to 15 contain the described logic:

JS/TS
To adjust the TS code, you have to declare the NativeComponentProps. This interface holds all of the component props.


Passing callback from RN to Native
So far, only one-way communication is established. You can pass props from RN to the native side. The most straightforward way to receive some information from the native side in a React Native app is to use callbacks. This step’s goal is to add an action to the "Send to RN" button. Each time the button is pressed, the current number value should be displayed at the bottom of the screen.

Android
First of all, modify the NativeNumberGeneratorViewManager class by overriding the getExportedCustomDirectEventTypeConstants method (lines 23-28):

This method returns the mapped callbacks.
To use the callback inside the NativeNumberGenerratorView, you need to call the receiveEvent method from RCTEventEmitter class. The method takes 3 arguments. The first argument is targetTag. The second one is the event name. The third one is the map of arguments to pass to the React Native side. Lines 41-50 contain all the "Send to RN" button logic:

iOS
The first step is to extend the view manager interface with the new view property - line 15:

Then, you need to modify the NativeNumberGeneratorView class in three steps:
- Declare an optional Obj-C variable with the same name and type as in the previous step - line 5,
- Create a handler that uses the passed callback declared in the previous step. Pass a dictionary as an argument. Make sure that you do a nil condition check before - lines 70-74.
- Add the touch-up handler to the “Send to RN” button - line 51.

JS/TS
Firstly, update the type definition in the src/RandomNumberGeneratorView.tsx file:

Then, to use the callback, create a Text component that holds the number passed from the native side in the App.tsx file. Next, define a handleNumberSend callback. Finally, add an onNumberSend prop to the RandomNumberGeneratorView component:

Summary
Bridging native UI views can be a powerful tool in a developer’s hands. The ability to expose Swift/Kotlin components to React Native makes it possible to use already available native libraries for iOS and Android applications. The presented approach does not require creating another native screen. We can use the created components on as many screens as we want and we are not limited when it comes to the navigation solution.


