Building Cross-Platform GUI Applications in Kivy


Contents
Building GUI applications is quite a challenging task, especially when it comes to running the application on various platforms.
In this article, I will be demonstrating the design and implementation of a cross- platform GUI application. There are plenty of Python-based frameworks available on the market. I like the Kivy framework the most though. Kivy is an open source Python framework designed for implementing cross-platform user interface applications.
Applications developed in Kivy can be ported on any platform. Isn’t it cool? Let’s deep dive into the fragrance of Kivy.
Why Kivy?
Of course, it's a valid question from anyone who knows different GUI frameworks. So, What is special about Kivy? Well, It has its reasons!
Firstly, we should consider the performance, flexibility and separation of concerns (SoC). Kivy enables GPU acceleration and C-level execution for critical jobs. It’s cross-platform in nature by supporting all major operating systems and touch devices. Rather than writing more theory here, I would suggest checking more information about Kivy’s architecture. Whereas, I will jump into writing a simple Tic-Tac-Toe game application in Kivy, which will cover many aspects of the development.
Installation
Setting up and running the Kivy application is quite simple and easy.
pip install kivy
Though it depends on the development environment, you may choose any suitable way described in Installing Kivy, based on your development environment.
Hello World application without KV Lang
Below-mentioned is an example of writing a simple hello world application.
from kivy.app import App
from kivy.uix.button import Button

class MyApp(App):

   def build(self):
       return Button(text='Hello world')

if __name__ == '__main__':
   MyApp().run()
You can write these lines of code in main.py and execute the file as a standard python script.
python main.py
Hello World application with KV Lang
The above application can be divided into two parts.
-
Python Script
The App class calls the build method and it returns either a widget or an instance of the Builder class.
from kivy.app import App

class MyApp(App):
   pass

if __name__ == '__main__':
   MyApp().run()
In our case, we didn’t mention the build method. Hence the App will execute the default build method and load the .kv file as mentioned below.
-
KV file
Here, I have created a separate kivy file with an extension of .kv as my.kv. This illustrates the implementation of UI components.
#: kivy 2.0

Button:
   text: "Hello world from KV file"
There are different ways of loading the .kv file. By default Kivy loads the .kv file that matches the prefix of the app class defined in the Python script. Such as the MyApp class defined in the above script and it doesn’t have any reference to .kv file. However we have created the my.kv file in the directory level, Hence my.kv will be loaded as default.
-
load_file
Other then the default mechanism, We can explicitly mention a specific .kv file to load
using the load_file method of the Builder class.
from kivy.app import App
from kivy.lang import Builder

class MyApp(App):

   def build(self):
       return Builder.load_file("path/to/any.kv")

if __name__ == '__main__':
MyApp().run()-
load_string
There is another way to write the KV lang as string and then load it using the load_string method.
from kivy.app import App
from kivy.lang import Builder

KV_STRING = '''

#: kivy 2.0

Button:
   text: "Hello world from KV String"
'''

class MyApp(App):

   def build(self):
       return Builder.load_string(KV_STRING)

if __name__ == '__main__':
   MyApp().run()
Understanding KV language
Kivy highly recommends having separation of concerns (SoC), which can be achieved by Kivy Language or KV Lang. KV Lang is a descriptive language with the implementation of rules definition and widget context. It provides a sophisticated way of designing UI components.
Syntax
KV language consists of three kinds of blocks such as:
Root widget class
Every KV file can have only one root widget definition. However, Root widget can have multiple child widgets. For example, in the below mentioned snippet BoxLayout is a root widget and has a Label widget as a child. The syntax of KV lang follows the standard indentation rules of the Python programming language.
BoxLayout:
      orientation:'horizontal'
      Button:
          text: 'Sample button'
Dynamic widget class
A dynamic widget class is a way of defining a custom widget which inherits built-in widgets. There are two different ways to create a custom widget class. One way is to define a custom widget class in a Python file, which enables you to have a mixing of two widgets and overriding the existing behavior.
Here is an example of creating an image button widget by inheriting ButtonBehaivor and Image classes.
``` Python snippet
from kivy.uix.image import Image
from kivy.uix.behaviors import ButtonBehavior

class ImageButton(ButtonBehavior, Image):
    def on_press(self):
        pass
``` KV snippet
#: import ImageButton <package.path>

BoxLayout:
    orientation:'horizontal'
    ImageButton:
        source: '<image_path>'
Another way is to define a custom widget in the KV file itself with a special
syntax as mentioned below.
# Single inheritance
<MyLabel@Label>:
   markup: True
   color: (.27, .27, .27, 1)

# Multiple inheritance
<ImageButton@ButtonBehavior+Image>:

# Override attributes here
BoxLayout:
    orientation:'horizontal'
    MyLabel:
        text: 'Sample label text'
    ImageButton:
        source: '<image_path>'
Here we defined the MyLabel class on the fly, which inherits from Label as a single inheritance.
Inheritance is declared by the “@” symbol, whereas multiple inheritance is simply appending other class with the “+” symbol as mentioned in the above snippet.
This block is defined with the angle brackets like “<Rule1>:” “<Rule1, Rule2>:”. Whereas Rules will be the names of any widget class. This allows us to modify or override the properties and graphical interface of any widget.
Example:
<Label>:
    markup: True
    color: (.27, .27, .27, 1)

BoxLayout:
    orientation:'horizontal'
    Label:
        text: 'Sample label text'
This will change the graphical representation of the Label widget. Hence, wherever we use the Label widget inside the BoxLayout widget or any other parent widget, the label widget will have these two attributes by default.
Essential of KV
There are a few attributes that play a crucial role while accessing or manipulating the associated attribute data on a specific widget. The following is the list of essentials of KV language.
EventDispatcher
EventDispatcher is the core base class of the Kivy Framework. It is responsible for registering and dispatching events. Classes like Widget, Animation and Clock are good examples of EventDispatcher. Kivy has three categories of events such as:
-
Clock Events
These events are associated with the kivy.clock.Clock class. You can register or schedule trigger events by calling its methods like Clock.schedule_once, Clock.schedule_interval and Clock.create_trigger. For example,
from kivy.clock import Clock

def callback_function(duration):
   pass

# Schedule callback_function for every 2 seconds
event = Clock.schedule_interval(callback_function, 2)

# Canceling the event
event.cancel()

# Unscheduling the event using Clock.unschedule
Clock.unschedule(event)

# Schedule callback_function in 3 seconds
Clock.schedule_once(callback_function, 3)

# Create a trigger to callback_function with a delay of 5 seconds.
event_trigger = Clock.create_trigger(callback_function, 5)

# Execute the trigger
event_trigger()-
Widget Events
The widget supports two types of events, including
1. Property events: Every widget has some default properties associated such as size, position, among others. Whenever there is change in its value an event gets triggered. In the next section, we will talk more about the properties classes.
2. Predefined events: These are the events that are bound with the user's action like a Button is pressed or released.
-
Custom Events
With the help of the EventDispatcher class we can write a custom event dispatcher.
Properties
Kivy implements property classes that are built based on the Observer pattern. There are various types of property classes such as
- StringProperty
- NumericProperty
- BoundedNumericProperty
- ObjectProperty
- DictProperty
- ListProperty
- OptionProperty
- AliasProperty
- BooleanProperty
- ReferenceListProperty
on_property
Whenever there is a change in the property value, it will trigger the event to the on_<property> callback. For example,
`main.py`
from kivy.app import App
from kivy.uix.label import Label
from kivy.properties import NumericProperty

class CounterLabel(Label):
   counter = NumericProperty(0)

   def on_counter(self, instance, value):\
       instance.text = 'Counter is set to %d' % value

class MainApp(App):
   title = 'Sample App'

if __name__ == '__main__':
   MainApp().run()
value_expression
Kivy supports Python statements as a value expression for property and on_property attributes.
Like the below mentioned snippet.
Button:
    text: self.state and ('UP' if self.state == 'normal' else 'DOWN')
Button widget has a text attribute which is nothing else but an instance of StringProperty. We can use a Python statement in the value section and the result of the statement will be stored as value to the text property.
reserved keywords
Since every widget has its predefined attributes. Kivy defines a scope of context to access these attributes using the following reserved keywords.
-
self
self keyword refers to the current widget context. For example,
#: kivy 2.0

BoxLayout:
   orientation:'vertical'
   Button:
text: self.state and ('UP' if self.state == 'normal' else 'DOWN')-
root
root keyword refers to the root widget context. You can use this in order to access root level attributes. For example,
#: kivy 2.0
<MyCustomeWidget@BoxLayout>:
   custome_text: 'Custom text'
   orientation:'vertical'
   Button:
text: root.custom_text-
app
app keyword refers to app instance defined in main.py such as
from kivy.app import App
from kivy.uix.button import Button

class MyApp(App):
    title = 'My Kivy application'

if __name__ == '__main__':
   MyApp().run()
In the KV file you can use the app instance as mentioned below.
#: kivy 2.0

BoxLayout:
   orientation:'vertical'
   Label:
       text: app.title
In case you want to access the app instance anywhere in your Python context, you may use this kivy.app.App.get_running_app(). This will return the currently running app instance.
-
args
By using the args keyword you can access the arguments passed in the on_<action> callback methods. For example,
#: kivy 2.0

#: import BooleanProperty kivy.properties.BooleanProperty

BoxLayout:

   focus_status: BooleanProperty(False)

   orientation:'vertical'

   TextInput:

       on_focus: root.focus_status = args[1]

   Label:

       text: "Text Input has focus %s " % str(root.focus_status)
Here we used the on_action method and set the received method arguments into a BooleanProperty variable. I will talk more about properties in upcoming sections.
Ids
Whenever we define the id attribute in a KV file, it will never be available on the widget instance, instead of it will be on weakref to the widget. When a KV file is being processed, weekrefs of every widgets tagged with id attribute will be added to the dictionary “ids” attribute on the root widget. Here is an example to illustrate it.
#: kivy 2.0

BoxLayout:
   orientation:'vertical'
   Button:
       id: btn
       text: "Press me"
   Label:
       text: "Button state is %s " % root.ids.btn.state
Let’s have a glimpse on designing a hello world application with & without KV language.
Tic-Tac-Toe implementation
Tic-Tac-Toe is a very well-known gamel around the world. Though there could be a 0.01% possibility that few people would not know about it. Designing the Tic-Tac-Toe game from scratch is our problem statement.
Project scaffolding
Scaffolding the project is a crucial part of development. It indicates how well you defined and modularized the project. It always helps developers to understand the project. Below is the major breakout of the project.
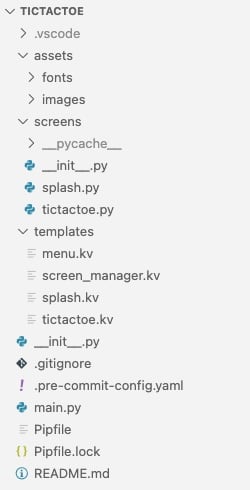
- templates: This contains the UI components design implementation.
- screens: There are few screens where you need to define the business logic and perform some actions based on the user interaction. In that case, I have created python files which extend the screen behavior and user actions.
- assets: This directory contains all media files used in the project.
- main.py: It is the main python script which contains the application build logic and execution point of the application.
- other files and directories are self explanatory
Screen Manager
Screen Manager is a special widget that helps you to manage all other Screen widgets throughout the application. It is dedicated to transition between multiple screens and share data among different screens.
In our case, I have defined a screen manager as templates/screen_manager.kv
#: kivy 2.0
#: import ScreenManager kivy.uix.screenmanager
#: import CardTransition kivy.uix.screenmanager.CardTransition
#: include ./templates/splash.kv
#: include ./templates/tictactoe.kv
#: include ./templates/menu.kv

ScreenManager:
   id: manager
   transition: CardTransition()
   SplashScreen:
       id: splash
       manager: manager
   TicTacToe:
       id: tictactoe
       manager: manager
   MenuScreen:
       id: menu
       manager: manager
This will be loaded by main.py with the load_file method of Builder class. You can refer to it in the main.py section. I have mentioned other screens with two important attributes:
- id: This attribute will be used to refer to the associated instance of the widget.
- manager: Screen widget has a manager attribute which can be used to navigate and access attributes of other screens.
Screens
Screen widget is especially designed to work with Screen Manager. It supports useful events such as on_pre_enter, on_enter, on_pre_leave and on_leave. We will be using some of these events. Let’s jump into designing the splash screen.
Splash Screen

On this screen, We just need to display a logo with a basic animation. After a few seconds we will transit to the tictactoe screen. This means we have two requirements such as the graphical representation of the screen and the behavior.
Graphical representation can be defined in a KV file templates/splash.kv as mentioned below.
#: kivy 2.0
#: import SplashScreen screens.splash

<SplashScreen>:
   canvas.before:
       Color:
           rgba: 1, 1, 1, 1
       Rectangle:
           size: self.size
           pos: self.pos
   BoxLayout:
       id: logo
       orientation:'vertical'
Screen behavior can be defined in the python file screens/splash.py where we can write the logic to achieve the animation on specific screen events.
In our case, we want to display a logo image with a bounce animation for 2 seconds and then transit to the main screen. This can be achieved in the on_enter event as mentioned below.
from kivy.uix.screenmanager import Screen
from kivy.uix.image import Image
from kivy.animation import Animation
from kivy.clock import Clock

class SplashScreen(Screen):

   def on_enter(self, *args):
       Clock.schedule_once(self._splash_in, 2)
       return super().on_enter(*args)

   def _splash_in(self, duration):
       logo_image = Image(source="assets/images/netguru_logo.png", pos=(800, 800))
       animation = Animation(x=0, y=0, d=2, t="out_bounce")
       animation.start(logo_image)
       self.manager.ids.splash.ids.logo.add_widget(logo_image)
       Clock.schedule_once(self._splash_out, 2)

   def _splash_out(self, duration):
       self.manager.transition.direction = "left"
       self.manager.transition.duration = duration
       self.manager.current = "tictactoe"
TicTacToe Screen
This screen will be the main game screen. It represents the dynamic presentation of several UI components such as grid to place X or O dice images, highlighting both players' turn, and scores.

This screen involves many different components, thus I will be creating a few custom widgets and some of these widgets will be loading dynamically. Since the graphical representation and functionality are divided into two files templates/tictactoe.kv and screens/tictactoe.py.
templates/tictactoe.kv
- imports: I have mentioned some imports from the Python declaration in screens/tictactoe.py, which will be covered in the next section.
#: kivy 2.0
#: import TicTacToe screens.tictactoe
#: import Tile screens.tictactoe
#: import StringProperty kivy.properties.StringProperty- Label: Override the default graphical representation of labels used in this screen.
<Label>:
   markup: True
color: (.27, .27, .27, 1)- Tile: This widget will be used in the grid layout where we will place the dice images dynamically.
<Tile>:
   canvas.before:
       Color:
           rgba: (1, 1, 1, 1)
       Rectangle:
           size: self.size
           pos: self.pos
   on_press: app.root.ids.tictactoe.make_move(self)
- PlayerDataLayout: We will be designing a layout which will display player information as mentioned in the below screenshot. This layout will be used twice for both players.

<PlayerDataLayout@BoxLayout>
   orientation:'vertical'
   dice_image: StringProperty('assets/images/X.png')
   score: ''
   canvas.before:
       Color:
           rgba: (0.88, 0.88, 0.88, 1.0)
       Line:
           width: 2
           rectangle: self.x, self.y, self.width, self.height
   BoxLayout:
       orientation:'horizontal'
       Label:
           text: 'PLAYER '
           font_size: self.width/5
           size_hint_x: 0.7
           allow_stretch: True
       Image:
           source: str(root.dice_image)
           size_hint_x: 0.3
           allow_stretch: True
   Label:
       canvas.before:
           Color:
               rgba: (0.88, 0.88, 0.88, 1.0)
           Rectangle:
               size: self.size
               pos: self.pos
       size_hint_y: None
       height: 1
   Label:
       canvas.before:
           Color:
               rgba: (0.65, 0.70, 0.70, 0.23)
           Rectangle:
               size: self.size
               pos: self.pos
       text: root.score
       font_size: self.width/6
bold: True- GridLayout: This will be the final gridlayout where we are going to load Tile widget dynamically.
<TicTacToe>:
   id: 'tictactoe'
   name: 'tictactoe'
   canvas:
       Color:
           rgba: (1.0, 1.0, 1.0, 1.0)
       Rectangle:
           pos: self.pos
           size: self.size
   AnchorLayout:
       anchor_y: 'top'
       BoxLayout:
           orientation:'vertical'
           BoxLayout:
               orientation:'horizontal'
               size_hint: (1, 0.3)
               padding: ('20dp', '20dp', '20dp', '10dp')
               spacing: '10dp'
               PlayerDataLayout:
                   dice_image: root.player1.active_dice_image
                   score: str(root.player1.score)
               PlayerDataLayout:
                   dice_image: root.player2.active_dice_image
                   score: str(root.player2.score)
           GridLayout:
               id: grid_layout
               spacing: 2
               rows: root.rows
               cols: root.cols
               canvas.before:
                   Color:
                       rgba: (0.88, 0.88, 0.88, 1.0)
                   Rectangle:
                       size: self.size
                       pos: self.pos
screens/tictactoe.py
In this section, I will be explaining about the implementation of the TicTacToe game. I have defined a few classes:
- Tile: This is the declaration of the Tile widget which is used in the KV file.
class Tile(ButtonBehavior, Image):

   def __init__(self, name, **kwargs):
       self.name = name
super().__init__(**kwargs)- Player: This will be a subclass of the EventDispatcher.
class Player(EventDispatcher):
   active = BooleanProperty(False)
   display_score = StringProperty("0")
   name = StringProperty("")
   active_dice_image = StringProperty()
   score = NumericProperty(0)
   winner = BooleanProperty(False)

   def __init__(self, name, dice, dice_image, winner_dice_image, active=False, **kwargs) -> None:
       super(Player, self).__init__(**kwargs)
       self.dice = dice
       self.dice_image = dice_image
       self.winner_dice_image = winner_dice_image
       self.active_dice_image = dice_image
       self.active = active
       self.name = name

   def on_winner(self, obj, value):
       if value:
obj.score += 1- TicTacToe: This will be the subclass of Screen. Here we will be defining all required attributes.
class TicTacToe(Screen):
   player1 = Player(
       name="Player 1",
       dice="X",
       dice_image="assets/images/X.png",
       winner_dice_image="assets/images/X-WIN.png",
       active=True,
   )
   player2 = Player(
       name="Player 2",
       dice="O",
       dice_image="assets/images/O.png",
       winner_dice_image="assets/images/O-WIN.png",
   )
   rows = BoundedNumericProperty(3, min=3, max=3, errorvalue=3)
   cols = BoundedNumericProperty(3, min=3, max=3, errorvalue=3)
   game_over = BooleanProperty(False)
   is_draw = BooleanProperty(False)
   winner_dice_image = StringProperty("")
   matrix = {}
   tiles = {}
   winner_matrix = []
Now you can relate all attributes used in the KV file. Rest of the methods are highlighted in the below mentioned screenshot.

Menu Screen
This screen will be shown when there is a game over or drawn. In this screen we will be showing a few menu options and game results.

In this screen, we don’t have to implement detailed functionality. Instead of we will have navigation and game status display. Hence this could be achieved in the VK file itself.
templates/main.kv
#: kivy 2.0
#: import Screen kivy.uix.screenmanager


<Button>:
   background_color: (1, 1, 1, 0.3)

<MenuScreen@Screen>:
   name: 'menu'
   canvas:
       Color:
           rgba: (1.0, 1.0, 1.0, 1.0)
       Rectangle:
           pos: self.pos
           size: self.size
   BoxLayout:
       size_hint: (0.4, 0.4)
       orientation:'vertical'
       pos_hint: {'center_x': 0.5,'center_y': 0.79}
       padding: ('0dp', '20dp', '0dp', '50dp')
       opacity: 10 if root.manager.ids.tictactoe.is_draw else 0
       BoxLayout:
           orientation:'horizontal'
           Image:
               source: 'assets/images/X.png'
           Image:
               source: 'assets/images/O.png'
       BoxLayout:
           orientation:'vertical'
           Label:
               text: 'DRAW!'
               font_size: self.width/7
   BoxLayout:
       size_hint: (0.4, 0.4)
       orientation:'vertical'
       pos_hint: {'center_x': 0.5,'center_y': 0.79}
       padding: ('0dp', '20dp', '0dp', '50dp')
       opacity: 10 if not root.manager.ids.tictactoe.is_draw else 0
       BoxLayout:
           orientation:'horizontal'
           Image:
               source: root.manager.ids.tictactoe.winner_dice_image
       BoxLayout:
           orientation:'vertical'
           Label:
               text: 'WINNER!'
               font_size: self.width/7
   BoxLayout:
       size_hint: (0.5, 0.5)
       orientation:'vertical'
       pos_hint: {'center_x': 0.5,'center_y': 0.4}
       Button:
           text: 'PLAY AGAIN'
           font_size: self.width/15
           on_press: app.root.current = 'tictactoe'
       Button:
           text: 'RESET GAME'
           font_size: self.width/15
           on_press: app.root.ids.tictactoe.reset_scores(); app.root.current = 'tictactoe';
       Button:
           text: 'SHARE'
           font_size: self.width/15
       Button:
           text: 'END GAME'
           font_size: self.width/15
           on_press: exit()
We are using the manager attribute to perform the navigation and gathering the game status data, reset score is from the tictactoe screen.
Main.py
This is our starting point script. It will contain the app instance of the Kivy App class. Since we are using screen manager, our app instance will be loading the screen manger kv file in the build method.
from kivy.app import App
from kivy.lang import Builder
from screens.tictactoe import Tile

class MainApp(App):
   title = "Tic Tac Toe"

   def build(self):
       manager = Builder.load_file("templates/screen_manager.kv")
       self._build_grid_layout(manager)
       return manager

   def _build_grid_layout(self, manager):
       for row in range(manager.ids.tictactoe.rows):
           for column in range(manager.ids.tictactoe.cols):
               manager.screens[1].ids.grid_layout.add_widget(
                   Tile("%d%d" % (row, column))
               )
       return manager

if __name__ == "__main__":
   MainApp().run()
Here we have a special method called _build_grid_layout . This method is responsible for building the grid layout based on the mentioned dimension in the tictactoe screen. Here I am using the Tile widget to be dynamically added in the grid layout.
Final execution
You can see the final execution of the application in the below mentioned video. Also, if you can checkout the github repo here and simply run python main.py.
Source code
You can find the entire code base for your reference on GitHub.
Packaging
Once you are done with the implementation, you can simply make the build for any platform you want and publish your application.
On Packaging your application you can go through the detailed information about building and packing your application. I hope you enjoy reading and implementing this application. Please feel free to reach out to us in case you have any questions or concerns.
Thank you.


