Using Cypress and Screener to Automate Testing for Keller Covered


Having worked as a Quality Assurance Specialist for over two years, I was able to apply a combination of two tools - Cypress and Screener - to Keller Covered - a marketplace that helps homebuyers and homeowners shop and choose insurance plans tailored to their needs.
Keller Covered is an affiliated business with Keller Williams Realty, named the most innovative real estate company in 2019 by the “Fast Company” magazine.
The challenge was to keep the Keller Covered app free of critical bugs without slowing down our production speed while keeping our deployment processes safe.
Our results with Cypress exceeded our expectations so much, that, together with the Keller Covered team, we decided to share our story with this blog post.
Challenge
When I joined the project it was under heavy development and I knew that end-to-end testing would be useful. I have trust in unit tests but still my QA soul felt that we need to cover the most important paths with high-level tests. The previous projects I worked on were created with Ruby on Rails, so my natural choice of testing tool was Capybara.
Yet, as Keller Covered works with React.js and Node.js, I had to come up with a different tool as adding another language (Ruby on Rails) just for tests wasn’t an option either.
As I’ve mentioned before, the challenge was to keep the app free of critical bugs without slowing down our production speed while keeping our deployment processes safe. To guarantee the best experience, we sought solutions that met our objectives.
After a discussion with the development team, we decided to use Cypress, a much more reliable and faster tool than Selenium or Capybara.
Additionally, we saw a chance for our front-end engineers to learn the framework which then became a common cause for them and the QA team.
Long story short – we’ve found a framework and tools to test new versions of the app faster than before.
What is Cypress?
Cypress Runner
Cypress is a testing framework designed for developers and QA specialists, where users write theirs tests using Javascript. Cypress does not rely on Selenium and it does not require any drivers to communicate with the browser which results in quicker tests. This is because there is one less layer between the automation tool and the browser. Cypress was created in 2015 and it is consistently updated.
We chose the tool because:
- It’s surprisingly easy setup and configuration; There is only one command needed - npm i cypress --save-dev or yarn add cypress --dev.
- It’s easy to learn – especially when you have already written tests in other frameworks.
- It’s easy to debug errors.
- It’s compatible with various web applications.
Keller Covered is an application with a microservices architecture in the Node.js technology. The application strongly relies on the front-end, both with functionality and the visual side of the service. Our front end goal was to keep the styling as close as we could to what was designed by a third party design and branding partner.
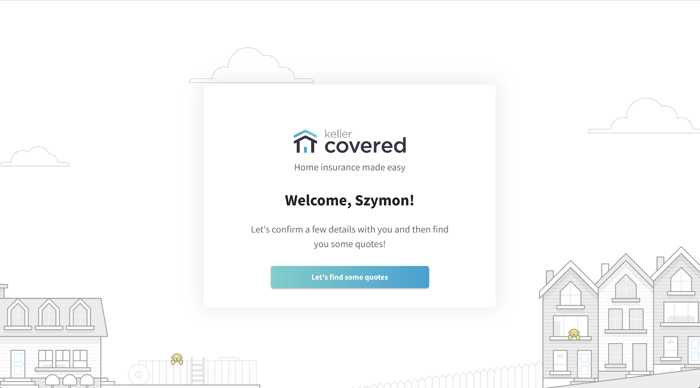
Keller Covered – Welcome page
How we work with Cypress
After deciding on Cypress we needed to plan how we wanted to implement tests, when they should run, and what they should cover.
1. Prioritizing quick builds, we needed to point out the most important paths and features in our app that we wanted to be tested automatically. Using the knowledge about the “testing pyramid” framework I wrote down all test cases in TestRail and, using filters and priority levels, I chose what should be automated using Cypress. I avoided testing email services and less business-important features.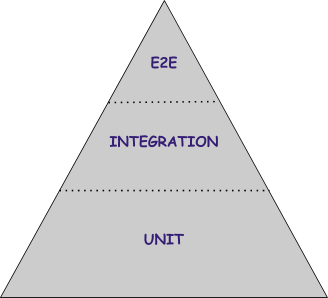
Testing pyramid
2. The next question was - where should we keep our tests? With so many microservices, we decided to place them in our front-end repository. We did this because it is the only part of the code where everything is connected. All views are connected to remote services/endpoints, so running a local server with front-end code means that we have a fully operational application.
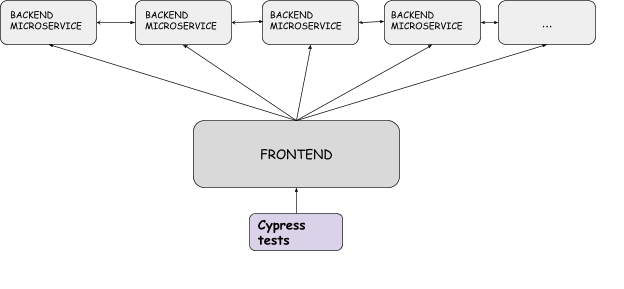
Architecture scheme and tests placement
3. We then needed to decide when we should run our tests. Using my current automation testing experience with Rails and Capybara and the team’s wide technological knowledge, we decided to integrate our Cypress tests into Travis builds.
After configuring our testing strategy, we noticed some consistent obstacles that we had to address:
- What if the backend team deploys something which makes our tests fail?
- How do we work with third-party services?
- How long are acceptable test runs? How can we reduce the duration of our builds?
- Who is responsible for adjusting tests during development?
For the first two problems we decided to use stubbed responses from the backend using a Cypress solution: cy.route() which allows one to mock request responses.

Custom command to stub a response when creating and getting quotes

Use of our custom command with condition if we want to stub responses
As shown above, we use the following condition: if the Cypress environment variable “STUBBED_RESPONSES” = true, then we mock our services.
We run our tests without stubbing as we need to know that the application is fully operational.
For daily development, pull requests, and testing environments we mock our services in order to have faster builds with fewer records in our database. Additionally, we only test changes made by the frontend, thus, making tests independent from the backend.
When it comes to our Travis build, we have to begin with describing our scripts:

We have cypress:debug and cypress:debug:without-stubbing (where we pass the value of the STUBBED_ RESPONSES env variable) to open the visible Cypress runner when writing or changing tests.
Other scripts we use in our continuous integration builds include, cypress, cypress:without-stubbing, test, test:demo and test:demo:without-stubbing
First we need to run a local server (fast or demo – depending on the environment we push changes to). We also decided to use cypress-retries-plugin which retries the failed scenarios. Passing CYPRESS_RETRIES with value “1” means that failed scenarios will be repeated only once. This ensures that if the same scenario fails twice, then there is something wrong with recent changes.
For testing, we chose the most popular browser among our users - Chrome.
We use the -spec $TESTFOLDER to run our tests in parallel using Travis. First, we divided our tests into three different folders:
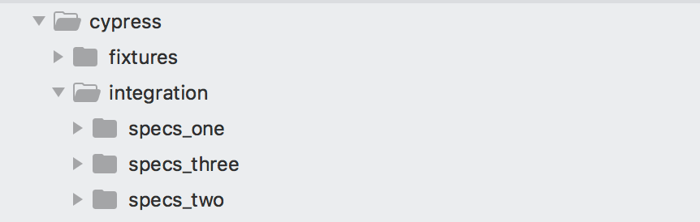
Cypress folders
We did that to pass the path of the particular folder to the TESTFOLDER variable in our Travis config:
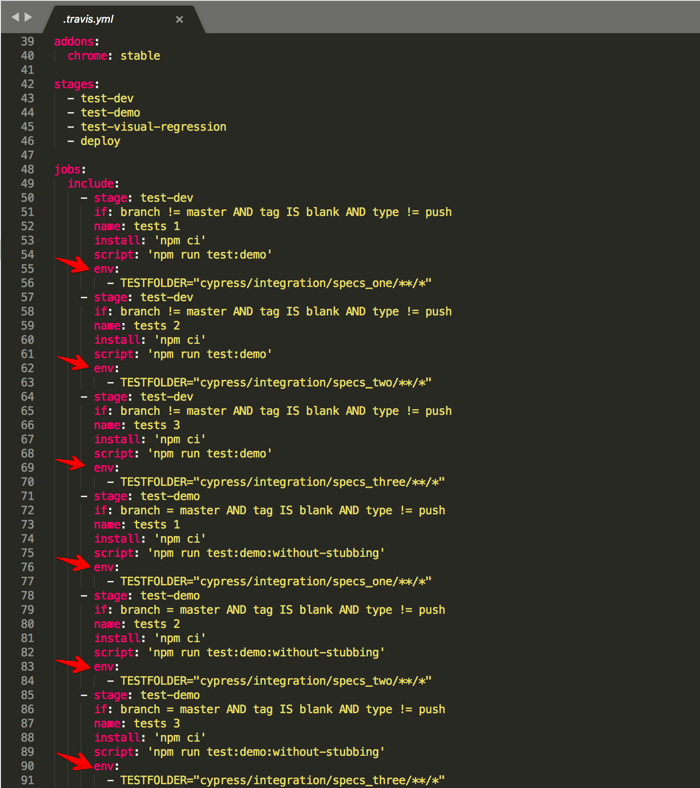
Travis config
Thanks to this and the Travis Build stages feature we were able to reduce the time of test runs to about eight minutes as we run three parallel builds with different test files.
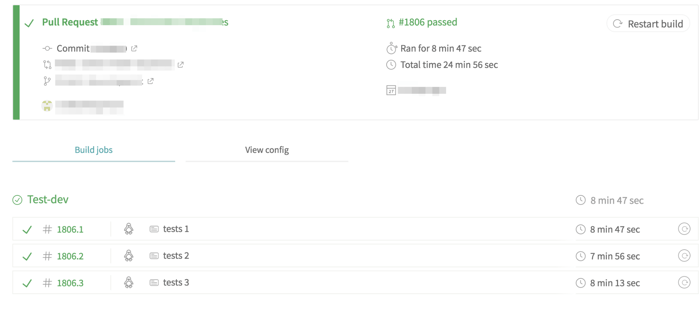
Travis build
Finally, we needed to decide who would be responsible for adjusting tests during development. We decided that, even though the QA engineer is responsible for writing new tests and helping others change them, our work pattern, combined with Cypress’ ease-of-use led us to conclude that the front-end team would be responsible for changing tests without QA’s help.
E2E testing – the actual tests
Now on to the most important part of E2E testing – the tests themselves! Because I am used to the Page Object Pattern, I decided to partially implement it here. I used Custom Commands within Cypress and I created newer, more descriptive, and more readable methods. These methods are added to a particular “page” which makes it easy to change and find because they are all in one place.
-1.png?width=700&name=Our%20%E2%80%9CPage%20Objects%E2%80%9D%2C%20design%2011%20(ef5fee41-8999-4f1a-9d5a-c688a7b411e0)-1.png)
Our “Page Objects”
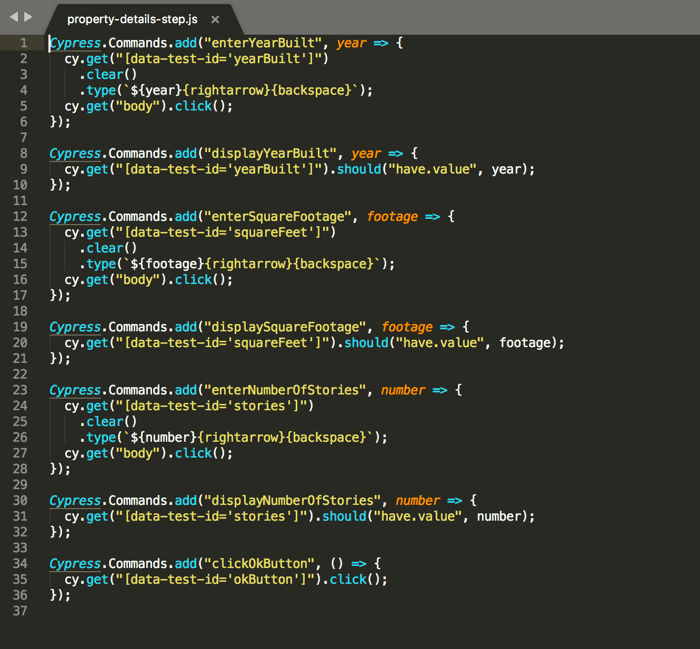
Property details page
Using Custom Commands and the Page Object Pattern, we have readable tests which should be understandable by non-technical readers:
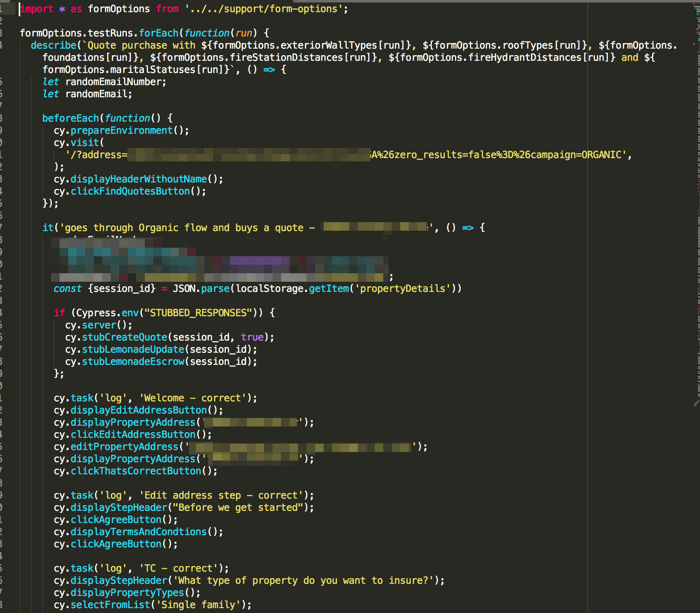
E2E Test
Pro tip: if you need more descriptive, custom logs, you can add this part of code to your plugins/index.js file:
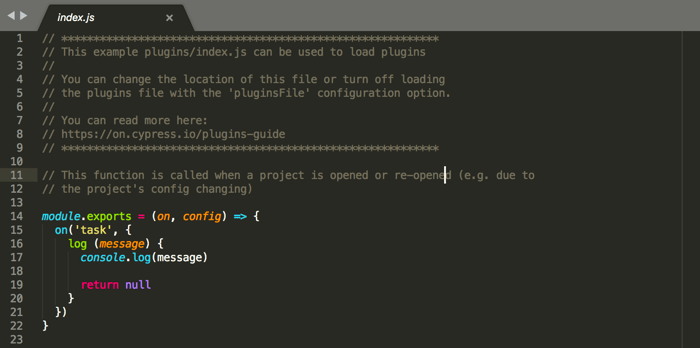
Tests logs
You can then use cy.task(‘log’, ‘Here is your text to print’); in your tests, which prints a message in your CI tool’s console:

Travis logs
To make tests resistant to changes of selectors, we always add data-test-ids which make our elements easy to grab.
Here is Cypress running our test:
Test running
What about the visual errors?
In the early phase of development we achieved good test coverage which made us confident about the app’s functionality. However, we noticed visual errors occurring on some resolutions, browsers, and devices. Working under tight deadlines, it was quite easy to miss some unwanted changes. Luckily, we found a solution – Screener.
What is Screener?
Screener is a visual test automation tool for web apps, where tests are recorded with a browser plugin. The testing mechanism consists of comparisons of snapshots of the previous and current state of the views. Screener supports Chrome, mobile Chrome, Firefox, and Internet Explorer 11 in various resolutions.

Screener logo
How do we work with Screener?
First we set up the project in Screener, to write (or rather record) our tests using the Screener Recorder. The tool automatically chooses selectors which are not always a good fit. So we had to adjust a few selectors manually.
Screener test run using the recorder
Again, we needed to decide where and when we should run visual regression tests. As these tests spot every small change (both wanted and unwanted), it is still required to check every comparison made by the tool. That’s why we run tests only once, before every bigger deployment to our staging environment. Currently, we run our visual regression tests on Chrome, iPhone X (Chrome), Samsung Galaxy S8 (Chrome) and iPhone 5 (Chrome).
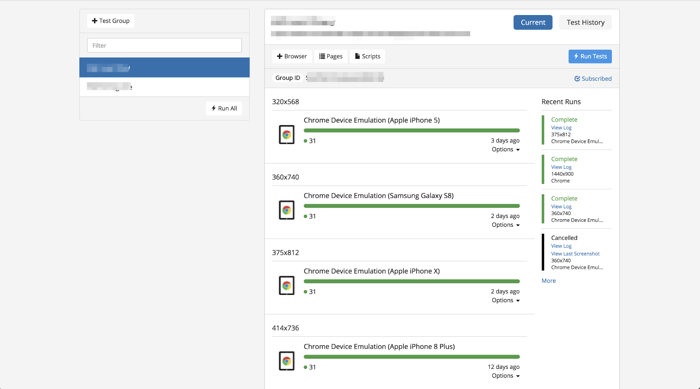
Our project dashboard in Screener
After the test runs, a QA Specialist or front-end developer checks what’s changed and based on the results we push changes (or not).
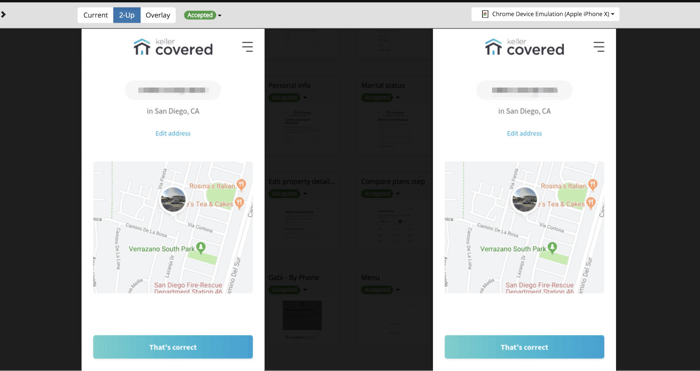
Example Screener comparison – iPhone X
Conclusion
Using E2E and visual regression tests help us every day, saving time and helping us spot issues.
These tests came in particularly handy during the first release of Keller Covered when we were able to make quick changes without worrying about breaking something.
Before implementing Cypress and Screener, every manual pre-deployment smoke test would require about 30 minutes for only one desktop browser in only one resolution.
In those same 30 minutes with Cypress and Screener we are able to tell which features are affected for mobile and desktop versions in four resolutions.


