Creating a GEM - a step by step tutorial


While working on one of our projects that uses the ActiveAdmin gem, I started wondering, what is a gem exactly? It works like a library, gives your application some ready-to-use functionality, but how does this happen?
Every RoR developer will have to modify a gem at least once in his or her career, but not everybody has actually created a gem. This is what got me going. I had to know exactly HOW you create a gem.
Starting Out
To get a gem started you need to run:
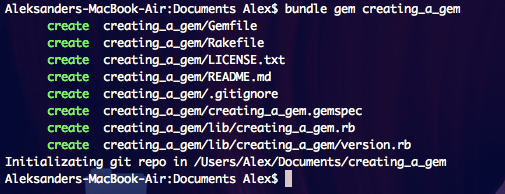
bundle gem your_gem_name
This will create some basic files and directories that you need to start developing a gem. For example:
Naming The Gem
Don’t think for a second that the name of a gem is some random string though. Keeping such a large and open community as is RoR in order needs defining guidelines for pretty much everything. This is no exception:
- every dash represents a structure (folder, module) immersion
- every underscore represents a joining in the class name
Let me give you some examples to make it clear:
- gem ruby_parser
- require 'ruby_parser'
- module/class RubyParser
and:
- gem gem-structure-gem_name
- require 'gem/structure/gem_name
- module/class Gem::Structure::GemName
The Package
Ok, let’s go through what the bundle command did for us.
Besides basic stuff, like a LICENSE.txt, README.md files and initializing a GitHub repo in our directory we get:
Gemfile - well, we’ve all seen in it before, but here this file looks a bit differently:
As you can see, it’s practically empty. That’s because all our development dependencies go into the *.gemspec file, which is included here. If your gem needs to use some other gems to work after it’s included to a RoR app, you should put it into this Gemfile.
*.gemspec - this is where you add all of your gem’s development dependencies, and much more.
What is a development dependency? It’s what you use while creating the gem. Things like rspec, rake and bundler should be in this file, because those might not be necessary for the person adding this gem to his or hers Gemfile.
In this file you will need to declare the version of your gem as well. You can do it by referencing CreatingAGem module’s variable ‘VERSION’ (see line 8 in gist above).
Here you will also need to list all the files that should be included to your gem. By default the bundler uses git ls-files command, but if you don’t want to use git it’s up to you how you list them.
Rakefile sounds familiar as well.
Here, at the start it’s a simple one line file, where you require gem_tasks from the bundler.
Aaaaand finally the creatingagem.rb (your_gem_name.rb) file!
As you can see, your code goes there ;).
Extend Rails
So, now you can start coding, you can test your gem and so on, but it still won’t be ‘tied’ to a Rails application if you add it to its Gemfile.
To extend Rails with your gem you will need to use Railtie, create a Railtie class which inherits from Rails::Railtie within your gem’s namespace. This class will be loaded during the Rails boot up.
Here you can see an example on how to do it:
Now you can use your gem with Rails! :)
Gem Versioning
Since you’re all set up to create your gem, you should know a couple of things about sharing what you create.
- There is a strict convention in regards to the gem versioning system. If you want to push your gem out to the world, you need to keep track of the changes you make.
- A gem version is a string of 3 numbers divided by dots - ‘X.X.X’.
- Incrementing either of those 3 numbers means a different type of change has occurred in the gems implementation.
- incrementing the third number, called the ‘build’ number means that the change was small (e.g. changing text on a button) and did not affect the functionality of the gem
- incrementing the second number, called the ‘minor’ number means that changes included adding new functionality, but the gem did not lose compatibility with the previous versions,
- incrementing the first number, called the ‘major’ number means that the changes made to the gem were so severe that it’s no longer compatible with the previously released versions.
There is a gem that helps you version your gem. Check it out: gem-release. It lets you bump the version on any of those three numbers with a simple ‘bump’ command.
Continuous integration
Everybody likes continuous integration, right? With services like Travis CI we can continuously integrate our gem. Thanks to the guys at Travis, you can build any open source project for free. To do so, you will need to register with Travis and select a public repo to build. Also you will need to configure your gem’s build. Here you can see a sample Travis configuration. It should be put inside ‘travis.yml’ file:
Puuuuuuush!
Finally, there is one last thing to do… Push the gem! :) To get it done, you’ll need to create an account on RubyGems.org. Once that’s finished, use your email and password when pushing the gem (RubyGems saves the credentials in ~/.gem/credentials for you so you only need to log in once).
After that it’s just a matter of making it available to other rubyists all over the world through rubygems.org. This is done with with two simple commands:
rake build
and once built:
gem push your_gem_name-0.0.1.gem
The End
And that’s all it takes to create a gem! Have fun creating amazing new gems and share them with us! :)
We've collected our most commonly used gems in one place - make sure to take a look at Gem Glory - 10 Gems To Make Ruby Dev's Life Easier