New Things in Android Fragments

Contents
Many Android Developers have had some bad experiences using Fragments. There are many issues connected to them, e.g. the lifecycle or animations to name a few. Fortunately, the Android team addressed some of these problems in the two latest releases of the Fragments library.
The most recent version is still a Release Candidate but in this article, I want to show what functionalities it will bring and what the future of Fragments will look like.
Getting started
I've decided to check out these new features by creating a simple project. It allows you to create and replace a Fragment in either the old way or the new one. On every Fragment, its number will be displayed, which is fetched from a mocked service.
To start working with new features that I will be explaining, new dependencies need to be added to the build.gradle file:
dependencies {
    def fragment_version = "1.1.0"

    // For Java
    implementation "androidx.fragment:fragment:$fragment_version"
    // For Kotlin
    implementation "androidx.fragment:fragment-ktx:$fragment_version"
    // For testing fragments
    implementation "androidx.fragment:fragment-testing:$fragment_version"
}
Fragment Container
One of the most important things introduced was a new view for holding Fragments, called FragmentContainer. Until now, when we wanted to add a single Fragment to our layout we needed to use the <fragment> tag. Since many Android developers treat it as an anti-pattern and instead of using it they would rather inflate a FrameLayout with the desired Fragment, we can say that until now there has not been a dedicated and well-working XML view for storing Fragments.
FragmentContainer extends FrameLayout but allows only Fragments as its children. Except for being the one and true container for Fragments, it also fixes the issues with animations between each transition.
In the project that I created, I added custom animation between each transition, to check how these components would behave.
parentFragmentManager.commit {
setCustomAnimations(
R.anim.enter_from_right,
R.anim.exit_to_left,
R.anim.enter_from_left,
R.anim.exit_to_right
)
replace(R.id.fragment, BaseFragment)
addToBackStack(null)
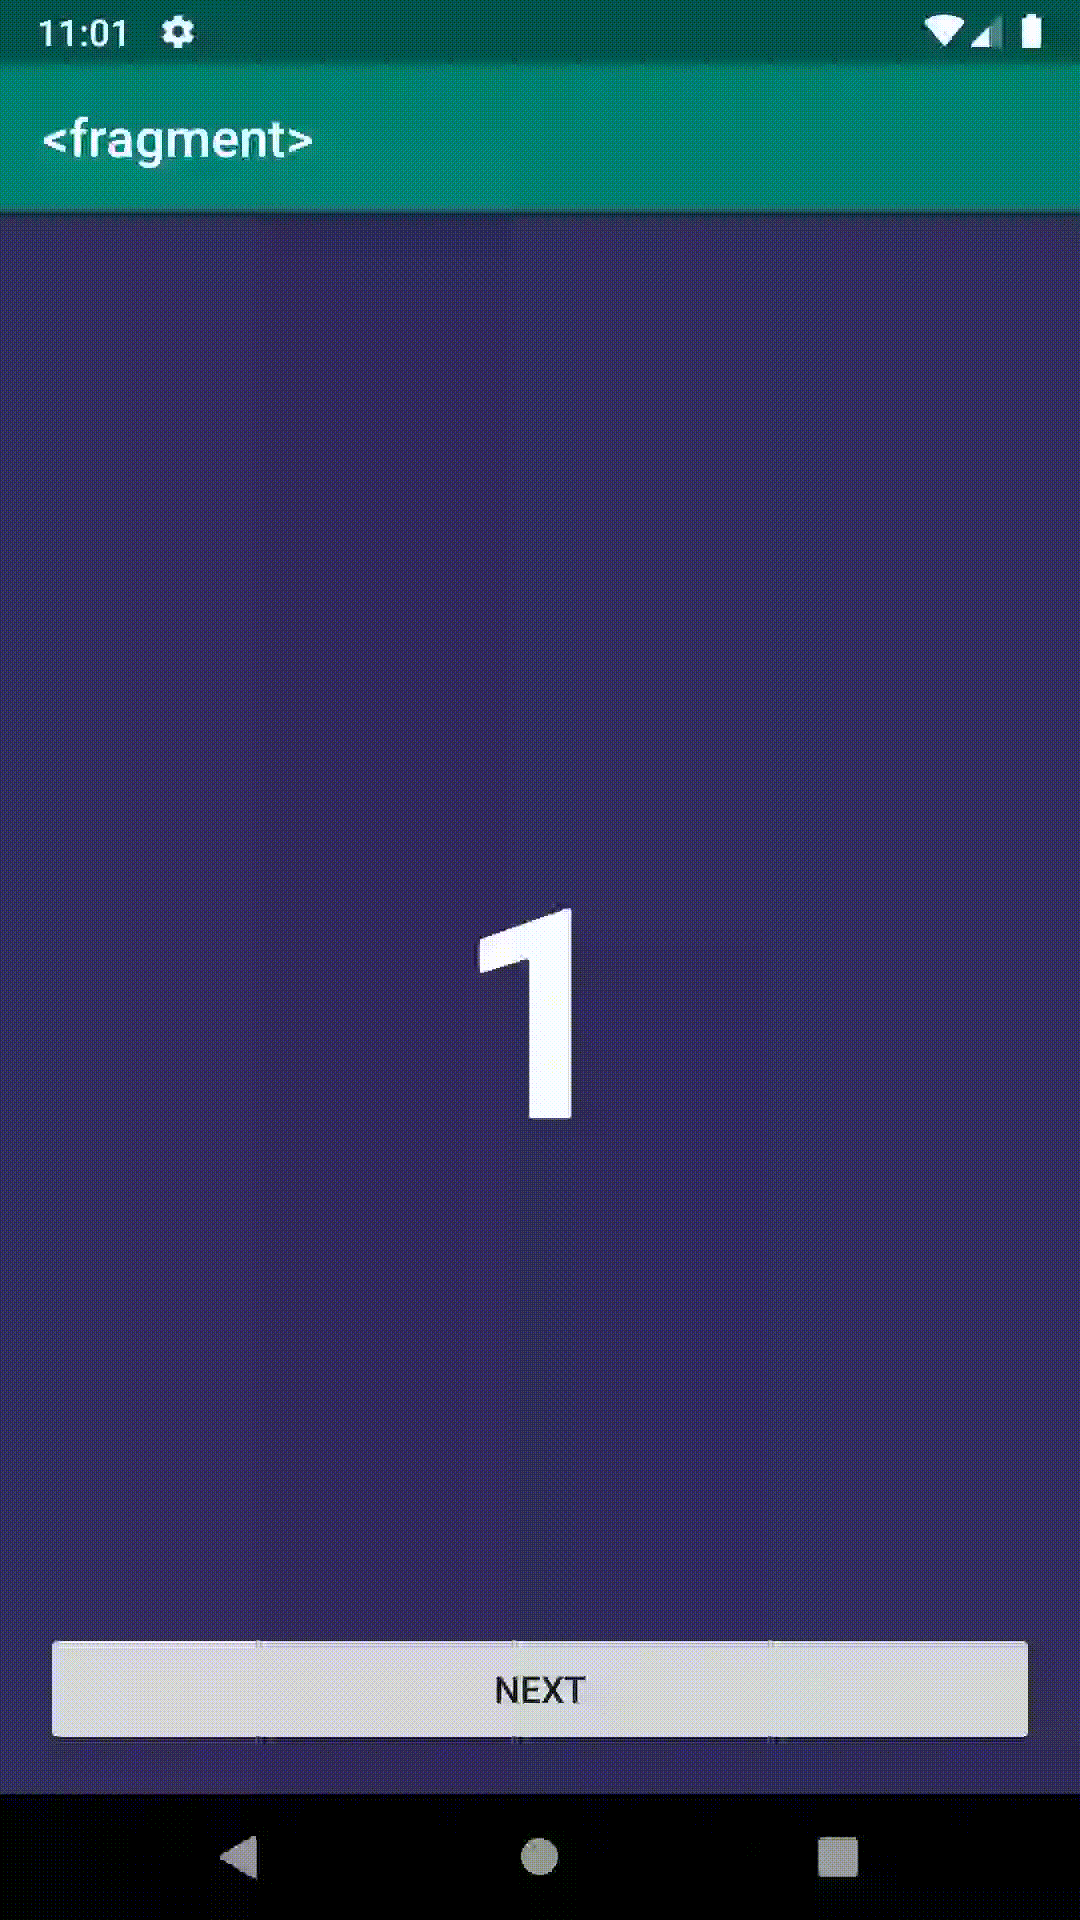
}Below are the results of this transaction using these two components.
 |
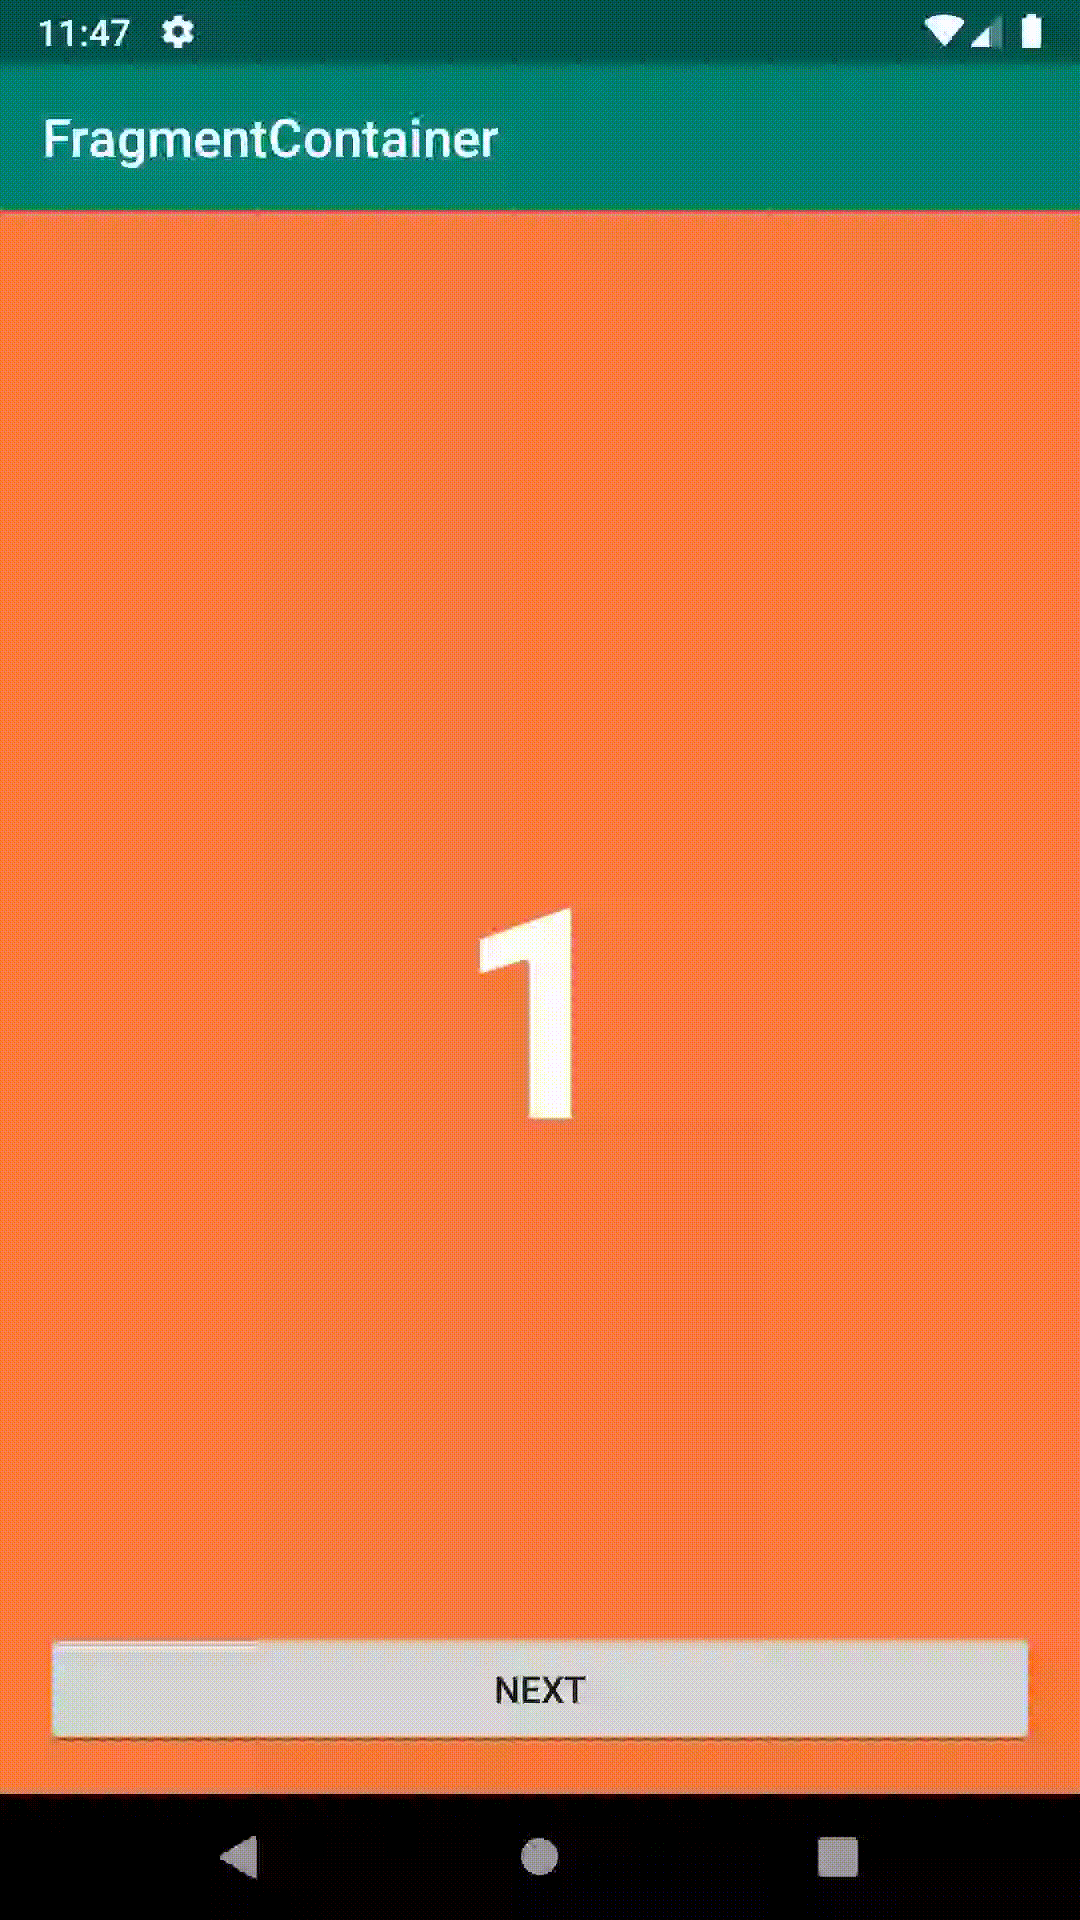 |
Pay attention to the bottom of each view, especially the button. It's really easy to see that the transition in FragmentContainer looks and works much better. This happens thanks to the fixes in the z-ordering of Fragments in the FragmentContainer.
Similarly to the <fragment> tag, FragmentContainer allows us to use the class tag to inflate the view with the desired Fragment. But unlike the old way, FragmentContainer uses FragmentTransaction for adding Fragments.
<androidx.fragment.app.FragmentContainerView
    android:id="@+id/fragment"
    android:name="com.example.fragmentsexample.feature.common.BaseFragment"
    android:layout_width="match_parent"
    android:layout_height="match_parent" />
Fragment Factory
Until now, whenever you wanted to create a new Fragment you needed to call its no-argument constructor and put all the variables in a Bundle, which should then be passed as arguments to Fragment with the setArguments setter. It was advised to do it this way because whenever the Android system recreated this Fragment it would call this empty constructor.
Bundle will work fine if you want to pass some object or list to Fragment. But this requirement makes it impossible to implement the constructor’s Dependency Injection.
To start working with FragmentFactory you need to create a class which will create an instance of fragments based on their class name:
class BaseFragmentFactory : FragmentFactory() {
    override fun instantiate(classLoader: ClassLoader, className: String) =
        when (className) {
            BaseFragment::class.java.name -> BaseFragment()
            SecondFragment::class.java.name -> SecondFragment()
            else -> super.instantiate(classLoader, className)
        }
}
Then, in the Activity that will show these Fragments, you should attach the newly created FragmentFactory:
class ContainerActivity : AppCompatActivity() {
   override fun onCreate(savedInstanceState: Bundle?) {
       supportFragmentManager.fragmentFactory = BaseFragmentFactory()
       super.onCreate(savedInstanceState)
   }
}
Now, whenever you want to replace or add Fragments, you can do it via its class’ name, rather than its instance, which enables the Fragment to have as many parameters in the constructor as you want:
parentFragmentManager.commit {
    replace<BaseFragment>(R.id.fragment_container)
}
On back-pressed dispatcher
When I was implementing an app a long time ago, I wanted to listen to back-press events in Fragment. To achieve this, I needed to send an event from Activity to my target class from onBackPressed method. It was annoying when I had to do this many times, and it generated a lot of boilerplate code.
Fortunately, now we can make use of BackPressedDispacher which could be used in any component that can get an instance of its Activity:
lateinit var dispatcher : OnBackPressedDispatcher
lateinit var callback: OnBackPressedCallback

override fun onAttach(context: Context) {
    super.onAttach(context)
    dispatcher = requireActivity().onBackPressedDispatcher
    callback = dispatcher.addCallback(
        //Lifecycle owner
        this
    ) {
        fragmentService.fragmentsCount--

        //Called when user should be navigated back
        callback.isEnabled = false
        dispatcher.onBackPressed()
    }
}
In the following example, on every back-press, I decrement the fragment number and then call onBackPressed to navigate the user back. Calling dispatcher methods can be done anywhere in code, so, for example, you can show a confirmation dialog upon a back arrow press, and after the user clicks on confirm, call the onBackPressed method.
 |
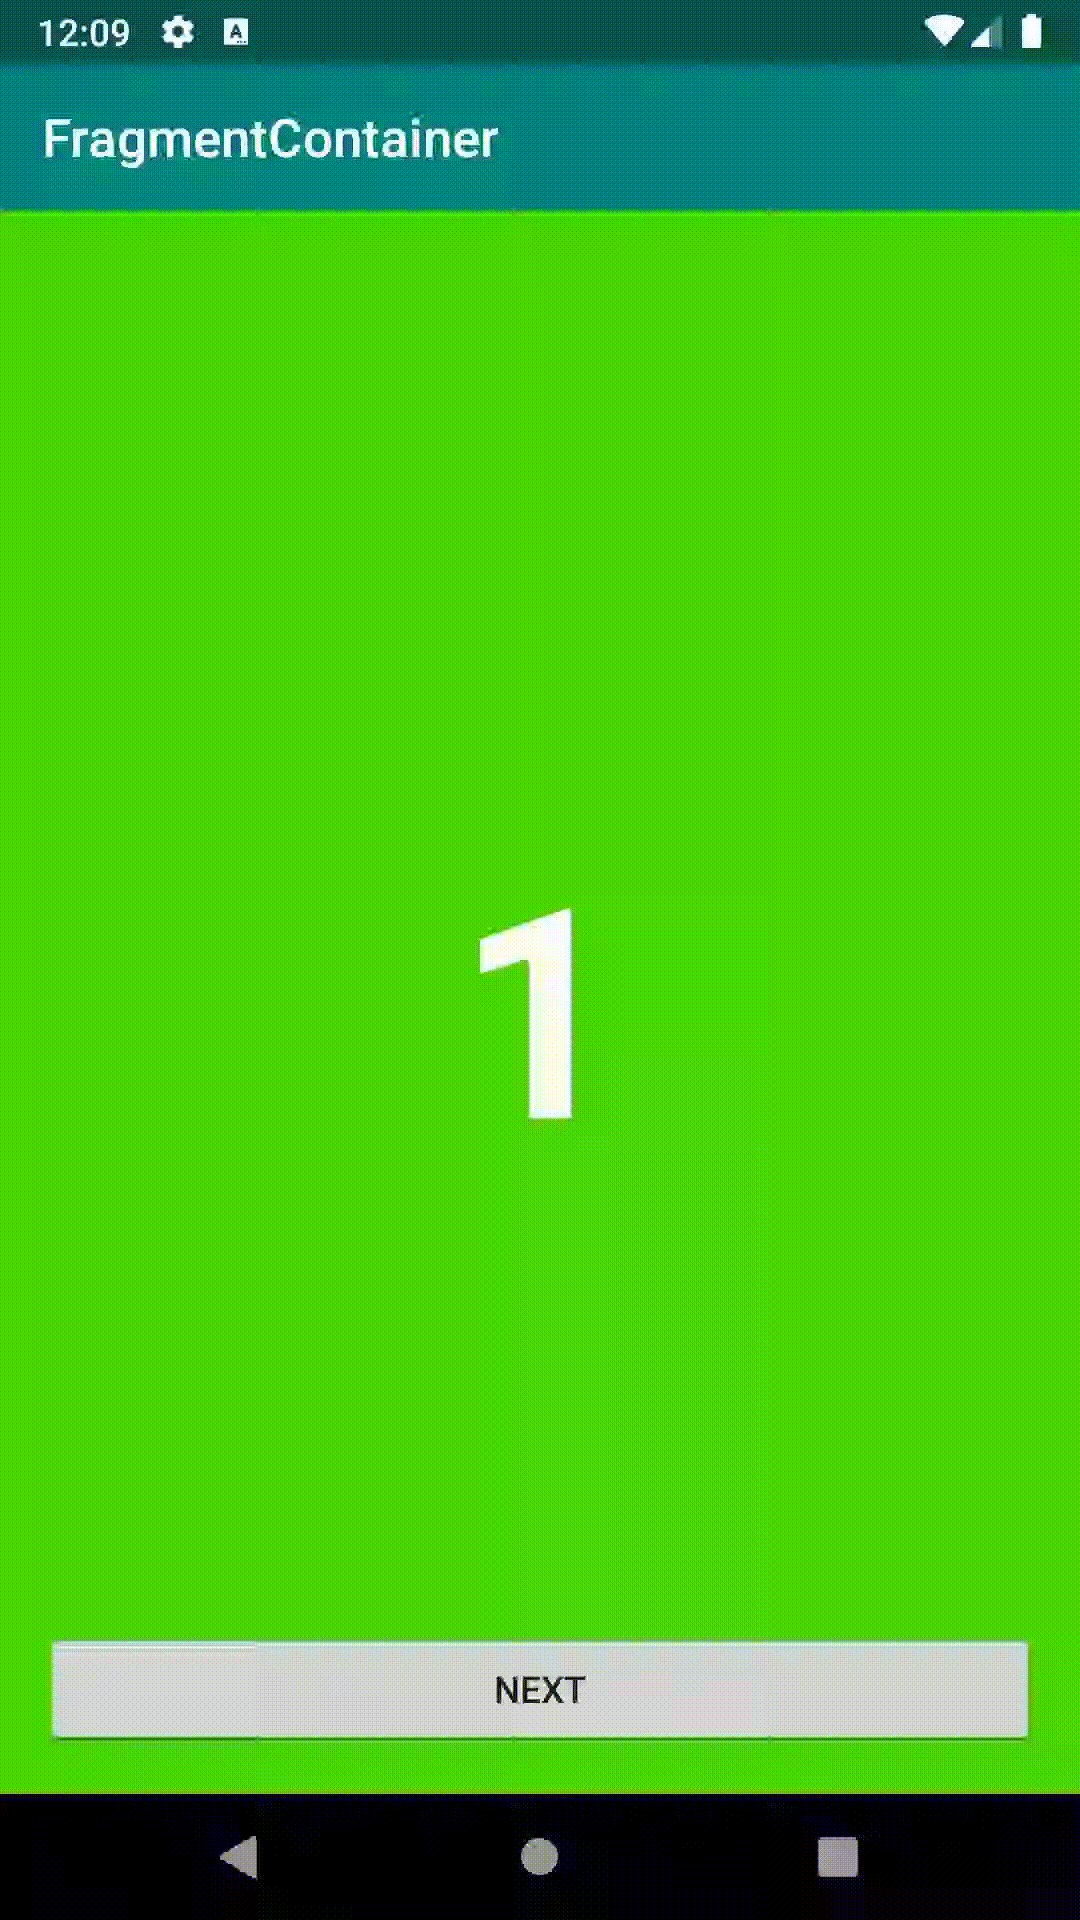 |
Both of these use cases contain the same view, and as you can see, it doesn't work as it is supposed to with old <fragment> tags. After pressing the next button, then returning and once again pressing the next button, the Fragment number should be shown as 2, but instead, it is displayed as 1. Both examples use the same Fragment class, and since it only works as it is supposed to with FragmentContainer, it is another reason to use FragmentContainer instead of the old <fragment> tag.
Alternatively, you can inject the OnBackPressedDispatcher from Activity to Fragment. A similar example was presented on Android Dev Summit.
Fragment Scenario
FragmentScenario allows you to isolate a fragment and test how it will behave on click, recreation, state changes, etc. Thanks to the usage of FragmentFactory, we can simply create a FragmentScenario with MockFactory, which will provide the mocked dependencies.
val scenario =
    launchFragmentInContainer<BaseFragment>(factory = MockBaseFragmentFactory())
To test each of the use-cases you have to call appropriate method on created scenario. Test assertions could be done with onFragment method.
//Move Fragment to onCreated state
scenario.moveToState(State.CREATED)

//Recreate Fragment
scenario.recreate()

//Check fragment on click
onView(withId(R.id.nextFragmentButton)).perform(click())

//Test assertions
scenario.onFragment{ fragment ->
    //Check if fragment responded as it should
}
The future of Fragments
One more thing that was addressed on Android Dev Summit was the future of Fragments. Features that they described are not yet available to be tested, but they look very promising. Since these are still things that they are working on, you need to keep in mind that their plans might still change.
Multiple back stacks. Until now, there was one stack that was responsible for holding fragments that have been started one after another. This approach made working with things that navigate to different Fragments in parallel on one screen (like BottomNavigationView) very painful. The solution that the Android team will propose is to have multiple back-stacks, each connected to their starting Fragments. Thanks to this, the state of all Fragments will be stored.
Returning results. Currently, if you want to pass data from one fragment to another, you need to use targetFragment, and keep a hard reference to it. Since we do not know in which state the referenced Fragment will be, this solution generates a lot of problems. The Android team will be working on improving the onResult method, so that you could receive results from different components, not only from Activity to Activity.
Fragment lifecycle. Now, there are two lifecycles connected to each Fragment. What Android team is trying to achieve is to merge these two lifecycles into one, based on the view lifecycle. So when the view is destroyed, the Fragment lifecycle will be destroyed as well.
Summary
I think that this update is a big step forward in dealing with Fragments in Android applications. Finally, developers have a dedicated view for storing Fragments, and finally, they can inject variables into its constructor.
These changes might not look like a real game-changer, but it's good to know that people working on the Android platform are paying attention to occurring problems, and have made the work easier for Android developers. I'm looking forward to the future of Fragments, and I think that you should too.
Useful links
Android Dev Summit presentation
AndroidX official documentation and changelog
Photo by Patrick Tomasso on Unsplash


