Automated End-to-End Testing in React Native with Detox


It means testing your application from the perspective of an end user, but doing so automatically. We write a set of instructions, and a program uses the provided tools to “click through” our application like a real user.
When using Detox, we write tests in JavaScript that utilise the native drivers for running those tests ( EarlGrey for iOS and Espresso for Android ).
The library is tested with React Native <=0.56, but will most likely work with newer versions. The setup changes with every major version, but the maintainers and folks from Wix try to make it as easy as possible.
Installation
Here are the dependencies that you need to check before you can run Detox in your React Native project:
1. Install the latest version of
Homebrew.
2. Install Node 8.3.0 or above using nvm or brew:
nvm install 8.3.0or
brew update && brew install node3. Install applesimutils, a collection of utils for Apple simulators. Detox uses it to communicate with the simulator:
brew tap wix/brew && brew install applesimutils
4. Install fbsimctl:
brew tap facebook/fb
5. Install Detox command line tools, detox-cli:
yarn global add detox-cli or npm install -g detox-cli6. When you have all of those dependencies installed on your computer, you can go to your React Native project and add detox to it:
yarn add detox —devor
npm install detox —save-dev
7. After adding detox to the project, you can finally initiate the detox environment:
detox init -r jest
or
detox init -r mocha
By specifying jest or mocha, we choose the test runner for our tests.
Writing tests
As mentioned above, we write tests in JavaScript when using Detox. Here are two examples of E2E tests for a very simple application.
firstTest.spec.js
describe('Go through the app', () => {

 // 1
 it('should Go to the Second Screen ', async () => {
   await expect(element(by.text('Log In'))).toBeVisible()
   await element(by.text('Log In')).tap()
   await expect(element(by.text('Second Screen'))).toBeVisible()
   await element(by.text('Second Screen')).tap()
 })

 // 2
 it('should tap on a filter', async () => {
   await expect(element(by.text('Filter Label'))).toBeVisible()
   await element(by.text('Filter Label')).tap()
 })

 // 3
 it('Should choose an option from filter', async () => {
   await element(by.text('Tomato')).tap()
 })

 // 4
 it('Should Go to the Third Screen', async () => {
   await element(by.text('Third Screen')).tap()
 })

 // 5
 it('Should Log out and go back to the Log In screen', async () => {
   await element(by.text('Log Out')).tap()
 })
})
The first part of the test is to click through the app, choose an option from Filter and log out of the app. Each step is broken down into smaller steps and described by the sentence in the quotation marks.
Test driver:
1. Expects that element with the text “Log In” is visible. Then taps that element and after moving to the next screen, expects that the element containing the text “Second Screen” is visible, and then taps on that.
2. Expects the element containing the text “Filter Label” to be visible and taps on it.
3. Chooses an option from the filter by tapping on the name specified in the test.
4. & 5. Taps on the buttons specified by the text in the test.
secondTest.spec.js
describe('Login credentials', () => {

 it('Should write the Login in the text Input', async () => {
   await expect(element(by.text('Log In'))).toBeVisible()
   await element(by.id('Login')).clearText()
   await element(by.id('Login')).typeText('Admin')
 })

 it('Should write the Password in the text Input', async () => {
   await element(by.id('Password')).clearText()
   await element(by.id('Password')).typeText('password')
 })

 it('Should tap on the login button and log in to the app', async () => {
   await element(by.text('Log In')).tap()
   await expect(element(by.text('React Native Boilerplate'))).toBeVisible()
 })

})
Besides clicking through the app, we can also type text in an element with another matcher id. Then the test driver uses the software keyboard to type credentials in the text fields and go to the next screen.
Tip: If you use eslint in your project it’s essential to install eslint-plugin-detox to prevent it from highlighting your tests. You also have to add this comment as the first line of every test file.
/* eslint-env detox/detox, jest */
Test case: register form validation
The source code for this example can be found here: https://github.com/netguru/detox-form-validation-tests
package.json
  // ...
  "detox": {
    "test-runner": "jest",
    "configurations": {
      "ios.sim.debug": {
        "binaryPath": "ios/build/Build/Products/Debug-iphonesimulator/DetoxTest.app",
        "build": "xcodebuild -project ios/DetoxTest.xcodeproj -scheme DetoxTest -configuration Debug -sdk iphonesimulator -derivedDataPath ios/build",
        "type": "ios.simulator",
        "name": "iPhone 8"
      }
    }
  }
For this case, we use validate.js to simplify writing validation rules. Here's a simple wrapper that creates a function for further validation:
const createFormValidator = (constraints) => (formValues) => {
    const errors = validateJS(formValues, constraints)
    let formErrors = {}
    if (errors) {
      Object.keys(errors).forEach((key) => {
        formErrors[key] = errors[key][0]
      })
    }

    return formErrors
  }
}
Detox uses the testID prop to recognise components:
RegisterForm.js
// ...
<Input placeholder='Username' {...this.bindInput('username')} testID='usernameInput' />
<Input placeholder='E-mail' {...this.bindInput('email')} testID='emailInput' />
<Input type='password' placeholder='Password' {...this.bindInput('password')} testID='passwordInput'/>
When adding testID to a custom component, we need to propagate the prop to the appropriate native component:
Input.js
export default ({ error, testID, ...props }) => (
  <View>
    <Item error={!!error}>
      <Input testID={testID} {...props} />
    </Item>
    {error ? <Text testID={`${testID}Error`}>{error}</Text> : null}
  </View>
)
To run detox tests, we need to build our project:
yarn run test:e2e:buildAnd:
yarn run test:e2e
We should see the following output:
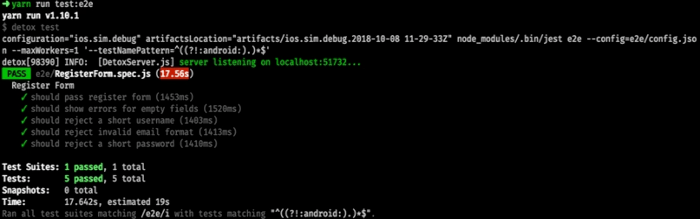
It runs our only test suite, located at e2e/RegisterForm.spec.js:
describe('Register Form', () => {
  beforeEach(async () => {
    await device.reloadReactNative()
  })

  it('should pass register form', async () => {
    await element(by.id('usernameInput')).replaceText('test')
    await element(by.id('emailInput')).replaceText('test@test.test')
    await element(by.id('passwordInput')).replaceText('testtest')

    await element(by.text('Register')).tap()

    await expect(element(by.id('welcome'))).toBeVisible()
  })

  it('should show errors for empty fields', async () => {
    await element(by.text('Register')).tap()

    await expect(element(by.id('usernameInputError'))).toBeVisible()
    await expect(element(by.id('emailInputError'))).toBeVisible()
    await expect(element(by.id('passwordInputError'))).toBeVisible()
  })

  it('should reject a short username', async () => {
    await element(by.id('usernameInput')).replaceText('ab')
    await element(by.text('Register')).tap()

    await expect(element(by.id('passwordInputError'))).toBeVisible()
  })

  it('should reject invalid email format', async () => {
    await element(by.id('emailInput')).replaceText('invalid@email')

    await element(by.text('Register')).tap()

    await expect(element(by.text('Enter a valid email address'))).toBeVisible()
  })

  it('should reject a short password', async () => {
    await element(by.id('passwordInput')).replaceText('short')
    await element(by.text('Register')).tap()

    await expect(element(by.id('passwordInputError'))).toBeVisible()
  })
})
Summary
There are many more matchers and actions available to use in Detox, which can simulate user behaviours – the full list of its API can be found here.
Detox is a great library and a pioneer of E2E testing in React Native. It's effortless to add testID props to our components, and that's everything we need to set us on a path for testing our app with Detox!
Authors
- Krzysztof Kraszewski
- Paweł Karniej
Headline photo by Nicolas Thomas on Unsplash.